5. Installation
2. Tip on
Start
fi
ne alignment (all axis)
.
The software starts with the alignment. The intermediate light output results can be followed on the
preview graph.
The alignment can take a while. Once the light output reaches its maximum value the process stops
automatically.
3. To interrupt the alignment procedure, tip on
Stop Alignment process
.
5.3.4
Manual lamp alignment
What can be done ?
The light output of the lamp can be adjusted manually using the motor functions on the lamp house or
by turning manually on the adjustment knobs on the lamp house. In both cases a preview is given in the
Lamp light output history
.
Z-axis alignment is the fast alignment to improve the light output. While the X and Y axis alignment is
fi
ne
alignment to further improve the light output.
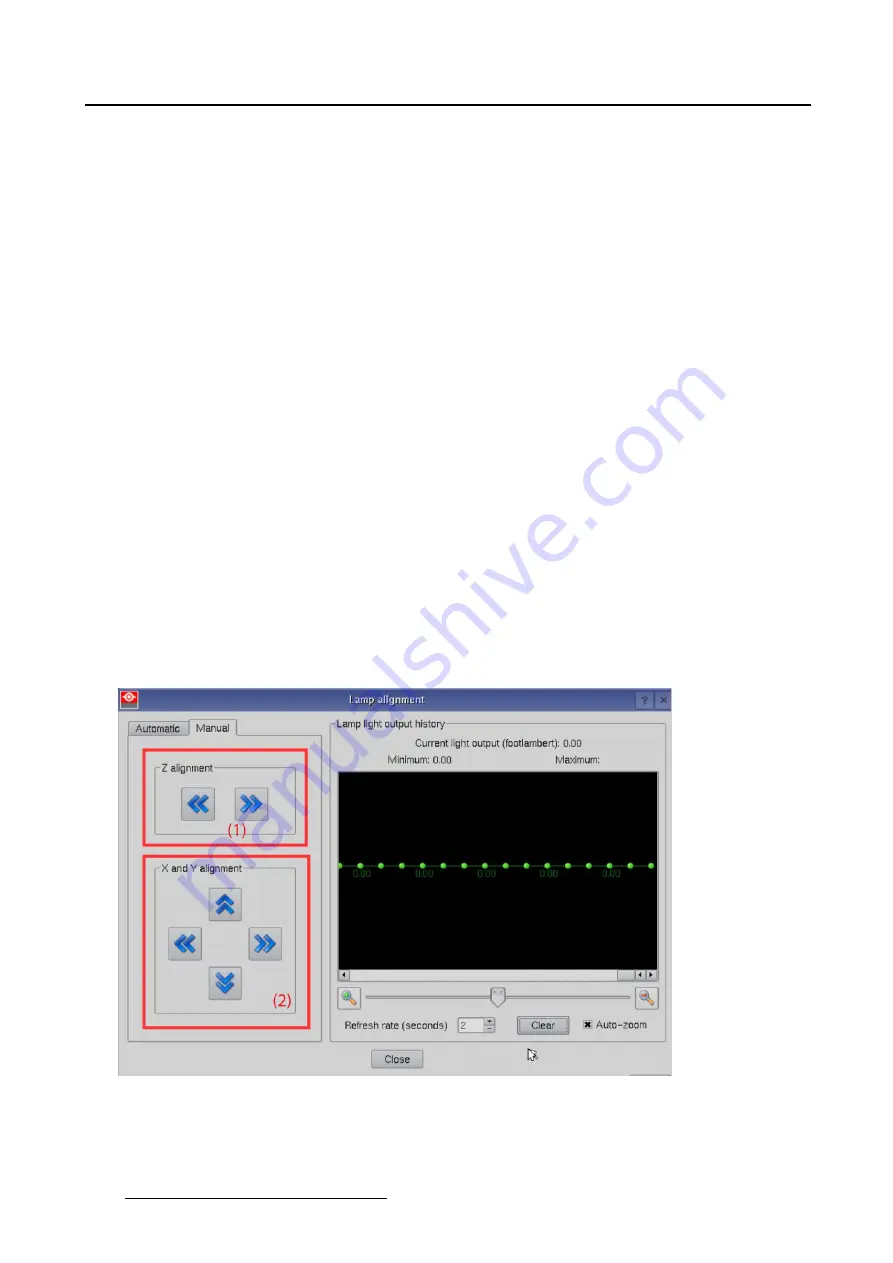
How to align
1. For the Z-axis alignment, tip on left or right arrow keys below
Z alignment
. (image 5-12)
Tip
fi
rst in one direction and look to the preview to see if there is an improvement. If there is an improve-
ment, continue in the same direction. If not, tip in the other direction until the maximum light output is
obtained.
2. For a
fi
ne adjustment, adjust the X and Y axis. Tip on the corresponding buttons.
Adjust the X-axis (left - right keys) and the Y-axis (up down keys) for maximum current light output (Foot-
lambert Measured). Carefully adjust for maximum light output. Once over the maximum, tip slightly in
opposite direction to reach the maximum light output again.
Do this for each direction and minimum repeat this adjustment cycle twice.
Image 5-12
Manual lamp alignment
130
R59770488 COMMUNICATOR TOUCH PANEL 06/06/2012
Summary of Contents for DP2K Series
Page 1: ...Communicator Touch Panel User guide For DP2K DP4K series R59770488 05 06 06 2012 ...
Page 10: ...Table of contents Index 277 6 R59770488 COMMUNICATOR TOUCH PANEL 06 06 2012 ...
Page 36: ...2 Controls 32 R59770488 COMMUNICATOR TOUCH PANEL 06 06 2012 ...
Page 170: ...5 Installation Image 5 44 Image 5 45 166 R59770488 COMMUNICATOR TOUCH PANEL 06 06 2012 ...
Page 180: ...5 Installation Image 5 54 Cloning TI board 176 R59770488 COMMUNICATOR TOUCH PANEL 06 06 2012 ...
Page 201: ...5 Installation Image 5 76 Image orientation R59770488 COMMUNICATOR TOUCH PANEL 06 06 2012 197 ...
Page 202: ...5 Installation 198 R59770488 COMMUNICATOR TOUCH PANEL 06 06 2012 ...
Page 214: ...6 Maintenance Image 6 12 IP selection 210 R59770488 COMMUNICATOR TOUCH PANEL 06 06 2012 ...
Page 239: ...7 Touch panel Image 7 17 R59770488 COMMUNICATOR TOUCH PANEL 06 06 2012 235 ...
Page 245: ...7 Touch panel Image 7 23 Edit color palette R59770488 COMMUNICATOR TOUCH PANEL 06 06 2012 241 ...
Page 274: ...8 Macro editor 270 R59770488 COMMUNICATOR TOUCH PANEL 06 06 2012 ...
Page 280: ...A Source settings 276 R59770488 COMMUNICATOR TOUCH PANEL 06 06 2012 ...