background image


VIA

 GO Quick Start (P/N: 2900-301153QS REV 7)


P/N:


2 9 0 0 - 3 0 1 1 5 3 QS


Rev:  7


Scan for full 

manual


VIA GO Quick Start Guide 

For Installer


This guide helps you install and configure your 

VIA GO

 for the first time. 

Go t

www.kramerav.com/downloads/VIA GO

 to download the latest user manual 

and check if firmware upgrades are available. 


Step 1: 

Check what’s in the box 


VIA GO

 Collaboration Device 

  1 VESA mounting bracket  

  1 Quick start guide 

  1 Power adapter (19V DC) 


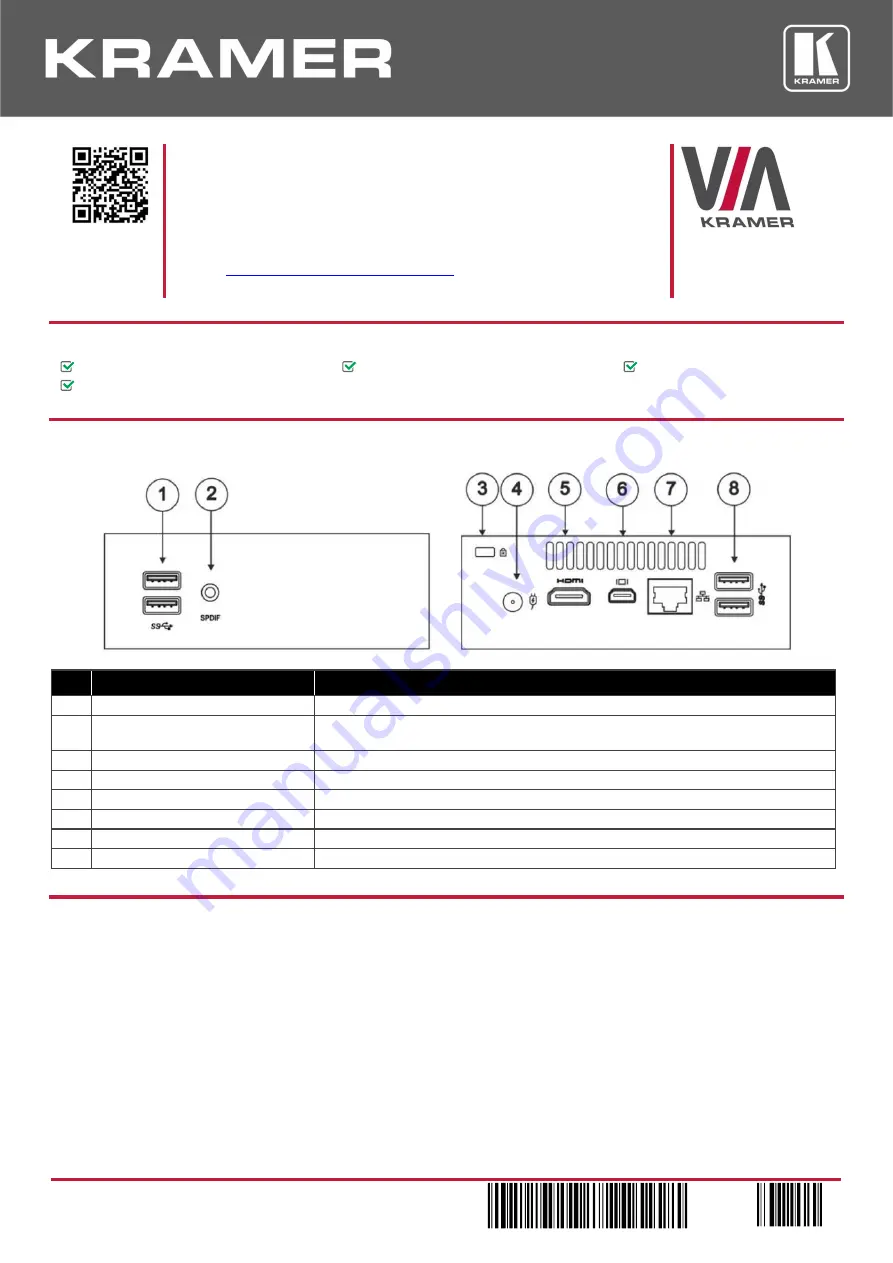
Step 2:  Get to know your VIA GO 


Feature 

Function 

USB 3.0 Connectors 

Connect to up to two USB devices. 

3.5mm Mini Jack Connector 

Connect to earphones or a speaker (digital embedded audio from HDMI

TM

 and analog 

audio supported). 

Lock Opening 

Connect to a security locking cable. 

Power Connector 

Connect to the 19V DC power supply. 

HDMI Connector 

Connect to an HDMI acceptor. 

Mini DisplayPort Connector 

Connect to a mini DisplayPort acceptor. 

RJ-45 Connector 

Connect to a LAN cable and to a network router (optional). 

USB 3.0 Connectors 

Connect to up to two USB devices, for example, a keyboard and mouse. 

The terms HDMI, HDMI High-Definition Multimedia Interface, and the HDMI Logo are trademarks or registered trademarks of HDMI Licensing Administrator, Inc. 

Step 3:  Install VIA GO 

Install 

VIA GO

 using one of the following methods: 

  Mount on a wall or the back of a display using the included VESA mounting bracket. 

  Mount in a rack using the recommended Kramer rack adapter. 

  Place on a flat surface. 


Summary of Contents for VIA-GO

Page 1: ...al embedded audio from HDMITM and analog audio supported 3 Lock Opening Connect to a security locking cable 4 Power Connector Connect to the 19V DC power supply 5 HDMI Connector Connect to an HDMI acceptor 6 Mini DisplayPort Connector Connect to a mini DisplayPort acceptor 7 RJ 45 Connector Connect to a LAN cable and to a network router optional 8 USB 3 0 Connectors Connect to up to two USB device...

Page 2: ...ck Features Settings 2 Enter the User Name default su and Password default supass and click Login The VIA Settings window appears 3 The VIA Settings tabs are LAN Settings Configure your network parameters and apply settings DHCP is enabled by default System Controls Manage your display and audio settings run control panel select your language etc Wi Fi when using built in WiFi capability Activated...

Page 3: ...p without downloading it Intended for guests who are using VIA only temporarily OR Select Install VIA to download the Kramer VIA app onto your computer Intended for regular users of the VIA For iOS or Android devices Download and install the free Kramer VIA app from Apple App Store or Google Play or scan the QR code above Step 3 Join the meeting using Kramer VIA App 1 In the Room Name field of you...

Page 4: ...eatures For a complete updated list of available features go to www true collaboration com products html Wireless Connection Do Not Disturb DND Native ePolling Powerful Content Security Customizable Features Web Browser Mobile Mirroring VIA Pad Compatible Third Party Apps Full HD Video Streaming VIA Site Management VSM Digital Signage available as an optional license Integrated YouTube Player Reco...

Reviews: