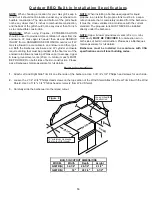
Outdoor BBQ Built-in Installation Specifications
Wid
th
Height
10” minimum clearance
from cutout (for Hood)
Depth
Non-combustible
Construction
Figure 8
NOTE:
When choosing a location for your Gas grill, keep in
mind that it should not be located under any overhead com-
bustible construction. The side and bottom of the grill should
not be any closer than 14 inches to combustible construction,
and the back of the grill should not be any closer than 16 inch-
es to combustible construction.
WARNING:
When using Propane, EXTREME CAUTION
should be used to provide ample ventilation of vapor from the
enclosure. LP Gas vapor is heavier than air and SERIOUS
INJURY from a DANGEROUS EXPLOSION could occur if LP
Gas is allowed to accumulate in an enclosure and then ignit-
ed. Both the Barbecue enclosure and LP cylinder enclosure
require venting that must be provided at the floor level of the
enclosure to allow any leaking LP Gas vapor to escape. Upper
& lower ground-level vents (20 sq. in. minimum each) MUST
BE PROVIDED on both sides of built-in construction. Please
ask a Barbeques Galore associate for full details.
NOTE:
When installing a barbecue equipped for liquid
propane in an island, the propane tank must be in a sepa-
rate enclosure that is completely isolated from the barbecue.
It must be cross-ventilated in accordance with the current
standard. The propane tank MUST NEVER be installed
directly under the barbecue.
NOTE:
Upper & lower ground-level vents (20 sq. in. mini-
mum each)
MUST BE PROVIDED
for combustion air on
both sides of built-in construction. Please ask a Barbeques
Galore associate for full details.
Barbecues must be installed in accordance with CSA
specifications and all local building codes.
MODEL
Width
Depth
Height
G55TR(N) 3
2
-
1
/
4
"
20
-
1
/4" 9-1/2"
G65TR(N)
3
9
"
20
-
1
/4" 9-1/2"
BUILT-IN CUTOUT DIMENSIONS
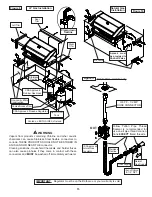
Built-in Instructions
1.
Attach Left and Right Side Trim Kit on either side of the barbecue. Use 3 of 1/4"x 3/4" Phillips head screws for each side.
2.
Loosen the 2 1/4" x 3/4" Phillips Head screws on the top section of the Wind Shield. Attach the Rear Trim Kit with the Wind
Shield. Use 3 of 1/4" x 3/4" Phillips head screrws (2 from Wind Shield).
3.
Carefully slide the barbecue into the island cutout.
14
Summary of Contents for Turbo select G5STR
Page 2: ......


