FLOOR MODEL ELECTRIC DECK OVEN OPERATION MANUAL
4
INSTALLATION INSTRUCTIONS
c) Raise the left side of the upper unit and place a
piece of wood or similar material to keep a 1” to
1 1/2” space between the two ovens.
d) Insert the connecting pipe, small end up,
(see Fig. 5d) through the access opening of the
lower unit and screw it into the lower pipe union of
the upper oven, leaving a space between the lower
union sections identical to the space between the
two ovens.
e) Lift the upper unit, remove the spacer and carefully
lower it until the two union parts in the lower oven
meet. Adjust the height of the connecting pipe,
if necessary, to have a perfect match at the lower
union, then tighten the lower union.
It is very important to have a good match at the
lower union before tightening it. If the connecting
pipe is too long or too short, this will put undue
stress on the pipe joints and could cause failure
of these components and property damage or
injuries as well.
WARNING
f) At the end, insert the connecting pipe, small end
up, through the appropriate opening at the base of the
bottom unit and screw it into the lower pipe union.
Single Oven
Insert the connecting pipe, small end up, through the
appropriate opening of the base and screw it into the
lower pipe union. (See fig. 5e)
Installation Of Decks
Steel Decks
Steel Decks for Bake and Roast Application are factory
installed and no further installation is required.
Ceramic Decks
Ceramic Decks for Pizza Application are shipped in a
separate carton. Depending on the model, two
(see Fig. 6a) or three slabs (see Fig 7a) are provided
with each oven. This material is heavy and fragile and
should be handled carefully.
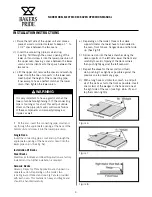
a) Depending on the model, three or four deck
supports (metal channels) have to be inserted in
the oven, front to back, flanges down and flat side
up. (See Fig.5f).
b) Slide one slab into the bake chamber along the
deck supports on the left side, lower the front end
carefully to avoid chipping of the deck corners,
then push tightly against the left oven wall.
c) Repeat the above for the second (and third)
slab, pushing it as tightly as possible against the
previous one to prevent any gaps.
d) With a long hook or similar tool, reach in and pull
all of the slabs as far to the front as possible. Insert
one (or two) of the wedges in the back and one at
the right side of the oven (see Figs. 6b & 7b) and
tap them down lightly.
Figure 6
Figure 7
Figure 8
Summary of Contents for EB series
Page 21: ...19 NOTES ...


