background image


15 

15 

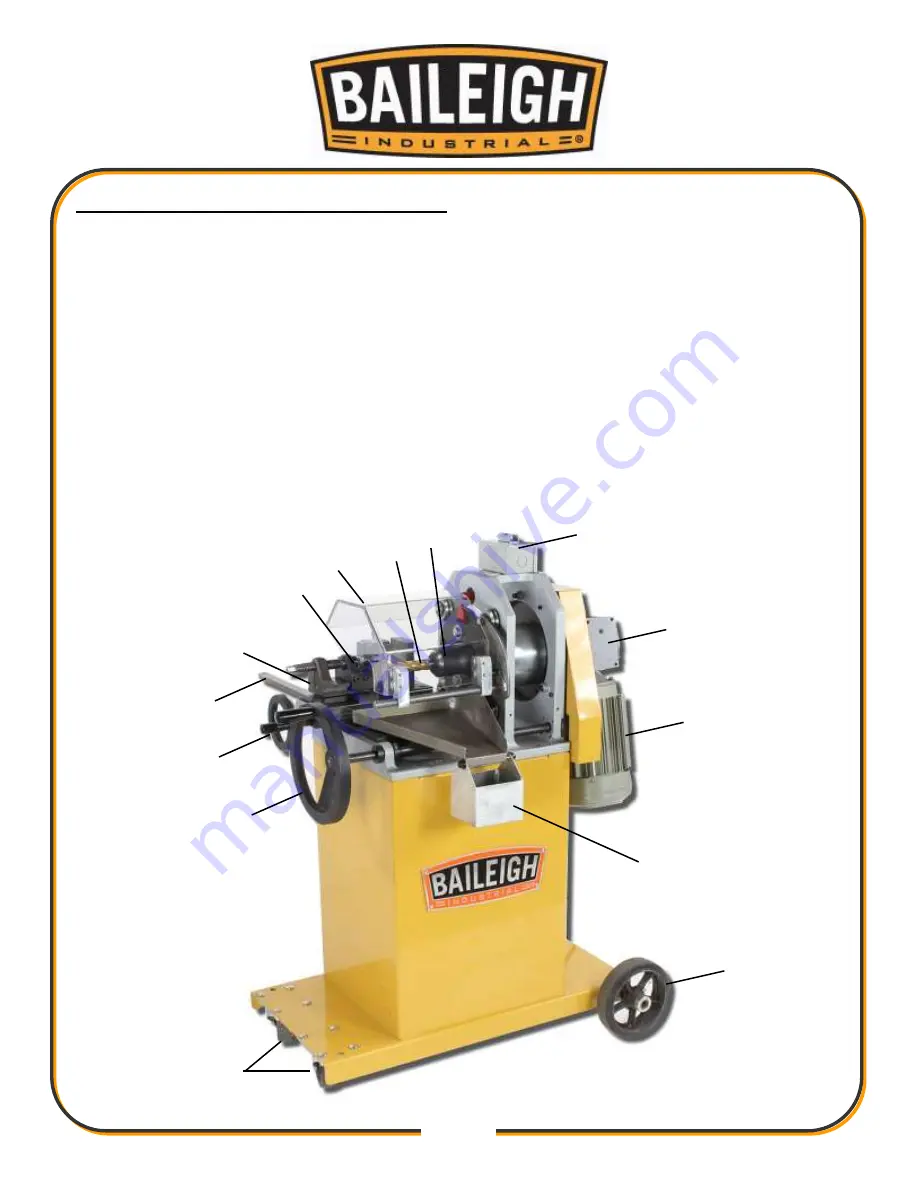
GETTING TO KNOW YOUR MACHINE 


  You have made a practical choice in purchasing a Model TN-800 Eccentric Cut Notching 

Machine. It has been carefully built of high quality materials and designed to give many 
years of efficient service.  The simplicity of design and minimum effort required to operate 
the machine contributes towards meeting schedules and producing greater profits. 

  The TN-800 is an electric powered end-mill notching machine specially designed to notch a 

variety of materials using only one end mill. The Patented Eccentric Cut feature, allows the 
user to feed an end mill cutter through an adjustable eccentric path. Creating a perfect weld 
joint when mating two or more pieces of tubing together. 

  The TN-800 Notching Machine you have purchased is built of solid steel and high quality 

components, ensuring maximum rigidity and long life. 


Summary of Contents for TN-800

Page 1: ...Pty LTD IS PROHIBITED Baileigh Industrial Pty LTD does not assume and hereby disclaims any liability for any damage or loss caused by an omission or error in this Operator s Manual resulting from acc...

Page 2: ...19 Cutter Selection 19 Material Insertion 20 Setting Offset 21 Notching 22 Angle Notching 22 Repeat Notching 23 Material Removal 23 Off Center Notching 23 MATERIAL SELECTION 24 STANDARD PIPE SIZES AN...

Page 3: ...designated agent employee of the Company 2 4 The Buyer must ensure that the terms of its order and any applicable specification are complete and accurate 2 5 Any quotation given by the Company is an o...

Page 4: ...y except a solvent voluntary liquidation for the purpose only of reconstruction or amalgamation or has a receiver and or manager administrator or administrative receiver appointed of its undertaking o...

Page 5: ...9 9 All electrical components and gearboxes carry a one year replacement warranty from the manufacturer This warranty does not include labour or shipping costs 10 RETURNS 10 1 The Buyer shall not be e...

Page 6: ...of the English courts 16 COMMUNICATIONS 16 1 All communications between the parties about this Contract must be in writing and delivered by hand or sent by pre paid first class post or sent by facsimi...

Page 7: ...tion of the functional parts of the machine Capacity charts Set up and start up instructions Machine operation Scheduled maintenance Parts lists GENERAL NOTES After receiving your equipment remove the...

Page 8: ...es a hazard or unsafe practice that will result in severe Injury or Death Safety signs with signal word DANGER or WARNING are typically near specific hazards General precautions are listed on CAUTION...

Page 9: ...against objectionable or uncomfortable loud noises BEWARE OF PINCH POINTS Keep hands and fingers away from the slide plate and pivot points when operating on and around this machine Keep chuck guard...

Page 10: ...remely dangerous if you do not follow proper safety procedures NEVER place hands directly over or in front of the cutter Keep the tooling guard in place and closed at all times while operating this ma...

Page 11: ...tools Before operating the machine make sure any adjusting tools have been removed 4 Keep work area clean Cluttered areas invite injuries 5 Overloading machine By overloading the machine you may cause...

Page 12: ...roperly adjusted for optimum performance 16 Keep children away Children must never be allowed in the work area DO NOT let them handle machines tools or extension cords 17 Store idle equipment When not...

Page 13: ...subject line Tech Support handles questions on machine setup schematics warranty issues and individual parts needs other than die sets and blades List the model number serial number and contact name a...

Page 14: ...y damage painted surfaces Follow manufacturer s label instructions when using any type of cleaning product After cleaning wipe unpainted metal surfaces with a light coating of quality oil or grease fo...

Page 15: ...securing bolts that attach the machine to the pallet Approaching the machine from the side lift the machine on the frame taking care that there are no cables or pipes in the area of the forks Move the...

Page 16: ...o consideration the size of the material to be processed Make sure that you allow enough space for you to operate the machine freely POWER SUPPLY PLACEMENT The power supply should be located close eno...

Page 17: ...schedules and producing greater profits The TN 800 is an electric powered end mill notching machine specially designed to notch a variety of materials using only one end mill The Patented Eccentric C...

Page 18: ...shown Used to move the vise bed into and away from the end mill F Vise Used to hold and secure the material to be notched May be rotated to feed the material into the end mill at an angle from 0 45 G...

Page 19: ...will damage the motor In the event of a malfunction or breakdown grounding provides a path of least resistance for electric current to reduce the risk of electric shock This tool is equipped with an...

Page 20: ...etely understood or if in doubt as to whether the tool is properly grounded Repair or replace damaged or worn cord immediately Extension Cord Safety Extension cord should be in good condition and meet...

Page 21: ...talled This will notch from 1 2 12 7mm up to 1 25 4mm diameter material 3 To install the cutter first unplug the power cord and open the Lexan guard 4 Loosen the set screws A located on the spindle an...

Page 22: ...angle not to exceed 45 deg DO NOT rotate the vise so that the lead screw B in in front of the end mill 5 Using the X and Y hand wheels position the material up to the cutter leaving about 1 2 12 7mm o...

Page 23: ...lines B up with the red indicator at the 12 o clock position 4 At this point all offset adjustments and table positioning will be made this is also the start and end point of every notch 5 On the face...

Page 24: ...d notch depth is achieved 5 Alternate depth notch if you know how deep you need to notch mark that depth on the material Rotate the red indicator to the 6 o clock position then feed with the X handwhe...

Page 25: ...is Counter display Actual distance in inches 0000 0 0 000 0001 0 0 100 0002 0 0 200 Material Removal 1 After the desired notch depth is reached activate the stop switch 2 Make sure the spindle has st...

Page 26: ...and Wall Thickness 5 10 40 80 160 XX STRONG 1 8 0 405 0 400 0 050 0 068 0 095 1 4 0 540 0 500 0 070 0 088 0 119 3 8 0 675 0 500 0 070 0 091 0 126 1 2 0 840 0 700 0 080 0 109 0 147 0 188 0 294 3 4 1 05...

Page 27: ...set too loose V rollers set too loose Motor stops while notching Feeding to fast Cutter is dull Not a good power source circuit should be dedicated to this machine only Main handwheel is tight or sti...

Page 28: ...26 26 ELECTRICAL SCHEMATIC...

Page 29: ...ll decrease the performance of the machine and may be unsafe Periodically check the power cord for cuts or bare wire and replace if damaged Oil Disposal Used oil products must be disposed of in a prop...

Page 30: ...28 28 PARTS DIAGRAM Base Assembly...

Page 31: ...29 29 Spindle Assembly...

Page 32: ...30 30 Forward Riser Assembly...

Page 33: ...31 31 Motor and Gearbox Assembly...

Page 34: ...32 32 Rear Riser Assembly...

Page 35: ...33 33 Crank Shaft Assembly...

Page 36: ...34 34 Vise Assembly...

Page 37: ...35 35 Slide Base Assembly...

Page 38: ...washer 4 14 Imperial 1 2 13 Hex Nut 3 15 ME M800 6A005 Support Disc 1 16 ME M800 7A005 Tapping Plate 1 17 ME M800 6A006 Tie Block 1 18 M10 X 1 5 X 20 SHCS 2 19 ME M800 7A007 Sprocket Spacer 3 20 M800...

Page 39: ...M10 X 1 5 X 30 SHCS 2 49 ME M800 6A015 Pointer 1 50 M800 5A002 Indicator Plate 1 51 M5 X 0 8 X 20 SHCS 2 52 M6 X 1 0 X 25 SHCS 3 53 PP 0042 39 40 Chain 1 54 Imperial M20 X 2 5 X 20 Set Screw 2 55 Impe...

Page 40: ...018 Short Lead Screw 1 84 ME M800 6A070 4 75 Gib Thick 1 85 ME M800 6A071 4 75 Gib Thin 1 86 M8 X 1 25 X 30 SHCS 6 87 ME M800 6A069 Gib Thin 1 88 ME M800 6A068 Gib Thick 1 89 M800 6A037 Vise Casting 1...

Page 41: ...6 PP 1296 CE On Off Switch 1 117 M800 6A046 Sprocket Guard 1 118 M5 X 0 8 X 10 PPMS 5 119 Imperial 1 2 13 X 2 75 Hex Bolt 1 120 M800 6A060 Moveable Vise Clamp 1 121 M800 7A025 Shoulder Washer 2 122 PP...

Page 42: ...40 40 NOTES...

Page 43: ...41 41 NOTES...

Page 44: ...NUE ONTARIO CA 91761 PHONE 920 684 4990 FAX 920 684 3944 BAILEIGH INDUSTRIAL LTD UNIT D SWIFT POINT SWIFT VALLEY INDUSTRIAL ESTATE RUGBY WEST MIDLANDS CV21 1QH UNITED KINGDOM PHONE 44 0 24 7661 9267 F...

Reviews: