18
18
5. Route the hydraulic hoses to the hydraulic fitting and matching the number labels (1 to 1 and
2 to 2), one at a time, remove the plugs and install the hoses to the fittings. Tighten securely,
however do not over tighten and distort the swivel fitting collar.
6. Route the hydraulic hoses to the top of the hydraulic cylinder and matching the number
labels (1 to 1 and 2 to 2), one at a time, remove the plugs and install the hoses to the fittings.
Tighten securely, however do not over tighten and distort the swivel fitting collar.
7. Fill the tank with hydraulic oil. The press is shipped without oil. Before starting up, the tank
needs to be filled with hydraulic oil #46 SHELL BRAND or an equivalent with similar
specifications.
8. Remove the filler plug on top of the hydraulic tank.
9. Fill the tank with approximately 26.5gal. (100L) of hydraulic oil.
10. Replace the filler plug.
IMPORTANT: NEVER
run the motor with a low oil level. This will damage the
hydraulic unit.
11. Locate, remove and retain the three screws that will secure the motor cover onto the
hydraulic tank and the side of the frame.
12. Place the cover over the motor and hydraulics so that the cutout provides access to the
operating controls.
13. Secure in place using the three screws removed earlier
Summary of Contents for HSP-176M-HD
Page 3: ...ELECTRICAL SCHEMATIC 38 Electrical Parts List 38 TROUBLESHOOTING 39 ...
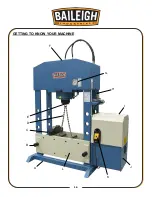
Page 19: ...16 16 GETTING TO KNOW YOUR MACHINE A I G H L J B F K C E D ...
Page 30: ...27 27 Using the Machine Incorrect Correct ...
Page 31: ...28 28 Incorrect Correct ...
Page 37: ...34 34 RAM PARTS DIAGRAM ...
Page 39: ...36 36 HYDRAULIC PUMP PARTS DIAGRAM ...
Page 43: ...40 40 NOTES ...


