LCD Operation
18
Settings screen
Press
to change the default machine settings. Press
or
, after you changed necessary settings.
■
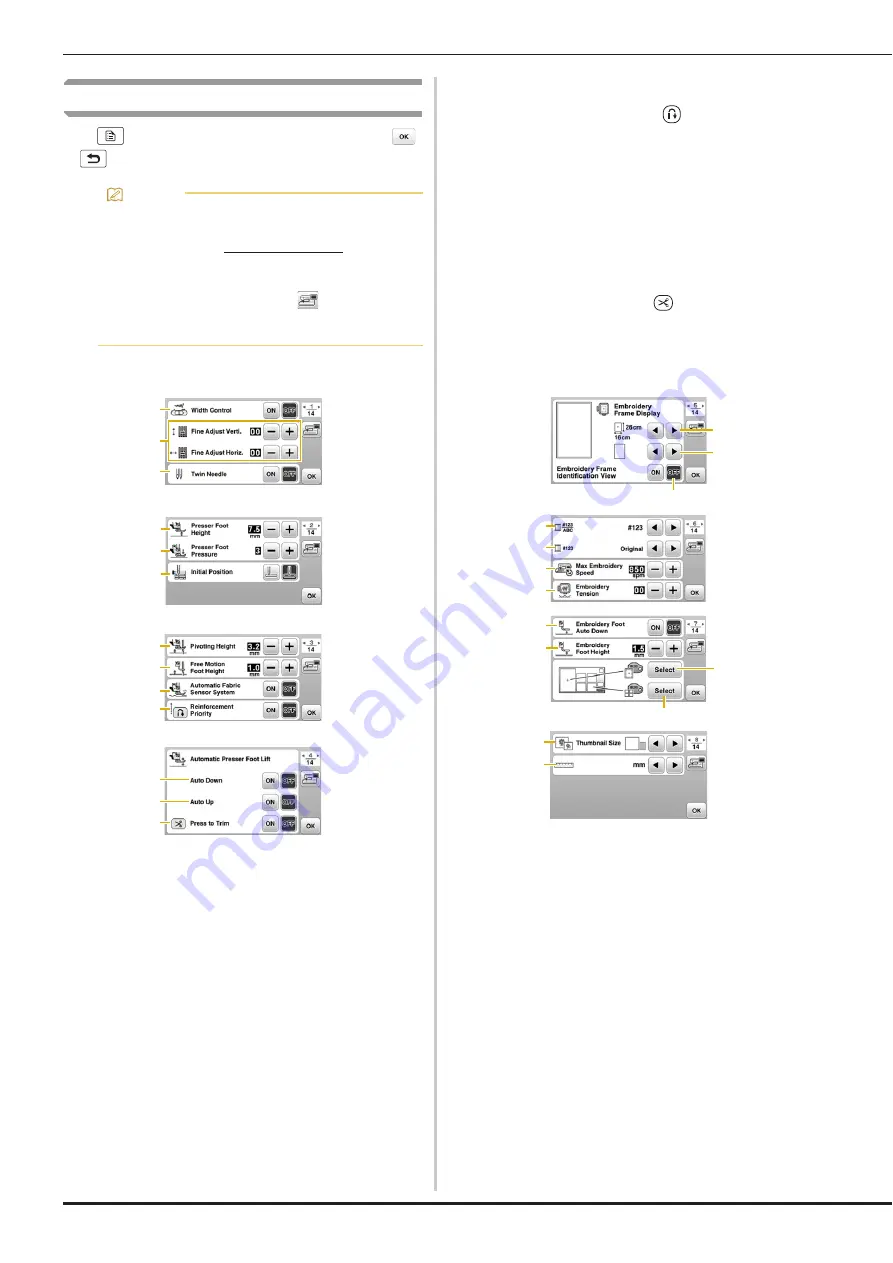
Sewing settings
1
Select whether to use the sewing speed controller to
determine the zigzag width. (page 72)
2
Make adjustments to character or decorative stitch
patterns. (page 80)
3
Set to [ON] when using twin needle. (page 77)
4
Adjust the height of the presser foot when the presser
foot is raised.
5
Adjust the presser foot pressure. The higher the number,
the greater the pressure will be. Set the pressure at [3]
for normal sewing.
6
Select either “1-01 Straight stitch (Left)” or “1-03 Straight
stitch (Middle)” as the utility stitch that is automatically
selected when the machine is turned on.
7
Adjust the height of the presser foot when sewing is
stopped when the pivot key is selected. (page 41)
8
Adjust the height of the presser foot when the machine is
set to free motion sewing mode. (page 68)
9
When set to [ON], the thickness of the fabric is
automatically detected by an internal sensor while
sewing. This enables the fabric to be fed smoothly.
(page 40)
0
When set to [ON], reinforcement stitches are sewn at the
beginning and/or end of sewing for a reinforcement
stitch pattern, even when the
(Reverse stitch button)
is pressed.
A
When set to [ON], pressing the “Start/Stop” button (or
depressing the foot controller) automatically lowers the
presser foot when it is raised, allowing sewing to begin.
B
When set to [ON], pressing the “Start/Stop” button (or
releasing the pedal of the foot controller) to stop sewing,
it will then automatically raise the presser foot. The
presser foot is raised to the height specified for [Presser
Foot Height] on page 2 of the settings screen.
When the pivot setting is selected, the presser foot is
raised to the height specified for [Pivoting Height] on
page 3 of the settings screen.
C
When set to [ON], pressing
(Thread cutter button)
automatically lowers the presser foot when it is raised,
allowing the thread to be cut.
After the thread is cut, the presser foot is raised again.
■
Embroidery settings
1
Select the embroidery frame to be used.
2
Select the center mark and grid lines that are displayed.
3
When set to [ON], you can only select the embroidery
pattern corresponding to the embroidery frame size that
you selected in
1
. (page 90)
4
Change the thread color display on the embroidery
screen; thread number, color name. (page 93)
5
When the thread number [#123] is selected, select from
thread brands. (page 93)
6
Select the maximum embroidery speed setting.
7
Adjust the upper thread tension for embroidering.
(page 95)
8
When set to [ON], pressing the "Start/Stop" button when
the presser foot is raised automatically lowers the
presser foot before starting embroidering. (page 95)
9
Select the height of the embroidery foot during
embroidering. (page 86)
0
Select the color of the background for the embroidery
display area.
A
Select the color of the background for the thumbnail
area.
B
Select the size of pattern thumbnails.
C
Select the display units (mm/inch).
Memo
• The latest version of software is installed in your
machine. Check with your local authorized Baby
Lock retailer or at www.babylock.com for available
updates.
• You can save the current settings screen image in
a USB flash drive by pressing
when the USB
flash drive is inserted into the USB port. The files
are saved in a folder labeled “bPocket”.
1
2
3
4
5
6
7
8
9
0
A
B
C
3
2
1
4
5
6
7
8
0
9
A
B
C


