AZTPOS AZT-805W User Manual Download Page 5

8


AZT

POS Desktop Receipt Printer User Guide

AZT

POS Desktop Receipt Printer User Guide   9
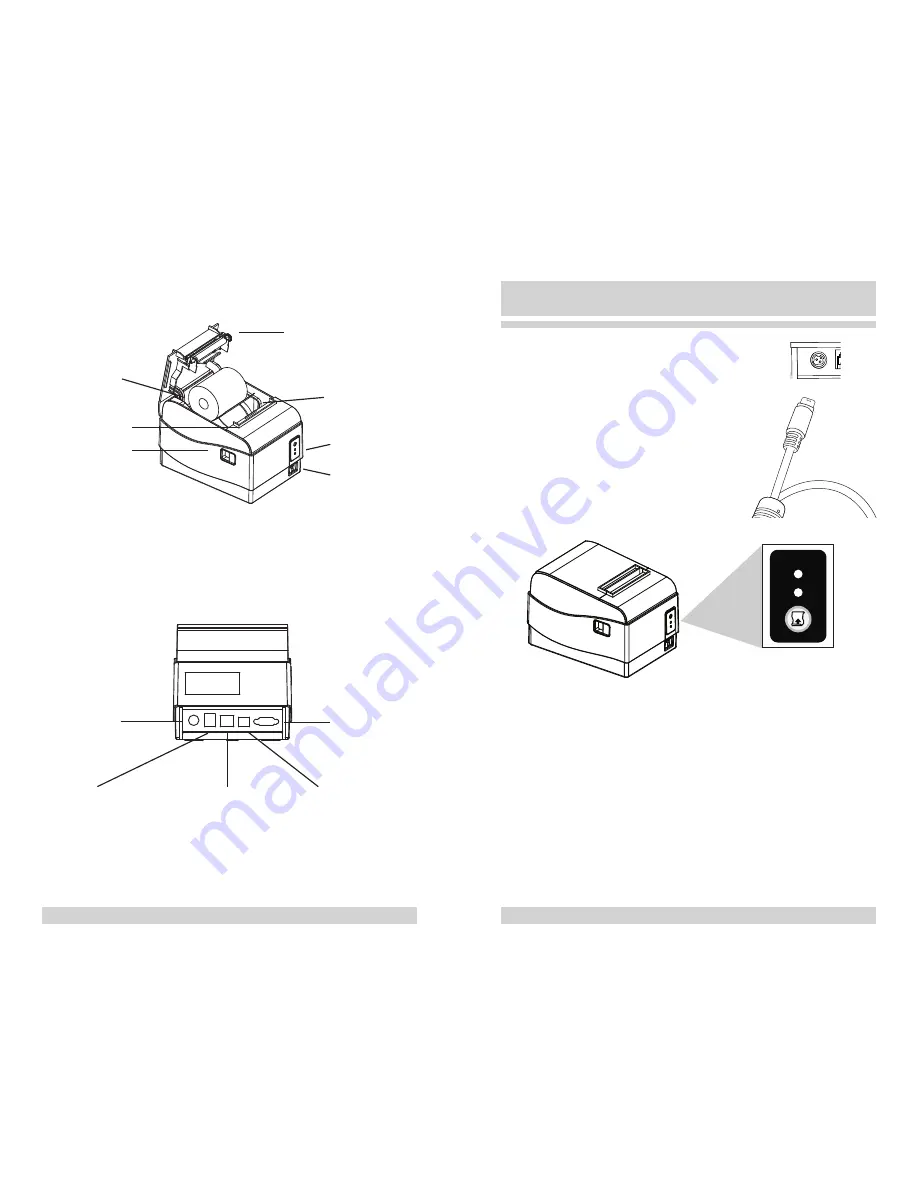


Cover opener

Printer cover

Printer head

Control panel

Power button

Paper cabin

Cutter cover

Power plug

Cash drawer interface

USB port

DB9 serial port

Ethernet port

1.2 Features

2.1. Connecting the Power Cord

To connect the power cord to the printer, 
ensure that the power cord and the 
adapter are connected. Then, insert the 
circular end of the power cord into the 
first port on the back of the printer. 
Once the power cord is connected to 
the printer port, plug in the power cord 
adapter to the power outlet. 

2.2. Control Panel 

The control panel includes the following controls to operate 
the printer:

•  POWER indicator light – A blue light indicates that the 

printer is on. There will be no light when the printer is 
off.

•  ERROR indicator light – A red light indicates that there is 

an error. An alarm will also sound when there is an error. 
The alarm will sound in the following conditions:


-

No paper in the paper roll


-

Printer cover shut incorrectly

2. Power and Controls 

POWER

ERROR

FEED

Summary of Contents for AZT-805W

Page 1: ...Desktop Receipt Printer User Manual for Model Numbers AZT 805W AZT 806BT Copyright 2016 AZT POS...

Page 2: ...Dip Switch Settings 12 3 Setup 13 3 1 Connecting Cables 13 3 2 Connection Methods 13 3 2 1 Connect AZT 805W via Ethernet 13 3 2 2 Connect Printer to USB Serial 14 3 2 3 Set an Ethernet IP Via DHCP Aut...

Page 3: ...ons 24 6 Wall Mount Template 27 Never disassemble or modify this product Tampering with this product may result in injury fire or electric shock Download all drivers and tools from http www aztpos com...

Page 4: ...pen lever and open the printer cover when printing is in progress Do not pull out paper when the printer cover is closed Use the feed button instead Do not transport the printer with its cover open an...

Page 5: ...power cord into the first port on the back of the printer Once the power cord is connected to the printer port plug in the power cord adapter to the power outlet 2 2 Control Panel The control panel i...

Page 6: ...perform the following 1 Ensure that the printer is powered off 2 Turn the printer upside down to reveal the bottom panel of the printer 3 Press up on the plastic clasp on the cover to remove the DIP...

Page 7: ...OFF 115200 bps ON ON Print Mode DIP3 DIP4 Default 42 characters OFF OFF AZT 806BT 48 characters OFF ON AZT 804R AZT 805W 53 characters ON OFF Reserved ON ON Beeper DIP5 Default Enable OFF Disable ON P...

Page 8: ...le is plugged into your router or switch 2 Press and hold the feed button on the front of the printer 3 Turn on the printer while still holding the Feed button 4 The printer will start beeping as it l...

Page 9: ...field enter admin c In the Password field enter 1234567 d Click OK 5 The Simple WiFi Module page will display 6 Click Wireless Settings in the left hand column of the screen 7 Type the WiFi SSID into...

Page 10: ...nd turn the printer upright 6 Turn the power on the printer off and back on to complete the reset 3 2 8 Connect AZT 806BT via Bluetooth Note The following instructions are for users with windows 7 8 a...

Page 11: ...ows 7 8 and 10 operating systems 1 Press the Start button 2 Select the Devices and Printers tab 3 Right click the printer you installed 4 Select Printer Properties from the drop down menu 5 Click Prin...

Page 12: ...that may be present 4 2 Cleaning To maintain the efficiency and operation of the printer it must be periodically cleaned Dust and food particles can accumulate on the print head this can degrade print...

Page 13: ...x 24 Font B 9 x 17 Characters Per Line Font A 48 Font B 64 Barcodes Code 39 Code 128 EAN 8 EAN 13 Driver Windows 7 8 10 Sensor Out of paper Receive Buffer Size 4K bytes Weight 3lbs 1 3kg Dimensions W...

Page 14: ...26 AZTPOS Desktop Receipt Printer User Guide AZTPOS Desktop Receipt Printer User Guide 27 6 Wall Mount Template Notes Hole Locations...

Page 15: ......

Reviews: