AZTPOS AZT-805W User Manual Download Page 12

22


AZT

POS Desktop Receipt Printer User Guide

AZT

POS Desktop Receipt Printer User Guide   23


If there is an error with the 
paper feed, an alarm will sound 
and the ERROR light will turn 
red. Paper alarms trigger the 
error alarm when the paper roll 
needs to be replaced or when a 
jam needs to be removed.
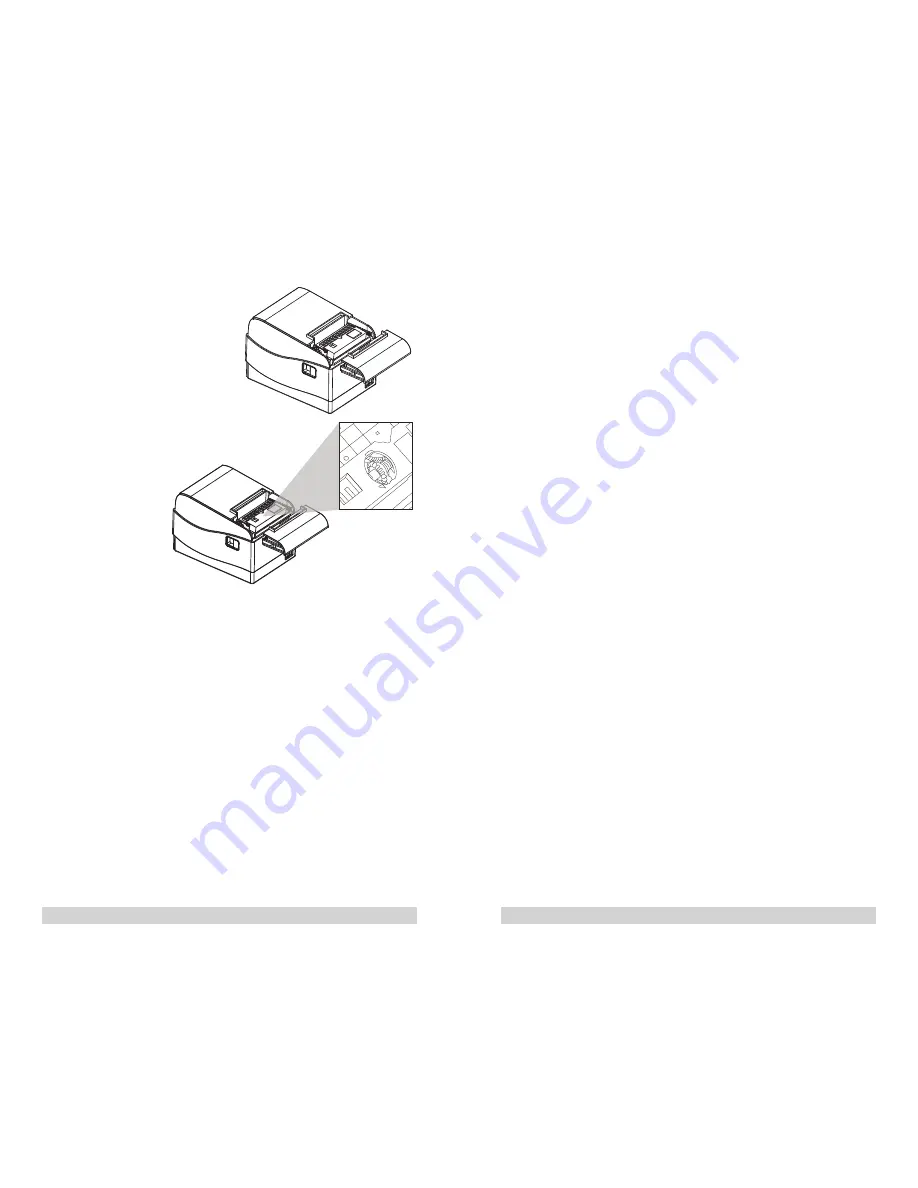
4.1.3. Resolving a 
cutter jam 

If the printer cover 
is stuck closed, there 
may be a paper 
cutter jam

Do not force the 
printer cover open 
with force or tools! 
Damage caused by 
use of force may void the warranty!

1.  Remove the front cover by pulling the metal teeth 

toward you. 

2.  Rotate the exposed gear with your finger until the paper 

cutter is reset.  You should notice a metal blade moving 
slowly as you turn the gear. 

3.  When the cutter is reset, pull the side latch on the side to 

open the printer cover and clear and clean any jam that 
may be present

4.2. Cleaning

To maintain the efficiency and operation of the printer, it 
must be periodically cleaned.  Dust and food particles can 
accumulate on the print head; this can degrade print quality of 
cause “streaks” in the receipt. 

4.2.1. Thermal Head

Wipe the surface of the thermal head with isopropyl alcohol to 
remove accumulated dust and particles. To access the thermal 
head:

1.  Remove the paper roll cover.

2.  Open the printer cover.

3.  The thermal head is the copper / white colored bar. 

4.  Apply isopropyl alcohol to a soft cloth, and wipe the 

surface of the thermal head. 

5.  Close the printer cover when the thermal head is clean. 

4.2.2. Paper Holder

Use a soft, cotton cloth to wipe the interior paper holder. To 
access the paper holder, perform the following:

1.  Remove the paper roll cover.

2.  Open the printer cover. 

3.  Remove the paper roll from the divot in the printer. 

4.  Wipe dust, dirt, and particles from the paper holder with 

the soft, cotton cloth. 

5.  Replace the paper roll. 

6.  Close the printer cover, and replace the  cover. 

Summary of Contents for AZT-805W

Page 1: ...Desktop Receipt Printer User Manual for Model Numbers AZT 805W AZT 806BT Copyright 2016 AZT POS...

Page 2: ...Dip Switch Settings 12 3 Setup 13 3 1 Connecting Cables 13 3 2 Connection Methods 13 3 2 1 Connect AZT 805W via Ethernet 13 3 2 2 Connect Printer to USB Serial 14 3 2 3 Set an Ethernet IP Via DHCP Aut...

Page 3: ...ons 24 6 Wall Mount Template 27 Never disassemble or modify this product Tampering with this product may result in injury fire or electric shock Download all drivers and tools from http www aztpos com...

Page 4: ...pen lever and open the printer cover when printing is in progress Do not pull out paper when the printer cover is closed Use the feed button instead Do not transport the printer with its cover open an...

Page 5: ...power cord into the first port on the back of the printer Once the power cord is connected to the printer port plug in the power cord adapter to the power outlet 2 2 Control Panel The control panel i...

Page 6: ...perform the following 1 Ensure that the printer is powered off 2 Turn the printer upside down to reveal the bottom panel of the printer 3 Press up on the plastic clasp on the cover to remove the DIP...

Page 7: ...OFF 115200 bps ON ON Print Mode DIP3 DIP4 Default 42 characters OFF OFF AZT 806BT 48 characters OFF ON AZT 804R AZT 805W 53 characters ON OFF Reserved ON ON Beeper DIP5 Default Enable OFF Disable ON P...

Page 8: ...le is plugged into your router or switch 2 Press and hold the feed button on the front of the printer 3 Turn on the printer while still holding the Feed button 4 The printer will start beeping as it l...

Page 9: ...field enter admin c In the Password field enter 1234567 d Click OK 5 The Simple WiFi Module page will display 6 Click Wireless Settings in the left hand column of the screen 7 Type the WiFi SSID into...

Page 10: ...nd turn the printer upright 6 Turn the power on the printer off and back on to complete the reset 3 2 8 Connect AZT 806BT via Bluetooth Note The following instructions are for users with windows 7 8 a...

Page 11: ...ows 7 8 and 10 operating systems 1 Press the Start button 2 Select the Devices and Printers tab 3 Right click the printer you installed 4 Select Printer Properties from the drop down menu 5 Click Prin...

Page 12: ...that may be present 4 2 Cleaning To maintain the efficiency and operation of the printer it must be periodically cleaned Dust and food particles can accumulate on the print head this can degrade print...

Page 13: ...x 24 Font B 9 x 17 Characters Per Line Font A 48 Font B 64 Barcodes Code 39 Code 128 EAN 8 EAN 13 Driver Windows 7 8 10 Sensor Out of paper Receive Buffer Size 4K bytes Weight 3lbs 1 3kg Dimensions W...

Page 14: ...26 AZTPOS Desktop Receipt Printer User Guide AZTPOS Desktop Receipt Printer User Guide 27 6 Wall Mount Template Notes Hole Locations...

Page 15: ......

Reviews: