background image

AXIS Q6032-E PTZ Dome Network Camera

PTZ (Pan Tilt Zoom)

PTZ (Pan Tilt Zoom)

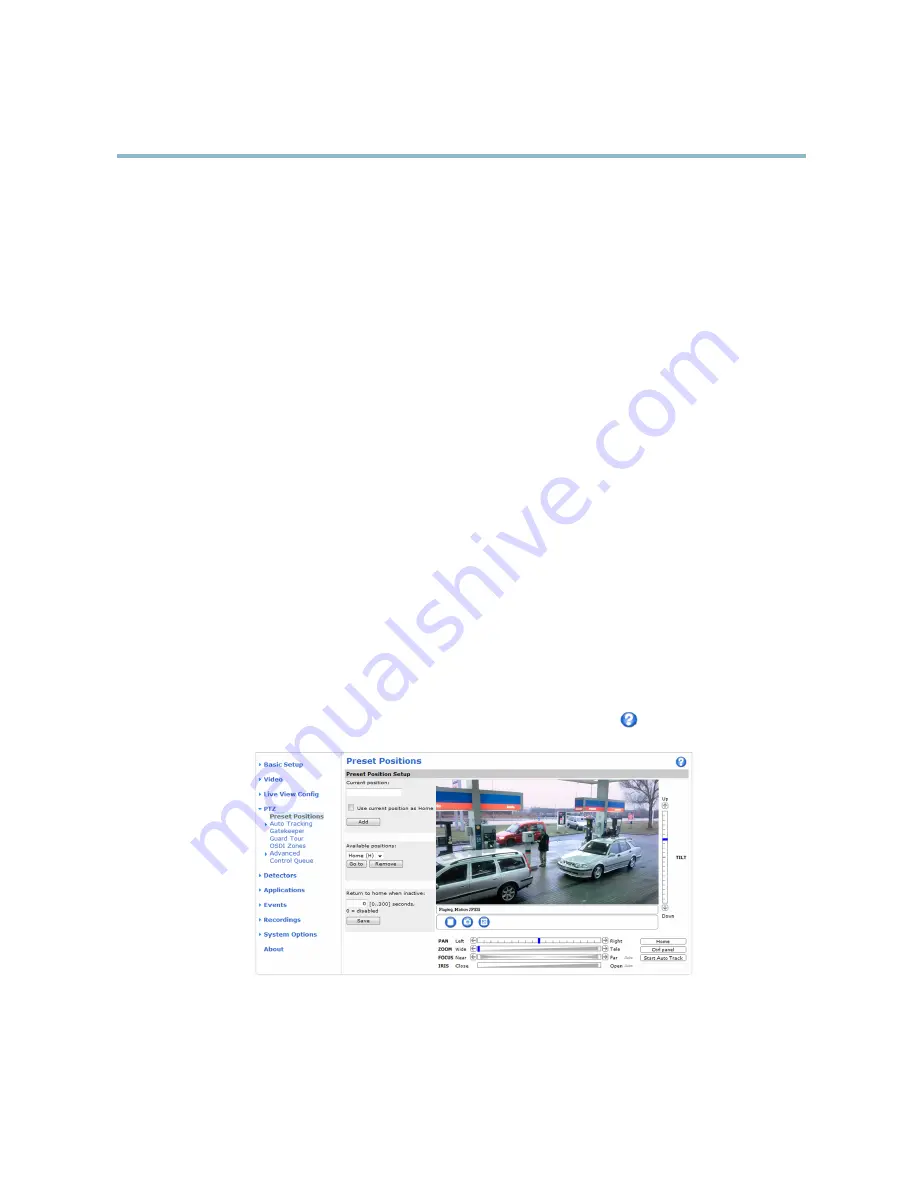
Preset Positions

A preset position is a prede

fi

ned view that can be used to quickly steer the camera to a speci

fi

c location. Preset positions can

be accessed in several ways:

• By selecting the preset from the

Preset positions

drop-down list in the Live View Page.

• When setting up action rules. See

page 31

.

• When setting up Guard Tour. See

page 25

.

• When setting up the Gatekeeper. See

page 25

To add a preset position:

1. Go to

PTZ > Preset Positions

.

2. Use the pan, tilt and zoom controls to steer the camera view to the desired position.

3. Enter a descriptive name in the

Current position

fi

eld.

4. If required, select

Use current position as Home

.

5. Click

Add

. The camera’s position, iris and focus settings are saved as a preset position.

The

Home

position is readily accessible by clicking the

Home

button on the Live View page and in the Preset Positions setup window.

To set a customized home position, select

Use current position as Home

when adding a preset position. The user-de

fi

ned home

position will have (H) added, for example, Entrance (H). The default Home position, called “Home”, will still be available.

The product can be con

fi

gured to return to the Home position when the PTZ functionality has been inactive for a speci

fi

ed length

of time. Enter the length of time in the

Return to home when inactive

fi

eld and click

Save

. Set the time to zero to prevent the

product from automatically returning to the Home position.

To include the preset position name in the overlay text, go to

Video

, select

Include overlay text

and enter the modi

fi

er

#P

in the

fi

eld.

For more information about modi

fi

ers, see

File Naming & Date/Time Formats

in the online help

.

Autotracking

The Axis product can detect movement in the

fi

eld of view, for example a moving vehicle or person. If autotracking is enabled, the

Axis product will automatically pan and tilt to follow the moving object. In case there is much simultaneous movement, the area with

23

Summary of Contents for Q6032-E

Page 1: ...USER MANUAL AXIS Q6032 E PTZ Dome Network Camera ...

Page 2: ...alled according to the instructions and used in its intended environment Immunity to electrical and electromagnetic phenomena when installed according to the instructions and used in its intended environment USA This equipment has been tested using a shielded network cable STP and found to comply with the limits for a Class B digital device pursuant to part 15 of the FCC Rules These limits are des...

Page 3: ...iew Config 20 PTZ Pan Tilt Zoom 23 Preset Positions 23 Autotracking 23 Gatekeeper 25 Guard Tour 25 OSDI Zones 26 Advanced 26 Control Queue 27 Detectors 28 Motion Detection 28 Applications 30 Events 31 Convert Event Types to Action Rules 32 Setting Up an Action Rule 32 Recipients 33 Schedules 33 Recurrences 34 Recordings 35 Recording List 35 Continuous Recording 35 System Options 37 Security 37 Dat...

Page 4: ...J 45 Ethernet connector Supports High Power over Ethernet High PoE Use the supplied midspan NOTICE Due to local regulations or the environmental and electrical conditions in which the product is to be used a shielded network cable STP may be appropriate or required Any network cables that are routed in outdoor environments or similar shall be shielded STP and intended for their specific use Make s...

Page 5: ...tings See page 46 Power button Press the power button to temporarily power the product when the dome cover is removed The power button is also used with the control button to reset the camera to factory default settings See page 46 LED Indicators Color Indication Unlit Connection and normal operation Amber Steady during startup Flashes during firmware upgrade Amber red Flashes amber red if network...

Page 6: ...ts the product can be configured to use a Java applet for viewing Motion JPEG Access from a Browser 1 Start a browser Internet Explorer Firefox Safari 2 Enter the IP address or host name of the Axis product in the browser s Location Address field To access the product from a Macintosh computer Mac OS X click on the Bonjour tab and select the product from the drop down list If you do not know the I...

Page 7: ...must set the password for the default administrator user root This is done in the Configure Root Password dialog which appears when the product is accessed for the first time To prevent network eavesdropping the root password can be set via an encrypted HTTPS connection which requires an HTTPS certificate HTTPS Hypertext Transfer Protocol over SSL is a protocol used to encrypt traffic between web ...

Page 8: ... on the Live View Page The Stream Profile drop down list allows you to select a customized or pre programmed stream profile Stream profiles are configured under Video Stream Profiles See Stream Profiles on page 16 The Manual Trigger button is used to trigger an action rule from the Live View page see Enable this button from Live View Config Action Buttons Click Snapshot to save a snapshot of the v...

Page 9: ...displays Pan Tilt Zoom PTZ controls The administrator can enable disable controls for specified users under System Options Security Users With the PTZ Control Queue enabled the time each user is in control of the PTZ settings is limited Click the buttons to request or release control of the PTZ controls The PTZ Control Queue is set up under PTZ Control Queue Click the Emulate joystick mode button ...

Page 10: ...mera or click on a position on the bar to set the focus position Using the focus bar will disable the product s autofocus To re enable use the PTZ control panel which is opened by clicking the Ctrl panel button see above Iris bar Click on a position on the iris bar to change the degree to which the iris is opened This will disable the product s auto iris To re enable use the PTZ control panel whic...

Page 11: ...multaneous unicast connections Multicast RTP This method RTP over UDP should be used for live multicast video The video stream is always up to date even if some images are dropped Multicasting provides the most efficient usage of bandwidth when there are large numbers of clients viewing simultaneously A multicast cannot however pass a network router unless the router is configured to allow this It...

Page 12: ...Axis product in the following ways Motion JPEG server push if supported by the client Firefox for example This option maintains an open HTTP connection to the browser and sends data as and when required for as long as required Still JPEG images in a browser Enter the path http ip axis cgi jpg image cgi Windows Media Player This requires AXIS Media Control and the H 264 decoder to be installed The ...

Page 13: ...reams Note ip IP addess The Axis product supports QuickTime 6 5 1 and later QuickTime adds latency to the video stream It may be possible to use other players to view the H 264 stream using the paths above although Axis does not guarantee this 13 ...

Page 14: ...r of the Live View page Administrators have unrestricted access to all settings Operators have access to all settings except System Options See also the online help Basic Setup Basic Setup provides shortcuts to the settings that should be made before using the Axis product 1 Users See page 37 2 TCP IP See page 39 3 Date Time See page 38 4 Video Stream See page 15 The Basic Setup menu can be disabl...

Page 15: ...Pixel Counter The pixel counter shows the number of pixels in an area of the image The pixel counter is useful in situations where there is a requirement that the image is a certain size for example in face recognition The pixel counter can be accessed from Video Video Stream Under Preview click Open and select the Show pixel counter option to enable the rectangle in the image Use the mouse to mov...

Page 16: ...ensate for this it is possible to prioritize either frame rate or image quality Not setting a priority means that frame rate and image quality are equally affected You must save your settings before they can take effect The current bit rate can be set to appear as text overlay To do this select the Include text check box option under Overlay Settings and enter the modifier b in the field MJPEG Som...

Page 17: ...ng frame rate and bandwidth considerations Exposure control These settings is used to adapt to the amount of light used Automatic is the default settings can be used in most situations The shutter speed is automatically set to produce optimum image quality Max exposure time Select the maximum exposure time from the drop down list Increasing the exposure time will improve image quality but decrease...

Page 18: ... a text string When using a text string modifiers can be used to display information such as the current bit rate or the current frame rate For information about available modifiers see File Naming Date Time Formats in the online help To enable overlays 1 Go to Video Video Stream and select the Image tab 2 To include an overlay image select Include overlay image at the coordinates The overlay imag...

Page 19: ... API The Privacy Mask List Video Privacy Mask shows all the masks that are currently configured in the Axis product and indicates if they are enabled Since the Pan Tilt Zoom coordinates define its size and position a privacy mask is dynamic in relation to the monitored area This means that regardless of the angle and zoom of the lens the same place or object will be hidden To define at what magnif...

Page 20: ...ge 20 Viewer Settings See page 21 Action Buttons These are the buttons described in Controls on the Live View Page on page 8 User Defined Links See page 21 Default Viewer for Browsers From Live View Config Default Viewer select the default method for viewing video images in your browser The product attempts to show the video images in the selected video format and viewer If this is not possible th...

Page 21: ...from your Axis reseller Select Show crosshair in PTZ joystick mode to enable a cross that will indicate the center of the image in PTZ joystick mode Select Use PTZ joystick mode as default to enable joystick mode The mode can be changed temporarily from the PTZ control panel Select Enable recording button to enable recording from the Live View page This button is available when using the AMC viewe...

Page 22: ... Live View Config Active Inactive displays two buttons one or each action To configure the active and inactive states go to System Options Ports Devices I O Ports and set the port s Normal state For more information about I O ports see 22 ...

Page 23: ...nd in the Preset Positions setup window To set a customized home position select Use current position as Home when adding a preset position The user defined home position will have H added for example Entrance H The default Home position called Home will still be available The product can be configured to return to the Home position when the PTZ functionality has been inactive for a specified leng...

Page 24: ...Areas Exclude areas are areas where movement is to be ignored Note Movement in an area blocked by a privacy mask is always ignored 1 Click Add area to create an exclude area 2 Resize and move the area the blue rectangle to the desired position 3 Enter a descriptive name and click Save To remove an area click the name of the area and click Remove To enable or disable an area click the name of the a...

Page 25: ...tions one by one in a predetermined order or at random and for configurable time periods The enabled guard tour will keep running after the user has logged off or closed the browser The guard tour function in this Axis product also includes tour recording see Tour Recording on page 26 To add a guard tour 1 Go to PTZ Guard Tour and click Add 2 Select Create a preset tour and click OK 3 Enter a desc...

Page 26: ...duct Each OSDI zone is set up with coordinates and a descriptive name OSDI zones are set up under PTZ OSDI Zones The Axis product uses the coordinates of the center of the view to set the lower left and upper right zone areas First navigate to where you would like the lowermost left point of the OSDI zone to be located Click Get to set the coordinates Proceed to where the upper right point of zone...

Page 27: ...s appear in the Live View page offering one viewer exclusive control for a limited period of time Other users will be placed in queue A user who belongs to a group see Users on page 37 with a higher PTZ priority can go before other users in the queue and take control of the product The order of priority is as follows 1 Administrator An administrator takes over PTZ control regardless of who is firs...

Page 28: ...tected Possible actions include uploading images and start recording For more information see Setting Up an Action Rule on page 32 Note Using the motion detection feature may decrease the product s overall performance Set Up Motion Detection Windows To set up a motion detection Include Window follow these instructions 1 Go to Detectors Motion Detection 2 Select the Configure Included Windows optio...

Page 29: ... 50 A large difference in luminance is required to trigger motion detection Low level 0 Even very small objects trigger motion detection An object that appears in the window triggers motion detection only for a very short time before it is considered as non moving Only very bright objects on a dark background trigger motion detection Recommended values 5 15 60 90 75 95 Default values 15 90 90 Note...

Page 30: ...he License menu option If the product is connected to the Internet Automatic Installation appears in the web page If the product is not connected to the Internet go to www axis com applications to acquire a License key You will need a license code and the product s serial number found on the label and under System Options Support System Overview to receive a license key Installed Applications list...

Page 31: ...o the SD card Input Signal Manual Trigger trigger the rule using the Manual Trigger button in the Live View page see Controls on the Live View Page on page 8 This can for example be used to validate actions during product installation and configuration PTZ Autotracking trigger the rule when autotracking starts or stops see Autotracking on page 23 Moving trigger the rule when the camera view moves ...

Page 32: ...es and click Convert NOTICE This is not recommended when using a VMS based on the old Event Management System Setting Up an Action Rule An action rule defines the conditions that must be met for the product to perform an action for example record video or send email notifications If multiple conditions are defined all must be met to trigger the action The following example describes how to set up ...

Page 33: ...pient Use with action Email Send Images Send Notification FTP Send Images HTTP Send Images Send Notification Network Share Send Images TCP Send Notification Note A network share can also be used as a storage device for recorded video Go to System Options Storage to configure a network share before setting up a continuous recording or an action rule to record video See Storage on page 43 for more i...

Page 34: ... every 5 minutes or every hour To set up a recurrence 1 Go to Events Recurrences and click Add 2 Enter a descriptive name and recurrence pattern 3 Click OK To use the recurrence in an Action Rule first select Time from the Trigger drop down list in the Action Rule Setup page and then select the recurrence from the second drop down list To modify or remove recurrences select the recurrence in the R...

Page 35: ...click Download The downloaded file is a zip file containing a minimum of three files of which the Matroska mkv files are the actual recordings The recordings are time stamped with the date and time they were downloaded that is not the date the recordings were made Note To play recordings in Windows Media Player AXIS Matroska File Splitter must be installed AXIS Matroska File Splitter can be downlo...

Page 36: ... a recording is ongoing the recording will be stopped and saved in the recording list and a new recording with the new stream profile will start All previous continuous recordings will remain in the recording list until they are removed manually or through automatic removal of old recordings 36 ...

Page 37: ...dvantage of the possibilities offered by network video technology ONVIF enables interoperablity between different vendor products increased flexibility reduced cost and future proof systems By creating a user you automatically enable ONVIF communication Use the user name and password with all ONVIF communication with the product For more information see www onvif org IP Address Filter IP address f...

Page 38: ...icate The CA certificate is used to validate the identity of the authentication server Enter the path to the certificate directly or locate the file using the Browse button Then click Upload To remove a certificate click Remove Client certificate Client private key The client certificate and private key are used to authenticate the network device They can be uploaded as separate files or in one co...

Page 39: ... reset the product to the factory default settings see page 46 and then perform the installation again To use a static IP address check Use the following IP address and specify the IP address subnet mask and default router IPv6 Address Configuration If IPv6 IP version 6 is enabled the Axis product will receive an IP address according to the configuration in the network router To enable IPv6 go to ...

Page 40: ...rver is the host name in the fully qualified domain name myserver mycompany com where mycompany com is the domain name Primary Secondary DNS server Enter the IP addresses of the primary and secondary DNS servers The secondary DNS server is optional and will be used if the primary is unavailable NTP Configuration NTP Network Time Protocol is used to synchronize the clock times of devices in a netwo...

Page 41: ...wall but the essential purpose of the device is the same Enable Disable When enabled the Axis product attempts to configure port mapping in a NAT router on your network using UPnPTM Note that UPnPTM must be enabled in the product see System Options Network UPnP Use manually selected NAT router Select this option to manually select a NAT router and enter the IP address for the router in the field I...

Page 42: ... SMTP email Enter the host names or IP addresses and port numbers for the primary and secondary mail servers in the fields provided A From email address is also required If the mail server requires authentication check Use authentication to log in to this server and enter the necessary information SNMP The Simple Network Management Protocol SNMP allows remote management of network devices An SNMP ...

Page 43: ...rt for Bonjour Bonjour is enabled by default and the product is automatically detected by operating systems and clients that support this protocol Bonjour can be disabled under System Options Network Bonjour Storage SD Card NOTICE To prevent corruption of recordings the SD card should always be unmounted before it is ejected The Axis product supports SD cards with the following file systems ext4 r...

Page 44: ...e 1 Go to System Options Storage 2 Click Network Share 3 Enter the IP address DNS or Bonjour name to the host server in the Host field 4 Enter the name of the share in the Share field 5 If required select The share requires login and enter the user name and password 6 Click Connect To clear all recordings and data from the Axis product s folder on the designated share click Clear under Storage Too...

Page 45: ...provide a valid Server Report with your query System Log Provides information about system events Access Log Lists all failed attempts to access the product The Access Log can also be configured to list all connections to the product see below Server Report Provides information about the product status in a pop up window The Access Log is automatically included in the Server Report Parameter List ...

Page 46: ...e of Axis product configuration Most parameters can be set and modified from this page Help is available from the standard help pages To open Plain Config go to System Options Advanced Plain Config Reset to Factory Default Settings This will reset all parameters including the IP address to the factory default settings 1 Press and hold the Control button and the Power button for about 15 seconds un...

Page 47: ...xis website at www axis com techsup 2 Go to Setup System Options Maintenance in the products web pages 3 Under Upgrade Server click Browse and locate the file on your computer Click Upgrade After starting the upgrade process always wait at least 5 10 minutes before restarting the product even if you suspect the upgrade has failed AXIS Camera Management can be used for multiple upgrades See www axi...

Page 48: ...ddress intended for the product and the IP address of the computer used to access the product are located on different subnets you will not be able to set the IP address Contact your network administrator to obtain an IP address The IP address is being used by another device Disconnect the Axis product from the network Run the Ping command in a Command DOS window type ping and the IP address of th...

Page 49: ... enabled in the AMC Control Panel streaming tab See AXIS Media Control AMC on page 11 In the AMC Control Panel select the H 264 tab and click Set to default H 264 decoder Check that RTSP is enabled under System Options Network TCP IP Advanced No multicast H 264 displayed in the client Check with your network administrator that the multicast addresses used by the Axis product are valid for your net...

Page 50: ...dark or too light Check the video stream and camera settings under Setup Video Video Stream and Setup Video Camera Settings Missing images in uploads This can occur when trying to use a larger image buffer than is actually available Try lowering the frame rate or the upload period Slow image update Configuring pre buffers motion detection high resolution images or high frame rates will affect the ...

Page 51: ...ting to avoid problems with luminance Storage and disk management problems Video cannot be recorded Check that the SD card is not write protected that is read only SD card cannot be mounted Reformat the SD card and then click Mount Condensation in dome Blurred image Activate fan and heater to remove possible moisture from dome Focus zoom and fan Remote focus and zoom do not work In subzero tempera...

Page 52: ...me rate Motion JPEG Up to 30 25 fps 60 50 Hz in all resolutions Video streaming Multiple individually configurable streams in H 264 and Motion JPEG Controllable frame rate and bandwidth VBR CBR H 264 Video Image settings Wide Dynamic Range WDR Electronic Image Stabilization EIS manual shutter time compression color brightness sharpness white balance exposure control exposure zones backlight compen...

Page 53: ...s and browsers see www axis com techsup System Integration Management and maintenance AXIS Camera Management tool on CD and web based configuration Configuration of backup and restore Firmware upgrades over HTTP or FTP firmware available on www axis com Casing IP66 and NEMA 4X rated metal casing aluminum acrylic PMMA clear dome sunshield PC ASA Memory 256 MB RAM 128 MB Flash Battery backed up real...

Page 54: ... Performance Considerations When settings up your system it is important to consider how various settings and situations will affect performance Some factors affect the amount of bandwidth the bit rate required others can affect the frame rate and some affect both If the load on the CPU reaches its maximum this will also affect the frame rate The following factors are among the most important to c...

Page 55: ...User Manual Ver M1 9 AXIS Q6032 E PTZ Dome Network Camera Date June 2012 Axis Communications AB 2009 2012 Part No 46628 ...

Reviews: