background image


AXIS 240


User’s Manual

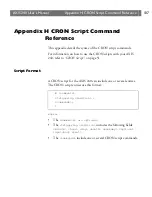
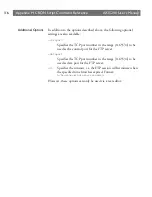
Appendix H: CRON Script Command Reference


113


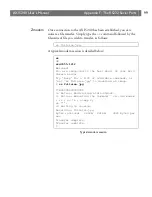
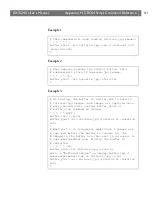
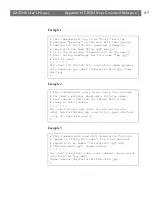
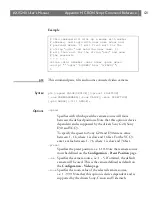
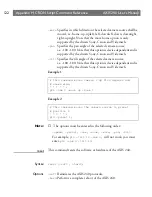
Example

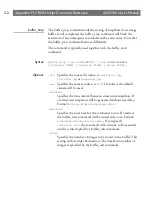
# This command initiates the buffer to hold 60

# halfsize.jpg and 5 hugesize.jpg images. New images

# are captured until the buffer_start command is

# interrupted.

* * * * * BOOT :

buffer_init 1,1,60:1,3,5;

buffer_start -src halfsize.jpg -interval s1 -duration 

inf;

buffer_start -src hugesize.jpg -interval m1 -duration 

inf;

%

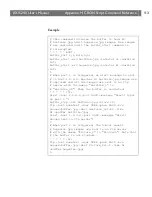
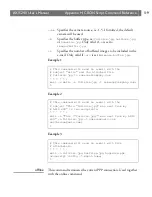
# When port 1 is triggered, an alert message is sent

# to host 1.2.3.4. Another 10 halfsize.jpg images are

# captured and all the images are sent to an ftp

# server with the names "Halfsize_1" to

# "Halfsize_60". Then the buffer is restarted.

* * * * * /I1:

alert -host 1.2.3.4 -port 4000 -message "Alert! Input 

on port 1.";

buffer_stop -src halfsize.jpg -store 10;

ftp -host somehost -user USER -pass PASS -src 

images/buffer.jpg -dest Halfsize_$r1-60 -time

h1 -buffer halfsize.jpg;

alert -host 1.2.3.4 -port 4000 -message "Alert! 

Images sent to ftp server";

%

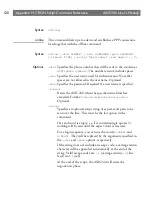
# When port 2 is triggered, the 5 most recent

# hugesize.jpg images are sent to an ftp server

# with the names "Picture_1" to "Picture5". Note that

# the buffer is not stopped.

* * * * * /I2:

ftp -host somehost -user USER -pass PASS -src 

images/buffer.jpg -dest Picture_$r1-5 -time h1

-buffer hugesize.jpg;

Summary of Contents for AXIS 240

Page 1: ......

Page 2: ...AXIS 240 User s Manual AXIS 240 Network Camera Server User s Manual ...

Page 3: ...pment fulfils the requirements for radiated emission according to limit B of EN55022 1994 and the requirements for immunity according to EN50082 1 1992 residential commercial and light industry Compliance is not valid for unshielded network and printer cables Liability Every care has been taken in the preparation of this manual if you detect any inaccuracies or omissions please inform us at an add...

Page 4: ...e fastest growing companies in the market and is now a leader in its field ThinServer Technology Being the core of all Axis products the ThinServer technology enables them to act as intelligent file server independent ThinServer devices A ThinServer device is a network server which includes thin embedded server software capable of simultaneous multiprotocol communication scalable RISC hardware and...

Page 5: ... enabling access to live cameras via any standard Web browser They offer a perfect solution for remote surveillance over the Internet and their sharp images can bring life into any web site These servers support Ethernet as well as PSTN and GSM phone lines Network Scan Servers enable easy distribution of paper based information across workgroups and the enterprise By sending the scanned documents ...

Page 6: ...signing an IP Address 16 Stage 6 Verifying the Installation 16 Section 3 Assigning an IP Address 19 Downloading the IP Address 19 Section 4 Configuring the AXIS 240 29 Configuring using a Web browser 30 Configuring using FTP 38 Section 5 Using the AXIS 240 41 Snapshots 42 Automatic Picture Updates 45 Pan Tilt Control 49 External Web Sites 50 CRON Script 51 Common Gateway Interface CGI parameters 5...

Page 7: ...s 83 Appendix E The Auxiliary IO Port 87 Physical Connection 87 Controlling and Monitoring 88 Appendix F The RS232 Serial Ports 91 Physical Connector 91 Setting Up the AXIS 240 Modem Server 92 Setting Up the AXIS 240 for Pan Tilt Connection 100 Appendix G Camera Applications 105 Application Examples 106 Appendix H CRON Script Command Reference 107 Script Format 107 Commands 108 ...

Page 8: ...ote monitoring Images can be captured and distributed over the local network or Internet using a standard Web browser Traditional surveillance systems often limit camera access to a specific monitor i e the control room However the AXIS 240 can be used for both industrial and security operations over a secure intranet system or allow open access via the Internet This means that you can monitor ope...

Page 9: ...so supports FTP so that snapshots can be taken and saved remotely Standard Image Format The AXIS 240 generates high quality pictures in standard JPEG format which can be viewed using a standard Web browser Fast JPEG Compression The AXIS 240 provides JPEG images directly without the need for manual conversion between image formats Its RISC based hardware results in fast JPEG compression A fullsize ...

Page 10: ... a self contained web server This means that the camera server is secured like any other Internet host The Network Administrator can decide whether individuals groups the whole company or the whole world may access your camera server Normally this is done in the company s Internet firewall Web Forum Discussions Axis Communications will be running a web forum for ideas and suggestion notes for poss...

Page 11: ...Introduction AXIS 240 User s Manual 10 ...

Page 12: ...ators and details the installation procedures Installation Summary You install the AXIS 240 in these stages Stage 1 Unpacking and Checking the Hardware Stage 2 Identifying the Connectors and Indicators Stage 3 Connecting the AXIS 240 to your Cameras Stage 4 Connecting the AXIS 240 to your Network Stage 5 Assigning an IP Address Stage 6 Verifying the Installation ...

Page 13: ...dures for Windows The AXIS Online CD will autostart from a local CD drive on Windows 95 98 and NT platforms Windows 3 1 users are required to navigate to the CD root directory and click on the setup31 exe file from within the Windows File Manager Startup Procedures for Macintosh UNIX and OS 2 Navigate to the CD root directory and click on the start pdf file from within your preferred file manager ...

Page 14: ...of the AXIS Online CD by clicking the HTML button from within the main installation dialog This interface allows Network Administrators to distribute the CD contents over intranet networks by simply broadcasting a URL reference Stage 2 Identifying the Connectors and Indicators Read the following information to familiarize yourself with the AXIS 240 making particular note of where the connectors an...

Page 15: ...the picture quality might be reduced I O A Mini DIN 8 pole external connector with four inputs for auxiliary connection to the AXIS 240 The functionality of this connector is fully discussed in Appendix E The Auxiliary IO Port Pan Tilt Modem Two 9 pin D sub connectors provides RS232 serial connections normally to a Pan Tilt device and a modem The connectors are discussed in detail in Appendix F Th...

Page 16: ... the appropriate sections of the manual Serial Number The serial number is located on the underside label of the AXIS 240 Please note that the serial number of your AXIS 240 is identical to the Ethernet address of the unit Stage 3 Connecting the AXIS 240 to your Cameras Connect the cameras to the AXIS 240 using the appropriate cables connectors The AXIS 240 can service up to 4 coax BNC cameras and...

Page 17: ... 2 Connect the power supply to the AXIS 240 3 Check that the Power indicator is constantly lit Stage 5 Assigning an IP Address To access the AXIS 240 from a Web browser you must first assign and download a valid IP address Refer to Section 3 Assigning an IP Address on how to do this Stage 6 Verifying the Installation After assigning a valid IP address you are now ready to test the connection betwe...

Page 18: ... ports are enabled by default Click on the Settings link and then the Video button to display the Configuration Video page Select thedefaultcamera anddisabletheunusedcameraports 3 If you are using aPan Tilt device you must configure the AXIS 240 according to thedescription inAppendixF SettingUp the AXIS240 for Pan Tilt Connection http camserv http 172 16 253 80 ...

Page 19: ...the Server push page The automatic updating functions are described in Automatic Picture Updates on page 45 7 If you have attached several cameras to your AXIS 240 click the Pan Tilt Control link to display snapshots from all the cameras Click on one of the images to the left to display it in the main window If a camera is combined with a Pan Tilt device you can adjust its orientation using the co...

Page 20: ... and OS 2 It requires the IP address for each new device to be downloaded individually It is not appropriate to use this method over routers RARP RARP is available in UNIX It downloads the IP address to each device automatically It requires a RARP daemon on your system and operates within a single network segment only BOOTP BOOTP is available in UNIX and is similar to RARP although it can operate ...

Page 21: ...found on the underside label of the unit Important Do not use the default or example IP address when installing your AXIS 240 Always consult your Network Administrator before assigning an IP address Mapping a Host Name to the IP Address If you are using host names you can map a unique host name to the acquired IP address Refer to your system manuals or to your Network Administrator for intructions...

Page 22: ...twork environments See AXIS IP Installer Windows 95 98 Windows NT Using the AXIS IP Installer on page 22 ARP Windows 95 Using ARP in Windows 95 on page 23 Windows 98 Windows NT Using ARP in Windows 98 and Windows NT on page 24 UNIX OS 2 Using ARP in UNIX and OS 2 on page 25 RARP UNIX Using RARP in UNIX on page 26 BOOTP UNIX Using BOOTP in UNIX on page 27 ...

Page 23: ...ollow the instructions as they appear on the screen 4 Click Finish to complete the setup 5 Run the AXIS IP Installer from the Start menu The AXIS IP Installer dialog is displayed on the screen 6 Restart your camera server 7 Select the serial number of your camera server in the list The serial number is identical to the Ethernet address of the unit 8 Enter the desired IP address Click Set IP addres...

Page 24: ... The host will return Reply from 172 16 253 80 or some similar message This indicates that the address has been set and the communication is established Note When you execute the ping command for the first time you will experience a significantly longer response time than usual arp s IP address Ethernet address my PC IP address ping IP address arp s 192 16 253 80 00 40 8c 10 00 86 171 16 6 40 ping...

Page 25: ...ing command 2 Ping the unit as follows Example The host will return Reply from 192 168 3 191 or some similar message This indicates that the address has been set and the communication is established Note When you execute the ping command for the first time you will experience a significantly longer response time than usual arp s IP address Ethernet address ping IP address arp s 192 168 3 191 00 40...

Page 26: ... communication is established Notes Please note that when you execute the ping command for the first time you may experience a significantly longer response time than is usual The arp s command may vary from system to system Some BSD type systems expect the host name and Ethernet address in reverse order whereas IBM AIX systems require the additional argument ether For example arp s host name Ethe...

Page 27: ...table This is typically performed using the command etc ethers Example 2 If necessary update your host table and alias name databases as described required by your system 3 If it is not already running startthe RARP daemon Thisis typically done using the command rarpd a 4 Restart the AXIS 240 to download the IP address Ethernet address host name 00 40 8c 10 00 86 camserv ...

Page 28: ...If it is not already running start the BOOTP daemon This is typically done using the command bootpd 4 Restart the AXIS 240 to download the IP address default router address and subnet mask host name ht hardware type vm vendor magic ha hardware address ip IP address sm subnet mask gw gateway field ht ether vm rfc1048 ha The Ethernet address of the AXIS 240 ip The IP address of the AXIS 240 sm The s...

Page 29: ...Assigning an IP Address AXIS 240 User s Manual 28 ...

Page 30: ...an configure the AXIS 240 via hyperlinks from within its own web pages from any standard Web browser Alternatively you can configure the AXIS 240 using FTP Refer to Appendix B The Parameter List for a full listing of the configuration parameters Note For the latest technical information access the AXIS 240 web site at http www axis com products cam_240 ...

Page 31: ...e Settings link to reach the Configuration pages The configuration parameters are grouped into these pages Image Date Time Security TCP IP Modem Video Pan Tilt Preset Position Viewing Angle Note When configuring the AXIS 240 for the first time log on as user root and use the default password pass You are recommended to change the root password since all Axis products are shipped with the same pass...

Page 32: ...tion Image Page You will find more information on the CGI parameters on page 59 Parameter name Description Rotation Presents snapshots with a varied degree of rotation normal upsidedown 90 deg or 270 deg Mirror With Mirror set to on your snapshot images will be mirrored horizontally Color With Color set to none the AXIS 240 generates a black and white snapshot image Compression Determines the comp...

Page 33: ...The date server provides the actual time and date when connected at TCP port 13 Daytime protocol TCP port 37 Time protocol or UDP port 123 NTP protocol respectively The date and time will be automatically updated in intervals as specified by the synchronization period Default values are 0 0 0 0 0 Time and 0 respectively Display Date Time When set to yes a date and time stamp will be superimposed u...

Page 34: ...u wish to restrict access to specific users enter the user names and passwords of only those authorized users If the anonymous user service is satisfactory to your system simply do not add any users Note Only characters a z A Z and 0 9 are valid Parameter name Description IP Address Defines the IP address of the AXIS 240 Default Router Defines the default router for the AXIS 240 By default the par...

Page 35: ...em access is not allowed When set to Full Support serial mode is enabled for both incoming and outgoing modem connection When set to Inbound only the AXIS 240 answers incoming calls but does not dial up When set to Outbound only the AXIS 240 dials up according to the behavior programmed in a CRON script but does not answer incoming calls Settings Modem Type Specifies the modem type Autodetected Mo...

Page 36: ...op of the Configuration page Parameter name Description Default Port Defines the port for the default camera The default camera is used e g for taking the snapshots displayed on the AXIS 240 Home Page CAM n Port Enables the camera port on camera n Image Text Position x y Optionally specify a descriptive text to appear on the snapshots Specify where the text should be placed on the snapshot Detect ...

Page 37: ...pecify an address 1 255 For each camera you should also define the Special Videmech Settings e g SafeMode soft stops for end positions zoom and focus etc Ernitec It is possible to connect up to five Ernitec units to the AXIS 240 if connected via an RS485 adapter For each camera that you intend to use enable Pan Tilt and specify an address 1 255 Pelco Digital Coaxitron t is possible to connect up t...

Page 38: ... positions can be used from the Pan Tilt Control page for directing a camera to a predefined position New Name Name for the selected position Source The camera input source Note that the camera must be connected to a Pan Tilt device Pan Tilt The desired pan and tilt value in degrees relative to the home position The valid range depends on the connected Pan Tilt device Zoom The desired zoom value i...

Page 39: ...TP 1 In a DOS or UNIX window type ftp camserv where camserv is the name or IP address of your AXIS 240 2 Login using the user root and the root password Default password is pass You are highly recommended to change the root password since all Axis products are shipped with this password as default 3 Windows 95 only Change directory not to overwrite any of your system files See the caution note bel...

Page 40: ...e stored temporarily until the next time the product is powered off 7 To exit FTP type the command quit bye or exit Caution Windows 95 has a directory called config that contains important system files It is therefore important to change to another directory using the cd command before modifying your AXIS 240 configuration file from within a Windows 95 environment Failure to do this may result in ...

Page 41: ...Configuring the AXIS 240 AXIS 240 User s Manual 40 ...

Page 42: ...he Server push Java image feed and Refresh image feed functions Pan Tilt control Adjusting the camera orientation via the Web browser interface External web sites Using snapshot files on the Internet CRON script Triggering the AXIS 240 by time or input events CGI parameters Defining special snapshot features and input output operations within embedded URL requests Point to Point Protocol PPP Acces...

Page 43: ... within the AXIS 240 Home Page Clean Snapshots To generate clean snapshots that are not embedded within the AXIS 240 Home Page you must specify the preferred snapshot type for the target JPEG file within the URL of your Web browser You can create snapshots in different file sizes e g fullsize halfsize etc Examples Camera Specified Snapshots From the Snapshots page it is possible to specify with wh...

Page 44: ... Size in pixels NTSC Description fullsize jpg 352 x 288 30 kBytes 320 x 240 The standard resolution Hardware generated in 0 5 seconds halfsize jpg 176 x 144 15 kBytes 160 x 112 Excellent for thumbnails Hardware generated in 0 3 seconds lastshot jpg 352 x 288 or 176 x 144 320 x 240 or 160 x 112 The last snapshot taken from any camera either as fullsize or halfsize snapshot Primarily intended for so...

Page 45: ...geMill 2 In your Web browser enter the URL that defines the name or IP address of your AXIS 240 and the snapshot type that you wish to create For example 3 Add anHTMLreferencetothe snapshotwithinthetargetwebpage as detailed below Each time anyone visits this page a new fullsize jpg snapshot will be generated and displayed in the Web browser http camserv fullsize jpg HTML HEAD TITLE Sample page TIT...

Page 46: ... adjust the frequency of the Server push snapshots within your Web browser In order to limit the memory overhead that this facility demands a maximum number of 5 clients can simultaneously activate a Server push link to the same camera Once this client threshold has been exceeded a single snapshot image is produced for all additional clients that are trying to activate the link Note The Server pus...

Page 47: ...TH and HEIGHT values specifies the size of the applet frame To fit the images exactly in the frame without resizing use these values frame width image width 10 pixels frame height image height 10 pixels To add a status bar to the image use these values frame height image height 40 pixels APPLET CODEBASE http www yoursite com classes CamImg CODE CamImg class WIDTH 362 HEIGHT 328 PARAM NAME Image VA...

Page 48: ...et CamCtrl that can be started from anywhere on the network The refresh rate is programmable Image Specifies a list of images to display Multiple file names must be separated by vertical bars Syntax PARAM NAME Image VALUE imgfile1 imgfile2 Default value fullsize jpg ImageLabel Specifies a label for each image Multiple labels must be separated by vertical bars Syntax PARAM NAME ImageLabel VALUE lab...

Page 49: ...pdating you can click Stop or enter another URL in the location address field Image Specifies a list of images to display Multiple file names must be separated by vertical bars Syntax PARAM NAME Image VALUE imgfile1 imgfile2 Default value fullsize jpg ImageLabel Specifies a label for each image Multiple labels must be separated by vertical bars Syntax PARAM NAME ImageLabel VALUE label1 label2 Defa...

Page 50: ...the desired position The indications on the position bars correspond to absolute camera positions This means that if you click on the left arrow the camera pans to its left view angle limits Click Home to move the camera to its home position which is defined by the Pan Tilt device Videmech Click on the position bars to move the camera to the desired position The position bars corresponds to absolu...

Page 51: ...rrent position If you wish to perform a more accurate adjustment of the camera position click inside the actual picture The further away you click from the center of the picture the further you move the camera position To adjust the camera zoom click Wide or Tele respectively Notes Optionally the Pan Tilt control page can be protected by a password On the AXIS 240 Home Page click Settings Pan Tilt...

Page 52: ... handle more than 5 simultaneous requests Generating large files such as the hugesize jpg is very time consuming If used with a CRON script the delay will not be noticed CRON Script Axis has developed an extended CRON service to facilitate periodic command execution within the AXIS 240 In practice the CRON service allows you to program event and or time triggered functions within the AXIS 240 Scri...

Page 53: ...art each new entry with a comment to describe its function Comments are optional but must be proceeded by a character as detailed below Example comment first entry trigger condition command 1 command 2 command n comment second entry trigger condition command 1 command 2 command n comment nth entry trigger condition command 1 command 2 command n comment This cron entry will ...

Page 54: ... each field within a trigger condition is governed by the following rules Each time and date field can contain several numerical event variables that are delimited by commas and hyphens Each field is delimited by an open space An asterisk represents the full range of event variables within the relative time and date field i e means every minute every hour every day every month every day of the wee...

Page 55: ... polls the input ports every 0 2 seconds Thus more rapid logical transitions will not be detected By combining the trigger variables using the logical AND function you can develop complex triggering mechanisms Example 1 Activate on Control button transition from high to low and Input port 1 high Trigger Variable Description BOOT Activate at startup B Activate after high low logical transition of C...

Page 56: ...Description Minute Hour Day Month Day of the Week Conditional Tag Valid values 0 59 0 23 1 31 1 12 0 6 0 Sunday BOOT B I1 I2 I3 I4 Command Description alert Sends a small message to a remote host buffer_init Initiates an image buffer buffer_start Stores snapshots in the image buffer buffer_stop Ends the storing of snapshots in the image buffer ftp Transfers an image to a remote host using FTP log ...

Page 57: ... AXIS 240 Alternatively you can use a standard text editor and download the CRON script file via FTP See Downloading the CRON Script via FTP on page 58 Notes If the camera number is not explicitly specified in a command the CRON script will apply to the camera defined as the default camera Only one CRON script can be resident within the AXIS 240 at a time Once a new script is installed the active ...

Page 58: ...site This the second entry will store a fullsize image using ftp on the ftp server an ftp site in home snapshots when input 1 goes high I1 ftp host an ftp site user aUser pass aPass src fullsize jpg dest home snapshots This the third entry will dial up an ISP and store an image on the ftp server an ftp site every hour It will then disconnect 0 online dial aNumber user aUser pass aPass ftp host an ...

Page 59: ...er complete or similar when the file transfer is complete The CRON script becomes active within one minute after it has been downloaded to the AXIS 240 Example FTP session downloading a CRON script C Temp ftp 171 16 3 30 Connected to 171 16 3 30 220 AXIS 240 Jun 6 1998 ready User 171 16 3 30 none root 331 User name ok need password Password 230 Root user logged in ftp bin 200 TYPE set to I ftp put...

Page 60: ...ions on the Pan Tilt port CGI Parameters for Snapshot Requests For snapshot requests use this syntax This table lists the CGI parameters for snapshot requests http cameraname imagefile cgi bin control parameter value parameter value Parameter Syntax Description Values camera n Selects the source for generating snapshots If omitted the default camera is used 1 2 3 4 5 compression value Adjusts the ...

Page 61: ...f pixels and truncated to multiples of 8 e g 45 is truncated to 40 Top height must not exceed the hugesize height i e 576 for PAL 480 for NTSC Left width must not exceed the hugesize width i e 704 for PAL 640 for NTSC move x Moves the Pan Tilt device 5 degrees in the specified direction up down left right home pan n Pans the Pan Tilt device n degrees relative to the home position 180 180 tilt n Ti...

Page 62: ...sts the CGI parameters for input output operations http camserv fullsize jpg clock on rotation 270deg http camserv hugesize jpg camera 2 compression high http camserv fullsize jpg camera 3 pan 45 http cameraname cgi bin control parameter value parameter value Parameter Syntax Description Values dataout string Writes the specified data string to the Pan Tilt serial port Maximum 128 bytes Hexadecima...

Page 63: ...formed first when combined with other parameters yes no http camserv cgi bin control dataout 430001FF http camserv cgi bin control flush yes dataout 2B004C4C4F wait 5 read 20 HTML HEAD TITLE HTTP Input Output Test Page TITLE HEAD BODY H2 HTTP Input Output Test Page H2 FORM ACTION http camserv cgi bin control method post Write hexadecimal byte string nbsp input type text size 20 maxsize 19 name dat...

Page 64: ...s for Preset Positions For preset position requests use this syntax It is also possible to use an index number instead of the preset position name Note It may take a few seconds for the camera to adjust itself to the new position but the snapshot is taken immediately Therefore you need to update the snapshot in the application after a while http cameraname imagefile cgi bin control presetposname p...

Page 65: ...an analog modem only operates at speeds up to 56 kbps PPP Setup for Windows 95 98 Follow these instructions to configure PPP from a Windows 95 98 host 1 Connect the remote modem to the serial port of the AXIS 240 US Robotics modem recommended 2 FromtheWindowsdesktop doubleclickontheMyComputericon and then open Dial Up Networking 3 Double click Make New Connection From within this dialog define a n...

Page 66: ...onnect The status dialogs Dialing and Logging onto the network are presented prior to the display of a Connected to name dialog that will confirm a successful connection You can now access the AXIS 240 by entering the IP address URL of your camera into the location field of your Web browser Please ensure that you are not using a proxy server Netscape Options menu Select Network Proxies PPP Setup f...

Page 67: ...cess will then fork off into the background A shell prompt will be returned immediately You may suppress this behavior by giving the switch detach 4 After approximately 20 seconds the connection should be ready for service You should then try pinging the AXIS 240 and make sure that it is online The ping response times should be similar to those below 5 Type the following to terminate the connectio...

Page 68: ...mmunication packages allow automatic download of snapshot files i e the program will detect the file transfer starting and then proceed to take care of it However should your communications package not support this you will need to manually select receive zmodem or similar from with the program The successfully transferred snapshot file is in JPEG compressed image format i e the downloaded file is...

Page 69: ...Section 5 Using the AXIS 240 AXIS 240 User s Manual 68 ...

Page 70: ... file records commands executed within the unit and can prove a useful diagnostic tool when attempting to resolve any problems that might occur If you cannot resolve your problem after referencing the information contained in this appendix or on the AXIS 240 FAQ we suggest that you send the following to the AXIS support desk A brief description of the problem The log file The config file If releva...

Page 71: ...ypical AXIS 240 Log File http camserv log messages Wed Nov 5 15 12 18 Info BOOT Wed Nov 5 15 12 36 Warning Modem failed to acknowledge hangup Wed Nov 5 15 12 48 Warning Modem not responding at 9600 BPS Wed Nov 5 15 12 56 Warning Modem failed to acknowledge hangup Wed Nov 5 15 13 01 Info Modem ready for incoming calls Wed Nov 5 15 13 16 Info SMTPC exec trying to connect to 193 13 178 2 Wed Nov 5 15...

Page 72: ... is available for use with your AXIS 240 The IP address is located within a different subnet In Windows 95 98 or Windows NT check that the IP address for your AXIS 240 is within the same subnet as your workstation 1 Click Start Settings Control Panel and Network 2 Specify the TCP IP adapter and click on Properties In Properties click IP Address 3 Check that the first 3 numbers within the IP addres...

Page 73: ...page 64 No image using Refresh and or Slow updating of snapshots using the Server push function Complex images i e those containing great picture contrasts have greater file size and thus place greater demand on the available file space within the AXIS 240 The memory constraints become significantly more acute if multiple clients try to access the same snapshot Try limiting the number of clients T...

Page 74: ...configured incor rectly Within Display Properties configure your display to show at least 65 000 colors i e at least 16 bit Using only 16 or 256 colors on your computer will produce dithering artifacts in the image Cannot access the modem connected to the serial port of the AXIS 240 Modem not set for RTS CTS Local echo not disabled 1 Ensure that the modem is set for RTS CTS serial communication Fo...

Page 75: ...Appendix A Troubleshooting AXIS 240 User s Manual 74 ...

Page 76: ...e AXIS 240 If empty all users have full access TCPIP MENU TCP_ENB YES Enables the TCP protocol INT_ADDR 0 0 0 0 The AXIS 240 IP address DEF_ROUT 0 0 0 0 All traffic directed outside the local network according to the NetMask is sent to the default router Any re routing via other routers is done automatically The default 0 0 0 0 indicates that no default router is set DNS1_ADDR 0 0 0 0 The IP addre...

Page 77: ...ate SERIAL_FLOW Modem server operation mode Set to Hardware RTS CTS MODEM_INIT String of commands to be sent to the modem for setup Used for non US Robotics modems BUSY_REDIAL The number of additional attempts the AXIS 240 will make in order to establish a connection in case the line is busy TCP_SERVPORT 0 The TCP port used together with the TCP driver TIME The current time DATE_SERVER 0 0 0 0 IP ...

Page 78: ...ge SECCODE 0 Enable password protection of the Pan Tilt control page Disabled by default SECPASS Password for the Pan Tilt control page PAREA Pan Tilt driver information Do not change IMGTEXTAREA Optional descriptive text to appear on the snapshot IMGTEXTPOSITION Position for text on the snapshot PREPOSAREA0 Preset camera position 1 PREPOSAREA1 Preset camera position 2 PREPOSAREA2 Preset camera po...

Page 79: ...second intervals 3 Release the Control button and wait at least two seconds one flash of the Active indicator 4 Press and hold the Control button for at least five seconds until the Active indicator remains constantly lit 5 If you need to restore the default IP address press and hold the Control button once again until the Active indicator starts flashing Otherwise the IP address setting will rema...

Page 80: ...starting with Support from within the AXIS 240 Home Page or enter http www axis com techsup cam_servers cam_240 within the URL of your Web browser Typically the software update file is called 240_x_xx exe where x_xx indicates the software version This self extracting archive file unpacks the associated data and text files upon execution It is recommended that you save this file in your root direct...

Page 81: ...on the AXIS 240 becomes unavailable over the network it may be necessary to reload the software through the parallel port Note Updating instructions are also supplied with the software update Upgrading using FTP Having obtained the upgrade software install it into the AXIS 240 by following the instructions below 1 Reset the AXIS 240 by powering it off and then on again 2 Start an FTP session and l...

Page 82: ...possible to download the software using FTP Therefore you are strongly advised to talk with your local distributor prior to commencing with the procedures defined below 1 Disconnect the power supply and the other external connectors 2 Remove the four screws securing the top cover of the enclosure 3 Remove the top cover 4 Connect the parallel cable between the PC LPT1 port of your workstation and t...

Page 83: ...Appendix C Updating the Software AXIS 240 User s Manual 82 ...

Page 84: ...c Chimera Protocols HTTP FTP TCP IP ARP RARP BOOTP SMTP PPP and ICMP Installation Assign an IP address using ARP RARP or BOOTP Connect to Ethernet or a modem for remote application Network Management Configuration and status via standard Web browser or FTP Software Updates Flash memory allows central and remote software updates over the network using FTP over TCP IP All software upgrades are free ...

Page 85: ...or JPEG file is updated in 0 7 seconds Using the server push function up to 6 frames second can be transmitted Network Connector 10baseT RJ 45 twisted pair Ethernet Hardware CPU 32 bit RISC processor ETRAX Flash PROM 2 0 Mbyte RAM 8 Mbytes Auxiliary Input Output A Mini DIN 8 pole external connector is provided for auxiliary connections to the AXIS 240 The functionality of this connector is fully d...

Page 86: ...s A CE EN 55022 1987 EN50082 1 1992 Safety EN 60950 UL CSA Size Height 1 5 in 4 0 cm Length 5 7 in 14 5 cm Width 7 7 in 19 5 cm Weight 1 0 lb 0 5 kg excluding power supply Power Supply 12V AC 9 6 VA via external power supply PS D Alternative power input on PS D connector 11 18V DC min 600 mA 10 15 V AC min 7 VA Does not use the same GND as the video inputs chassis etc Alternative power input on AL...

Page 87: ...Appendix D Technical Specifications AXIS 240 User s Manual 86 Dimensions ...

Page 88: ...agram for the auxiliary IO connector and a pinout table are detailed below Caution GND on the IO connector is not connected directly to the power connector Always use two independent power sources Connecting GND to the power connector will permanently damage your AXIS 240 Note The inputs are connected between the input pin and GND and must be potential free switches i e push button switches or rel...

Page 89: ...ly a username and password Login as root and supply the root password default pass Once access is granted the following files are displayed Relay Output You can use the relay output to drive directly a maximum load of 24V AC DC at 100mA By connecting additional relay circuitry you can also use this output to drive heavier loads You can drive the relay off and on simply by clicking relayoff txt or ...

Page 90: ...ation for each of the digital inputs is presented within a text string The status of the inputs can be read by clicking on the input txt link in the IO file URL The string will amongst other things define the time and duration of the last trigger event for each input input 1 current 0 last 1 pulse 2 time_of_change 12 22 input 2 current 1 last 0 pulse 6 time_of_change 14 43 input 3 current 0 last 1...

Page 91: ...how this connector is best utilized Naturally we would be more than pleased to learn of any interesting applications that you might develop String Description input Input reference Input 1 pin 6 Input 2 pin 7 Input 3 pin 4 Input 4 pin 5 current Current port status Logical high 1 Logical low 0 last Result of previous read operation pulse The number of logical one to zero transi tions on the I O pin...

Page 92: ...32 serial interface It provides instructions on how to set up a modem connection install a Pan Tilt device and configure the AXIS 240 for Pan Tilt control Physical Connector Pin Assignment A diagram of an RS232 connector and the AXIS 240 pin assignment table are detailed below Caution GND on the serial port is not connected directly to the power connector Always use two independent power sources C...

Page 93: ...ing standard modem equipment Configuration of the serial port for modem connection RTS CTS The AXIS 240 modem server utilizes hardware RTS CTS handshaking In this mode of operation a straight through RS232 cable is all that is required for connecting the modems to both the computer and the AXIS 240 Wiring This is the common wiring schedule for RS232 cables supplied with most of today s popular mod...

Page 94: ...must be configured correctly Follow these instructions to configure a US Robotics 28k8 modem 1 Connect the modem to your terminal 2 Check that the modem is responding by issuing the at command 3 Continue your configuration in accordance with the session detailed below user commands are written in bold text 4 To make sure that your modem reloads the established settings on each occasion it powers u...

Page 95: ...to those previously saved If it is your modem is now ready to be connected to the AXIS 240 Notes The above session was performed on a US Robotics modem Please be aware that the required settings for other types of modems may differ from those defined above Axis are currently checking the compatibility of the AXIS 240 with other popular modem types and will release configuration details for these s...

Page 96: ...SE ON HOOK A1 B1 C1 D2 H2 I0 K1 M4 N0 R1 S0 T5 U0 Y1 S00 000 S01 000 S02 043 S03 013 S04 010 S05 008 S06 002 S07 059 S08 002 S09 006 S10 007 S11 070 S12 050 S13 000 S14 000 S15 000 S16 000 S17 000 S18 000 S19 000 S20 000 S21 010 S22 017 S23 019 S24 000 S25 005 S26 000 S27 001 S28 008 S29 020 S30 000 S31 000 S32 000 S33 000 S34 000 S35 000 S36 000 S37 000 S38 000 S39 000 S40 000 S41 000 S42 000 S43...

Page 97: ...and then power up the AXIS 240 The new settings will now take effect Control Button For remote installations that are not directly connected to a LAN you can alternatively configure the AXIS 240 for serial mode operation as follows 1 Restart the AXIS 240 by removing and then re inserting the power connector 2 Wait 10 seconds 3 Press and hold the Control button until the Active indicator flashes 4 ...

Page 98: ... by setting the SERIAL_MODE parameter to FULL_SUPPORT 6 Start a new FTP session 7 When you are logged in issue the command put config to download the edited file to the AXIS 240 8 Log out again Dialing the Server You will reach the AXIS 240 modem server by dialing ATDTnnnnnn where nnnnnn is the modem phone number e g ATDT555 1212 The AXIS 240 will then answer the call and establish the connection ...

Page 99: ...user The Su username command is used to become another user e g Su root will if you supply the correct password when prompted for it give you root access and enable use of the Reset and SetDate commands Help Display help text Date Get current date and time SetDate Set current date and time Version Print current software version Su Become super user or another user Login Become a specific user Sz S...

Page 100: ...tailed below Typical zmodem session sz fullsize jpg at OK atdt555 1212 Welcome You are connected to the host shell of your AXIS Camera Server Try help for a list of available commands or just sz fullsize jpg to download an image sz fullsize jpg B00000000000000 Notice Redirecting stdin stdout Notice Executing the command cd dl modem rz xv sleep 2 rm rz waiting to receive Receiving fullsize jpg Byte...

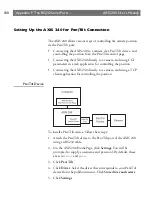
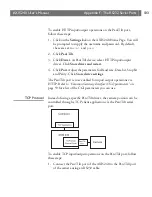
Page 101: ...plication for controlling the position Connecting the AXIS 240 directly to a camera and using a TCP client application for controlling the position Pan Tilt Device To install a Pan Tilt device follow these steps 1 Attach the Pan Tilt device to the Pan Tilt port of the AXIS 240 using an RS232 cable 2 On the AXIS 240 Home Page click Settings You will be prompted to supply a username and password By ...

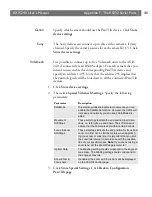
Page 102: ...k to Configuration Pan Tilt page Parameter Description SafeMode To avoid any undesired camera movements you can enable the SafeMode function However the traffic will increase and normally you can keep SafeMode dis abled Movement SoftStops These soft stops indicate the end position in all direc tions i e left right up and down The soft stops will assure that the camera is kept within certain bounds...

Page 103: ...ly Pelco Digital Coaxitron It is possible to connect up to five Pelco Digital Coaxitron units to the AXIS 240 if connected via an RS485 adapter For each camera that you intend to use enable Pan Tilt and specify an address 1 255 Click Store device settings 1 Click Port If required adjust the parameters for Baud rate Data bit Stop bit and Parity for the Pan Tilt port Click Store port settings 2 Clic...

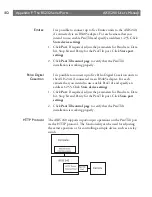
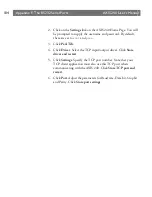
Page 104: ...lick Port Adjust the parameters for Baud rate Data bit Stop bit and Parity Click Store device settings The Pan Tilt port is now enabled for input output operations via HTTP Refer to Common Gateway Interface CGI parameters on page 59 for a list of the CGI parameters you can use TCP Protocol Instead of using a specific Pan Tilt driver the camera position can be controlled through a TCP client applic...

Page 105: ...to root and pass 3 Click Pan Tilt 4 Click Driver Select the TCP input output driver Click Store driver and restart 5 Click Settings Specify the TCP port number Note that your TCP client application must also use this TCP port when communicating with the AXIS 240 Click Store TCP port and restart 6 Click Port Adjust the parameters for Baud rate Data bit Stop bit and Parity Click Store port settings ...

Page 106: ...eed from any workstation of your choosing that supports a Web browser Just think no more late trips to the factory to investigate problems The only real limitation for the number of applications to which the AXIS 240 can be suited is your fantasy Some of the more obvious application ideas are Visual security systems Monitoring and surveillance of medical equipment Monitoring the production flow in...

Page 107: ... axis com neteye rm_demo front_doors html Child monitoring system for daycare centers and preschools http www kindercam com Construction pictures from the Riverview Wastewater treatment plant project http www pirnie com pws riverview cfm Traffic monitoring in New York City http www mte com webcam Note Axis is not responsible for maintaning the web sites listed above However you will find links to ...

Page 108: ...ipts with your AXIS 240 refer to CRON Script on page 51 Script Format A CRON script for the AXIS 240 can include one or several entries The CRON script entries use this format where The comments are optional The triggering condition includes the following fields minute hour day month weekday optional input boot event The commands include one or several CRON script commands comments triggering cond...

Page 109: ... Hexadecimal coded messages must be preceded by 0x e g 0x04 for the non printed character EOT To include a quotation mark it must be preceded by a backslash e g Example buffer_init The buffer_init command initiates or clears the image buffers This is needed in order to store images using the buffer_start and buffer_stop commands Syntax buffer_init CAMERANUMBER IMAGE SIZE CAMERANUMBER IMAGE SIZE Op...

Page 110: ...initiate several buffers you can stack multiple statements separated by colon Example 1 Example 2 buffer_start The buffer_start command stores snapshots in a specific image buffer Before the command can be used the buffer facility must be initiated using the buffer_init command 1 halfsize jpg 2 fullsize jpg 3 hugesize jpg At startup this command will initiate one buffer for camera 1 with 25 fullsi...

Page 111: ...ted the default camera will be used interval Specifies the time interval between consecutive snapshots If omitted new snapshots will be generated without any delay Format h hours m minutes s seconds duration Specifies the total time for the command to run If omitted the buffer_start command will be issued only once Format h hours m minutes s seconds If you specify duration inf the command will con...

Page 112: ... 15 fullsize jpg images New images are captured once every second until another buffer_start or buffer_stop command is issued BOOT buffer_init 1 2 15 buffer_start src fullsize jpg interval s1 duration inf When port 1 is triggered additional 5 images are captured before the buffer is locked All the images in the buffer are then sent in an e mail to someuser somehost com Finally the buffer is restar...

Page 113: ...lfsize jpg fullsize jpg or hugesize jpg cam Specifies the camera source i e 1 5 If omitted the default camera will be used interval Specifies the time interval between consecutive snapshots If omitted new snapshots will be generated without any delay Format h hours m minutes s seconds duration Specifies the total time for the command to run If omitted the buffer_start command will be issued only o...

Page 114: ...captured and all the images are sent to an ftp server with the names Halfsize_1 to Halfsize_60 Then the buffer is restarted I1 alert host 1 2 3 4 port 4000 message Alert Input on port 1 buffer_stop src halfsize jpg store 10 ftp host somehost user USER pass PASS src images buffer jpg dest Halfsize_ r1 60 time h1 buffer halfsize jpg alert host 1 2 3 4 port 4000 message Alert Images sent to ftp serve...

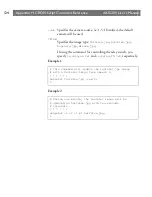
Page 115: ...e for logging on to the remote host If no user name is specified the compiler will complain pass Specifies the password for logging on to the remote host src Specifies the source file name If omitted the fullsize jpg file will be sent To include the image buffer specify images buffer jpg dest Specifies the name and whole path of the destination file If omitted the destination file name will be the...

Page 116: ...ion file only temp Specifies a temporary name for the destination This is to prevent someone else from accidentally reading the file during the download loop Specifies the time interval within which the command should be repeated Used together with the time attribute If omitted there will be no delay between repeated transfers Format h hours m minutes s seconds Optional time Specifies the total ti...

Page 117: ...cifies the TCP port number in the range 0 65534 to be used as the control port for the FTP server dataport Specifies the TCP port number in the range 0 65534 to be used as data port for the FTP server to Specifies the timeout i e the FTP session will terminate when the specified time limit has expired Format h hours m minutes s seconds However these options can only be used via a text editor ...

Page 118: ...ey src hugesize jpg dest home elvis king jpg temp tmp jpg This command will every hour every five seconds for twenty minutes download a fullsize image from camera 3 and save the images with a time stamp in the filename 0 ftp src fullsize jpg host an interesting site dest tmp full h m s jpg user billy pass startrek loop s5 time m20 cam 3 This command will send 1001 consecutive fullsize images to fu...

Page 119: ...e To use the mail command you must specify the IP address of the mail server and a valid return address on the TCP IP page Syntax mail s SUBJECT a ATTACHMENTS t RECIPIENTS cam CAMERANUMBER b BUFFERTYPE n NUMBER Options s Specifies the subject text for the e mail A simple one word subject does not require quotation marks A subject with multiple words must be surrounded by quotation marks a Specifie...

Page 120: ...e 3 offline This command terminates the current PPP connection Used together with the online command This command will send an e mail with the subject Hello and the attached file fullsize jpg to someone company com mail s Hello a fullsize jpg t someone company com This command will send an e mail with the subject This fullsize jpg was sent from my AXIS 240 to two recipients mail s This fullsize jp...

Page 121: ... specified timeout Resets the AXIS 240 when the specified time limit has exceeded Format h hours m minutes s seconds Optional script Specifies an optional script string of expect send pairs to be sent over the line This must be the last option in the command If a send word is empty i e if it contains single quotes nothing will be sent until the expect word is received For a login sequence you can ...

Page 122: ...een 1 76 where 1 is slow and 76 fast preset Specifies the preset position i e 1 10 Note that camera source must be defined on the Configuration Preset Position page cam Specifies the camera source i e 1 5 If omitted the default camera will be used This is the camera defined as default on the Configuration Video page zoom Specifies the zoom value of the selected camera source i e 1 999 Note that th...

Page 123: ... tilt angle of the selected camera source i e 180 180 Note that this option is device dependent and is supported by the drivers Sony Canon and Videmech Example 1 Example 2 Note The options must be entered in the following order speed preset cam zoom move pan tilt For example ptz tilt 10 cam 4 will not work you must enter ptz cam 4 tilt 10 reset This command resets the software or hardware of the A...

Page 124: ...ore proceeding with the next command in the event entry Example snapshot This command updates the lastshot jpg image The command can also be used for controlling the relay switch Syntax snapshot l LOOPTIME t TOTALTIME cam CAMERANUMBER FILE Options l Specifies the time between two consecutive image updates t Specifies the duration of the command Format h hours m minutes s seconds This command will ...

Page 125: ... jpg hugesize jpg or zoom jpg If using the command for controlling the relay switch you specify io relayon txt and io relayoff txt respectively Example 1 Example 2 This command will update the lastshot jpg image with a fullsize image from camera 2 snapshot fullsize jpg cam 2 During one minute the lastshot image will be updated as halfsize jpg with two seconds intervals snapshot l s2 t m1 halfsize ...

Page 126: ...cation examples 106 Camera applications 105 camera inputs 14 camera positions 37 Canon 49 101 CGI Parameters input output operations 61 preset positions 63 compression 31 config file 75 configuration 29 30 FTP 38 modem 93 password 33 connecting the cameras 15 connecting to the network 16 Control button 15 78 CPU 84 CRON alert 108 trigger condition 53 CRON script 56 buffer_init 108 buffer_start 109...

Page 127: ...ftp CRON script 114 fullsize 43 G generating snapshots 42 H halfsize 43 HTML reference 44 HTTP 83 HTTP input output operations 103 hugesize 43 I ICMP 83 Image page 31 image types 43 including snapshots in a web page 44 indicators Active 15 Network 15 Power 15 input txt 89 input output operations HTTP 103 Internet address 19 71 IO connector 14 84 IO files 88 J Java image feed 45 JPEG compression 8 ...

Page 128: ...Pan Tilt page 35 Pan Tilt serial port 102 103 parameter list defaults 78 descriptions 29 75 Web browser interface 30 password 33 36 50 Pelco Digital Coaxitron 50 102 performance 84 ping command 25 Point to Point Protocol 64 poor images 73 Power indicator 15 72 power supply 85 PPP 64 setup Linux 65 setup Windows 95 98 64 preset positions 37 problems 69 protocols 83 ptz CRON script 121 R RARP 19 26 ...

Page 129: ...s 42 TCP input output operations 103 TCP IP 8 33 83 technical specifications 83 terminator resistor 14 time stamp 32 CRON script 114 trigger condition 53 triggering snapshots 89 troubleshooting 69 U updates 79 Upgrading the software 80 using FTP 80 via the parallel port 81 US Robotics modem 93 V VideMech 49 101 video formats 83 video modulation 35 Video page 35 viewing angle 37 W Web browser inter...

Reviews: