

19
Connect the unit to the mains
•
Make sure the required supply voltage (see type plate
inside the housing) matches the local mains voltage.
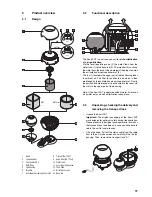
To do so, disassemble the fan housing, check the spec-
ification on the type plate, then assemble the fan hous-
ing again. Please follow the information on dismantling
and assembly given chapter 6.2.
Caution! Do not connect the Axair PH7 to the
mains if the voltage does not match!
–
Important! Never move the Axair PH7 if the water tank
or the base tub are filled with water. The water could
escape and moisten the filter thus making it unusable.
–
Caution, fire hazard! Make sure the air intake and
exhaust slots are not covered by objects such as clothes
when the unit is in operation as this could cause danger-
ous accumulation of heat inside the unit.
•
Connect the mains plug to the wall outlet.
Recommendation! Connect the Axair PH7 to a wall
socket featuring a fault current breaker (if available).
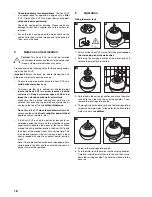
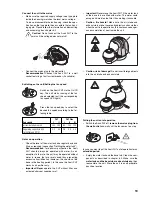
Switching on the unit/Setting the fan speed
Switch on the Axair PH7 via the On/Off
key. The unit starts running at the fan
speed selected last (the corresponding
fan speed LED lights).
Press the fan speed key to select the
desired fan speed according to the fol-
lowing table.
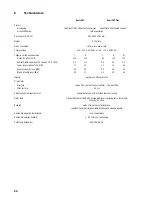
PH7
PH7 Plus
Fan speed
I
II
I
II
III
Air recirculation in m
3
/h 100 145 80 100 130
Vaporizing capacity in dl/h 3.0 4.0 2.8 3.5 4.0
(at 45%hr and 23°C)
Notes on operation
–
Check the level of the water tank on a regular basis and
fill up as required (see section “Refilling the water tank”).
Recommendation: for optimum purification the Axair
PH7 should always be operated with water. As an
exception to the rule, the unit may be operated without
water in rooms that are rarely aired thus preventing
excessive humidification (however, this should not be
done in the heating period). In this case the Axair PH7
works as air purifier only.
–
Important! Never operate the PH7 without filter and
activated charcoal vaporizer mat.
–
Caution, risk of damage! Do not insert foreign objects
into the air intake and exhaust slots.
Putting the unit out of operation
•
Switch the Axair PH7 off, remove the mains plug from
the wall outlet and wait until the fan comes to a stop.
In case you want to put the Axair PH7 out of operation for an
extended period:
•
Empty the water tank and the base tub. Clean the com-
ponents as described in chapter 6.2. Make sure the
water tank and the base tub are absolutely dry, then
reassemble the unit. Store the unit in an appropriate,
dust-free location.


