1
4
3
6
5
2
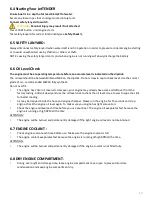
Engine bay Arrangement
1. Closed loop coolant reservoir
2 .Oil check dipstick
3. Fuel filter/separator
4. Battery
5. Cylinder
6. Electronic box
After Use: Flushing Procedure
To prolong engine life it is very important to flush engine of salt water after use and prior to storage. Failure to carry
out flushing will significantly reduce the life of engine components and may invalidate warranty. DO NOT operate
throttle out of water.
In addition it is advised to thoroughly wash with fresh water around the jet pump area to remove all salt deposits
after use.
CAUTION
. Engine MUST be running before water is connected. Risk of engine flooding exists if water remains
on after engine is switched off.
1. Connect a fresh water hose fitted with the male connector supplied with the tender to the flushing attachment
coupling fitted to the tender. Press outer ring to engage and release adaptor.
2. Start engine and immediately turn on water supply.
3. Run engine at idle for approximately 1 minute to completely flush the open loop cooling system.
4. Turn off water supply.
5. Allow the engine to run for no longer than 10 seconds to allow water to exit from the cooling system, then turn off
the engine. Remove hose connector from flushing attachment.
6. Check bilge of boat and dry any residual water.
1
2
3
4
5
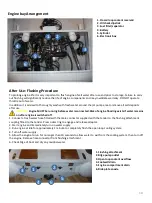
1. Flushing attachment
2. Bilge pump outlet
3. Open loop coolant overflow
4. Footwell drain
5. Engine compartment drain
6. Ride plate anode
6
18
Summary of Contents for JetTENDER 250
Page 1: ...JetTENDER 250 User Manual 1...
Page 6: ...6...
Page 7: ...7...
Page 8: ...8...
Page 27: ...27...

