background image

6.1 Fuelling 

As part of its pre-delivery inspection your new JetTENDER has been fully tested and drained of fuel. 

Ensure kill switch is remouved. 

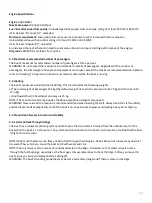
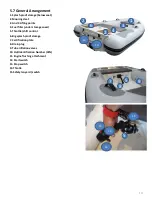
Open  back storage compartment to expose filler cap. 

Re-fuel in a ventilated area. 

Do not overfill the tank; be careful not to spill fuel. 

Tighten fuel cap securely after re-fuelling. 

Open engine hatch and inspect bilges after re-fuelling. 

Do NOT hose around the fuel filler area as water may enter the fuel tank. 

IMPORTANT! Do not use fuel from fuel pumps labeled E85. 

Use of fuel labeled E15 is prohibited by U.S EPA Regulations. 
Fuel containing Ethanol can result in problems in the fuel system and engine, resulting in: 

Starting and operating difficulties. 

Deterioration of rubber or plastic parts. 

Corrosion of metal parts. 

Damage to internal engine parts. 

6.2 Before Use 

Tube pressure will fluctuate with temperature. Inflate tubes in sequence to 250mB/3.6psi. Failure to observe this 
will compromise the sea-keeping ability and watertight integrity of the boat. Inflation valves are fitted with quarter-
turn locks to enable rapid deflation.

CAUTION

. Tubes must be inflated in the correct sequence to prevent over-inflation. 

Set valves to shut and inflate tubes evenly

Check bilge for fuel or water contamination. 

Tighten drain plugs. 

Check engine cover latches are secure 

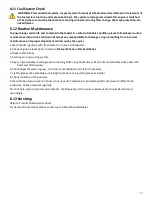
6.3 Safety Check! 

WARNING

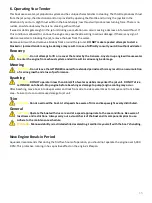
. ALWAYS attach yourself to the safety lanyard when engine is running. Before setting off as a 

precautionary measure always test lanyard for its functionality by pulling away from its seating 

engine 

should always stop. 

WARNING

. NEVER investigate engine bay with engine running or ignition on.

16

Summary of Contents for JetTENDER 250

Page 1: ...JetTENDER 250 User Manual 1...

Page 2: ...cal boating schools or competent instructors This user manual is not a detailed maintenance or trouble shooting guide In case of difficulty please contact the dealer Always use qualified and competent...

Page 3: ...s and closing valves 12 5 5 2 Stability and buoyancy 13 5 6 Avoiding the risk of fire or explosion 13 5 6 1 Refueling 13 5 7 General arrangement 14 6 Operating 15 6 1 Fuelling 16 6 2 Before use 16 6 3...

Page 4: ...d maneuvering equipment Check the function and condition of steering and the remote control and carry out the routine daily checks specified in the engine manual Seaworthiness Check the boat s seawort...

Page 5: ...he manuals of devices which are installed afterwards Space has been left for your own notes at the end of the manual The craft has a running serial number a CIN code Craft Identification Number The CI...

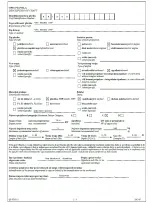
Page 6: ...6...

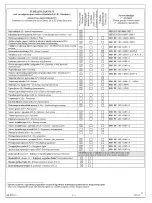
Page 7: ...7...

Page 8: ...8...

Page 9: ...airing or replacing as AXA may elect at its sole discretion any parts that prove in AXA sole judgement to be defective in material or workmanship THIS LIMITED WARRANTY SHALL BE THE ORIGINAL PURCHASER...

Page 10: ...ns to equip or modify inflatable boats produced prior to the date of such changes or alterations This Limited Warranty shall be governed by and construed and enforced in accordance with Croatian Law 4...

Page 11: ...hest third of the waves which approximately corresponds to the wave height as estimated by an experienced observer Individual waves may reach up to twice this height If the significant wave height is...

Page 12: ...fault weight of an adult is assumed to be 75 kg and that of a child 37 5 kg c And liquids fuel in fixed tanks and cargo is 15 kg NOTE The maximum load only includes the above mentioned weight componen...

Page 13: ...hes or appliances that can cause a spark Do not stow any loose items under the seat that if moved could prevent fuel flow to the engine This is particularly important for items that may press against...

Page 14: ...er under storage cover 5 Throttle shift control 6 Big splash proof storage 7 Certification plate 8 Drain plug 9 Tube inflation valves 10 Hull Identification Number HIN 11 Engine flushing attachment 12...

Page 15: ...ter the engine from exhaust system and will result in serious engine damage Mooring CAUTION Do not leave the JetTENDER moored for extended periods as this may result in an accumulation of marine growt...

Page 16: ...f rubber or plastic parts Corrosion of metal parts Damage to internal engine parts 6 2 Before Use Tube pressure will fluctuate with temperature Inflate tubes in sequence to 250mB 3 6psi Failure to obs...

Page 17: ...ngine has 2 liter oil reservoir However your engine may already have some oil left over from the factory testing Adds oil slowly and use the oil level stick to check the oil level Use a tower to wipe...

Page 18: ...Risk of engine flooding exists if water remains on after engine is switched off 1 Connect a fresh water hose fitted with the male connector supplied with the tender to the flushing attachment couplin...

Page 19: ...fresh water to remove salt deposits 2 Check engine oil level refer to section Oil Level Check in this handbook 3 Check coolant level 4 Flush open loop cooling system 5 Apply a good quality marine gre...

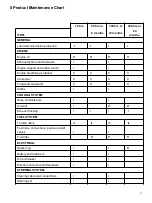
Page 20: ...fuel line connections for tightness Verify for any fuel leak odor as well as oil and coolant leaks Check any loosen parts Engine oil level Check refill Engine coolant Check refill Carburetor Periodic...

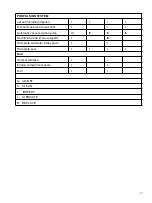
Page 21: ...eathing oil retainer C C C C Carburetor C C C C Fuel water separator C C C C Airbox I I COOLING SYSTEM Hose and fasteners I I Coolant I R R Exhaust flushing I I I I FUEL SYSTEM Throttle cable IL IL IL...

Page 22: ...ive shaft I I I Automatic vacuum siphon pump IC IC IC IC Sacrificial anode if so equipped I IR Ride plate and water intake grate I I Ride plate seal I I I I Hull Snorkel airintake I I Engine compartme...

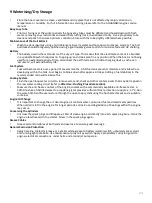
Page 23: ...the tank Fuel begins to break down after approx 30 days Adding a fuel stabilizer in the recommended ratio will minimise this Cooling System Flush the open loop water circuit to remove salt sand shell...

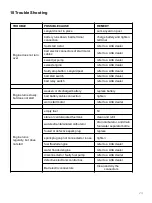
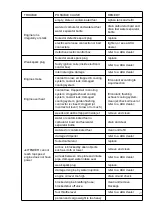
Page 24: ...AXA dealer Engine turns slowly but does not start weaken or discharged battery replace battery bad battery cable connection tighten worn start motor refer to a AXA dealer Engine turns regularly but do...

Page 25: ...stem coolant leak damaged cooling system garden flushing connector is closed clogged jet Incorrect oil level to low or to much fill coolant flushing exhaust cooling system clean jet check oil level or...

Page 26: ...y bad seal replace automatic siphon pump head is blocked clean fouled bilge pump replace bilge pump bad drive shaft mechanic seal refer to a AXA dealer hull leak refer to a AXA dealer loose drain plug...

Page 27: ...27...
Reviews: