background image

VIDEO VIEWER BASIC OPERATION 

-8- 

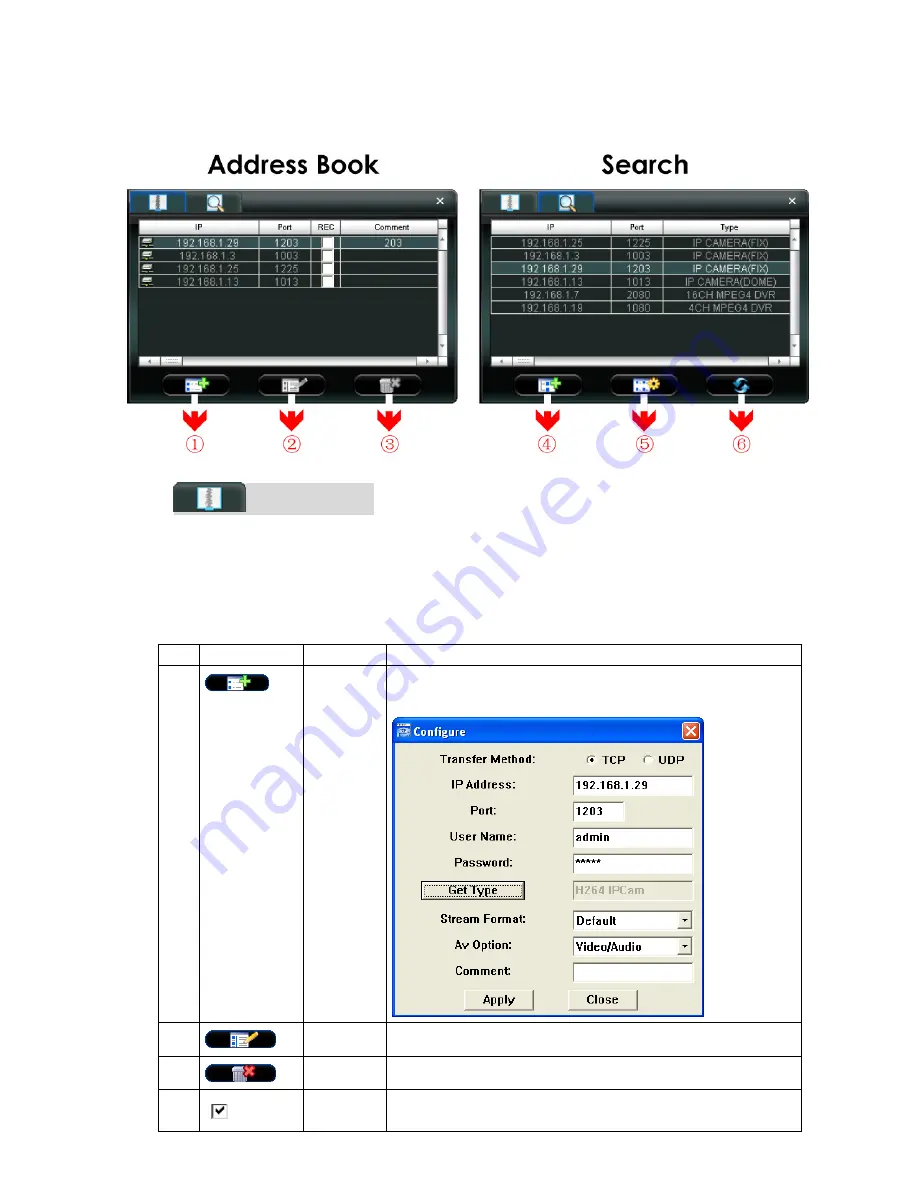
4.2 Address Book 

This view is displayed when the Video Viewer is activated for you to log in / out the network camera from the current 
address list, or search the available IP address as follows: 


(

(

A

A

d

d

d

d

r

r

e

e

s

s

s

s


B

B

o

o

o

o

k

k

)

)


Click to view the pre-defined network camera access details. 

To log in, choose one IP address from the address list, and click the address twice; to log out, click the connected 
IP address twice. 

You can also create new IP address information, or modify or remove the current IP address information. 

NO. Button 

Function  Description 


Add 

Click to directly add one IP address for login. Key in all the network camera 
access information needed, and click “Apply” and “Close” to add the selected 
address to the address book. 


Edit 

Select one current IP address from the address list, and click this button to edit 
the settings. 


Remove 

Select one IP address from the address list, and click this button to delete it. 


Record 

Check this checkbox to enable the record settings. For details, please refer to 

the “5.3 Record Setting” on Page 16. The default setting is unchecked. 

Summary of Contents for AVI 201

Page 1: ...212 manual_V0 83 AVI201 202 203 212 Network Cameras User s Manual Please read instructions thoroughly before operation and retain it for future reference The image shown above may differ from the actual product appearance ...

Page 2: ...ark symbolizes that within the European Union the product must be collected separately at the product end of life This applies to your product and any peripherals marked with this symbol Do not dispose of these products as unsorted municipal waste Contact your local dealer for procedures for recycling this equipment This apparatus is manufactured to comply with the radio interference requirements ...

Page 3: ...ion 13 5 VIDEO VIEWER MISCELLANEOUS CONTROL PANEL 14 5 1 Color Setting 15 5 2 Backup For DVR only 15 5 3 Record Setting 16 5 4 Server Setting 18 General 18 Log 19 Account 19 Online User 20 Trigger 21 Network 22 DDNS 23 SNTP 26 FTP 26 MAIL 27 Video 27 5 5 Tools 28 Firmware Upgrade 28 Language Selection 29 5 6 Status List 29 Record 29 Event 30 Backup For DVR only 31 Playback Screen 31 6 IE WEB BROWS...

Page 4: ...re is available and easy from anywhere at anytime 1 2 Features Low latency video streaming for sharp and clear images Hybrid digital analog video output Motion detection Complete IP surveillance system such as the Central Management System CMS software Network Attached Storage NAS Network Video Recorder NVR etc External microphone in audio out for two way voice communication AVI202 203 212 only Da...

Page 5: ...6mm f3 6mm f4 6mm f3 6mm F number F2 0 F1 9 F2 0 Viewing Angle 80 55 6 80 60 80 Shutter Speed 1 60 1 50 to 1 100 000 sec IR LED NO YES Min Illumination 1 Lux F2 0 1 Lux F2 0 0 Lux 10m IR ON 0 Lux 11m IR ON 1 Lux F2 0 0 Lux 10m IR ON Video Output 1 0 Vp p 75Ω BLC AUTO White Balance ATW Others Remote Control YES Motion Detection YES Alarm and event Notification NO Image upload over FTP and Email Gen...

Page 6: ...ower supplied this indicator will be on as red Audio Output AVI202 AVI203 AVI212 only Support the connection to an audio device such as a speaker for voice transmission of the remote side Audio Input AVI202 AVI203 AVI212 only Support the connection to an audio device such as a microphone for voice transmission of the local side Video Output Connect to the video input connector of your monitor with...

Page 7: ...le connection please refer to the section 2 1 Rear Panel on Page 3 Tool needed Power drill x 1 not supplied within the sales package 1 Prepare all the parts needed for camera installation Find the network camera bracket package a bag of screws wall plugs and a cap supplied with the sales package as shown in Figure 1 Unpack the bracket package to find the bracket disassembled into three parts the b...

Page 8: ...to secure as shown in Figure 4 Desktop With the upper side of the camera facing up align the mounting screw hole on the underside with the screw thread of the joint lock and rotate the camera to secure Figure 4 Connect the camera to the bracket Figure 5 Insert the cap to the camera 5 Insert the cap to the other mounting screw hole of the camera Ceiling mounted Insert the cap to the mounting screw ...

Page 9: ...o log in Note Your PC laptop and DVR must be under the same domain to build an area network Please change the IP address of your PC laptop into 192 168 1 X X can be the number between 1 255 except 10 to login The default IP address of your DVR is 192 168 1 10 and the default username as well as the password is admin Note For detailed network settings under different network types Static IP PPPOE D...

Page 10: ...mode Full Screen Click to view the images in the full screen mode To exit the full screen mode press Esc key on the keyboard of the PC Close Click to close the current image display view If the image display view is closed you will be logged out automatically Close All Click to close all the current image display view If the image display view is closed you will be logged out automatically Address...

Page 11: ...can also create new IP address information or modify or remove the current IP address information NO Button Function Description 1 Add Click to directly add one IP address for login Key in all the network camera access information needed and click Apply and Close to add the selected address to the address book 2 Edit Select one current IP address from the address list and click this button to edit...

Page 12: ...ss to the address book 5 Setting Select from the available IP address list and click this button to edit the setting 6 Refresh Click to update the available IP address list 4 3 Emap C Co on nf fi ig gu ur re e Click on the top bar you will see the default emap screen Then click Configure to enter the screen for emap setting Step 1 Click to load a JPEG or BMP file of the emap If the picture is too ...

Page 13: ...p pl la ay y o on n t th he e e em ma ap p Double click the icon of the camera on the emap The live display of this camera will be shown M Mo ot ti io on n t tr ri ig gg ge er r p pr ro om mp pt t You can also see the prompt icon of motion trigger if any motion is detected Note Please make sure you ve activated the motion detection function at first For the details about motion detection setting p...

Page 14: ...ox is checked in the Record On Off section check the REC box in the address book panel to start manual recording When the record function is started a flashing indication icon will be shown at the bottom right corner of the image display view And the recordings will be saved in the specified location 3 If you want to stop recording click on the top bar or cancel ticking off REC in the address book...

Page 15: ...so sort out the logs you want to speed up the search time For details please see 5 6 Status List on Page 29 To immediately play a recording file select a log from the list and click Play button or double click the selected log Then the playback control panel will be shown at the bottom of the main control panel similar to the following For the playback control panel details please see Playback Scr...

Page 16: ...rner of the image display view The snapshot will be saved in the path you specified in Record Setting For snapshot path setting please refer to 5 3 Record Setting on Page 16 4 7 Information Click this button to show the current network connection details 1 IP Address 7 Resolution 2 Transfer Type 8 Quality 3 Stream Format 9 Server Time 4 AV Option 10 Online Users 5 Bit Rate 11 Handler Name 6 Frame ...

Page 17: ... volume slider 2 Color Setting Click this button to adjust the brightness contrast hue saturation for the selected network camera For details please see 5 1 Color Setting on Page 15 3 Backup For DVR only The network cameras don t support network backup function This function is available when the Video Viewer is connected to a DVR You can log into the DVR via this software and remotely backup the ...

Page 18: ...or settings Note You need to be a supervisor to operate this function For details please see Account on Page 19 5 2 Backup For DVR only The network cameras don t have network backup function This function is available when the Video Viewer is connected to a DVR You can log into the DVR via this software and remotely backup the video data saved in the DVR Click Miscellaneous Control Backup to go in...

Page 19: ...ved 6 Simultaneous Playback To view the backup images simultaneously when the download process is in progress select the checkbox Simultaneous Playback You will see the backup images while the images are being downloaded to the PC or notebook To simply backup images without previewing deselect the checkbox Simultaneous Playback You will only see a message box indicating the total time needed the c...

Page 20: ...rm record blue the 3rd line motion record Tip To set schedule record alarm record and motion record all at once for the whole week press button To clear all record time settings press button Custom To specify the more specific time for recording click Custom a Select the desired record type s Schedule Motion Alarm and set the start end date and time b Press Add and a pop up window will appear and ...

Page 21: ...e and you can view set or modify all the network camera setting All the changes you make here will be applied to the connected network camera Note You need to be a supervisor to operate this function For details please see Account on Page 19 General Click Miscellaneous Control Server Setting General to go into the General page In General page you will see the following items Item Description Firmw...

Page 22: ... To view the earlier or later logs that are not shown in the current page click Prev Page or Next Page To clear all the logs click Clean Account Click Miscellaneous Control Server Setting General Account to go into the Account page In the Account page you can create a new account for login or delete or modify the existing account setting To add an account click New and set the User Name Password U...

Page 23: ...aracters Set the security level of an account to give the permission to control different Video Viewer functions There are 4 user levels Supervisor Power User Normal User and Guest User Level For the functions each user level is allowed to access For details please refer to APPENDIX 2 USER LEVEL FOR REMOTE OPERATION on Page 39 Life Time Select how long this account is allowed to stay online 1 MIN ...

Page 24: ...o enable the function of motion trigger And then click Setting to set the motion detection area Function Description Sensitivity Set the detection sensitivity For AVI201 202 212 0 9 the higher the number the lower the sensitivity For AVI203 Low Normal High Motion Detection Setting Area Set the motion detection area by selecting the area grids with your mouse Pink grids represent the area that is n...

Page 25: ...PEG4 you can set the record time of the notification video clip as 1 5 seconds If you ve set the video type as JPEG then this option stands for 1 5 images Note If your network camera mail server are not connected by LAN and the network connection is not stable or failed the notification method by Email or FTP might be failed Note Sometimes the length of the video clip emailed or uploaded might not...

Page 26: ...a any ISP 3 Obtain and install the PPPOE software CD When everything is ready choose the PPPOE IP type and key in the user name and password provided by your ISP Then select Network DDNS to set DDNS settings For detailed DDNS settings please refer to DDNS section DHCP This DHCP function needs to be supported by a router or cable modem network with the DHCP service Choose the DHCP IP type and selec...

Page 27: ...instructions Then you will see the screen Account Created and Dyndns will email the instructions to your specified E mail Sign up 1 Key in a user name for login This name is not equal to the domain name 2 Key in your E mail address and input it again to confirm 3 Set the password and input it again to confirm 4 Click Create Account ...

Page 28: ...t according to the instructions in the email Go to the hyperlink in the email and you will see Account Confirmed Your account is created successfully now Input the user name and the password you preset before to log in Click Add Host Services Input the user name and the password to login 1 Input a meaningful host name 2 Choose a domain name ...

Page 29: ...adjust the local area time of the system automatically Server Name Users can simply use the default SNTP server For example time stdtime gov tw Sync Server Time The network camera will synchronize the time with the network time FTP Click Miscellaneous Control Server Setting Network FTP to go into the FTP page Enter the detailed FTP information and press Apply to confirm The information you set her...

Page 30: ... Function Description Server Enter the SMTP server address provided from your e mail system supplier Mail From Enter the entire mail address to ensure E mails will not be blocked by SMTP Verify Password Some mail servers are required to verify the password Please enter the user name and password Email Address Add the E mail address s of the assigned recipient s Note Users can assign up to 4 mail a...

Page 31: ...s page you can upgrade the firmware of your network camera Function Description Update Server Select the IP address of the network camera Make sure the network settings of the selected network camera are correct Current Version In the Firmware section you will see the current firmware version For example 1010 1004 1003 1000 Add To upgrade the firmware version of your network camera click Add to lo...

Page 32: ...guage of your operation system is not supported by this software English will be the default language 5 6 Status List Click to view all the event and record logs All or search for the specific log s by date or by record type Condition There are three types of logs Record Backup and Event To playback the recorded data for a specific record or backup log select the log and double click to start the ...

Page 33: ...ir Click to fix the log with errors Apply This button is available in the Record tab when the Reserve checkbox is checked or unchecked If you want to keep an important record log for future reference and it can t be removed check the Reserve checkbox and click Apply The selected log will be kept and won t be deleted when somebody accidentally or intentionally chooses it and click Delete or Delete ...

Page 34: ...anged by time from the earliest to the latest Delete Delete All Click Delete to remove the selected log s or click Delete All to clear the current log list Tip To select more logs all at once press and hold the Ctrl key on your keyboard and click to select the logs you want to remove Play Click to play the selected download log The playback panel will be shown for your further operation For playba...

Page 35: ...the speed etc 2 Playback Progress Bar This area shows the playback progress and the progress percentage 3 Playback Operation This area is enabled only when the playback is started Rewind Forward Stop Pause Play Rewind Forward Click once to get 2X fast rewind forward twice to get 4X three times to get 8X and four times to get 16X the highest 4 De Interlace Click to reduce the vibration of the pause...

Page 36: ...6 2 Toolbar Display on the IE Web Browser NO Function Description 1 Main ActiveX Quick Time According to the type of web browser on your operating system choose the ActiveX or QuickTime controls TCP UDP Choose the internet transmission protocol TCP UDP BEST HIGH NORMAL LOW Choose the image quality BEST HIGH NORMAL LOW VGA QVGA Choose the image size VGA 640 480 QVGA 320 240 Audio On Audio Off Choos...

Page 37: ...Setting section of the Video Viewer on Page 15 5 General Language Support English Chinese language for the web interface Mac Address Display the MAC address of the network camera For details please refer to General section of the Video Viewer on Page 18 Log In the Log page you can see all the logs for the network camera such as POWER ON REMOTE LOGIN RESET DEFAULT EMAIL FTP DDNS PPPOE DHCP and SNTP...

Page 38: ... me eI In ns st ta al ll le er r e ex xe e file and follow the on screen instructions to finish the installation procedure Step 2 Open your QuickTime player Select File Open URL and key in the URL address The URL format for MPEG4 IP cameras is rtsp ipaddress port live mpeg4 The URL format for H 264 IP cameras is rtsp ipaddress port live h264 For example if the IP adderss is avtechipcam dyndns org ...

Page 39: ...2 1 10 64 5 High 1 15 128 8 full 490 full 208 1 2 278 1 2 109 4 1 3 226 1 3 85 2 1 4 196 6 1 4 75 2 1 5 180 6 1 5 64 6 1 10 100 8 1 10 45 9 Normal 1 15 79 4 full 276 full 104 1 2 185 4 1 2 62 8 1 3 147 6 1 3 51 2 1 4 131 8 1 4 50 2 1 5 125 2 1 5 44 2 1 10 68 2 1 10 36 VGA Basic 1 15 56 8 full 778 full 136 8 1 2 464 1 2 84 2 1 3 352 1 3 65 2 1 4 292 1 4 63 1 5 262 1 5 52 8 1 10 134 4 1 10 41 1 Best...

Page 40: ...36 2 Normal 1 15 126 9 full 552 full 705 1 2 330 1 2 384 1 3 248 4 1 3 285 1 4 200 1 1 4 207 6 1 5 177 1 5 194 7 1 10 129 1 10 104 1 4CIF Basic 1 15 104 4 full 909 full 588 1 2 543 1 2 363 1 3 378 1 3 260 4 1 4 278 4 1 4 3676 1 5 255 3 1 5 182 4 1 10 166 8 1 10 105 Best 1 15 121 8 full 543 full 522 1 2 290 4 1 2 275 4 1 3 208 2 1 3 209 4 1 4 167 4 1 4 166 5 1 5 146 4 1 5 151 8 1 10 105 1 10 87 3 H...

Page 41: ...Quality when you use AVI203 under the upload speed of 2M 1M 512Kbps H 264 MPEG4 MJPEG Upload Speed Resolution Quality Frame Rate Resolution Quality Frame Rate Resolution Quality Frame Rate 2M 4CIF Normal full 4CIF Normal 1 3 4CIF Normal 1 4 1M 4CIF Normal 1 3 4CIF Normal 1 5 4CIF Normal 1 5 512Kbps 4CIF Normal 1 4 CIF High 1 5 CIF Normal 1 4 ...

Page 42: ...ontrol Color Setting X X X Backup X X X X Record Setting Server Setting X X X Tools Update X X X Language Status List Record Snapshot Information For Web Browser AVI201 Supervisor Power User Normal User Guest Main Connection Mode Protocol Quality X Change resolution X Network DDNS X X SNTP X X X FTP X X MAIL X X Camera Color X X General Log X X X Account X X X Trigger X X Configure X X X Snapshot ...

Page 43: ...P X X MAIL X X Camera Color X X General Log X X X Account X X X Trigger X X Configure X X X Snapshot For Web Browser AVI203 Supervisor Power User Normal User Guest Main Stream format Quality X Change resolution X Audio function X Network DDNS X X X SNTP X X X FTP X X X MAIL X X X Filter X X X UPnP X X X Camera Color X X X Time X X X General Log X X X Account X X X Trigger X X X Video X X X Configu...

Page 44: ...APPENDIX 3 DEFAULT VALUE 41 APPENDIX 3 DEFAULT VALUE Default Value Items Default Value Default Network Settings User Name admin Password admin Port 80 IP Address 192 168 1 10 ...

Reviews: