background image

21

WebUI: I/O Config - Output Settings Cont.

Output Settings Label

 - Use this to give an alias/name to your extracted audio outputs.

Note:  There is a 15 character limit to this field, the name will replace the default “OUT #” throughout the 

rest of the WebUI (for instance the Video Matrix tab).

Output Settings Enabled - 

This is an enable/disable switch.  By default this will be Enabled/Green.  To 

change the setting simply click to switch.  Disabled/Red there will be no Audio passed on that extracted au-

dio port (both Toslink and balanced 5pin will be muted).

Output Settings Volume

 - Here you can use the slider bar to adjust the extracted port volume (0~100).  

You can also use the text box and enter a value (0~100).

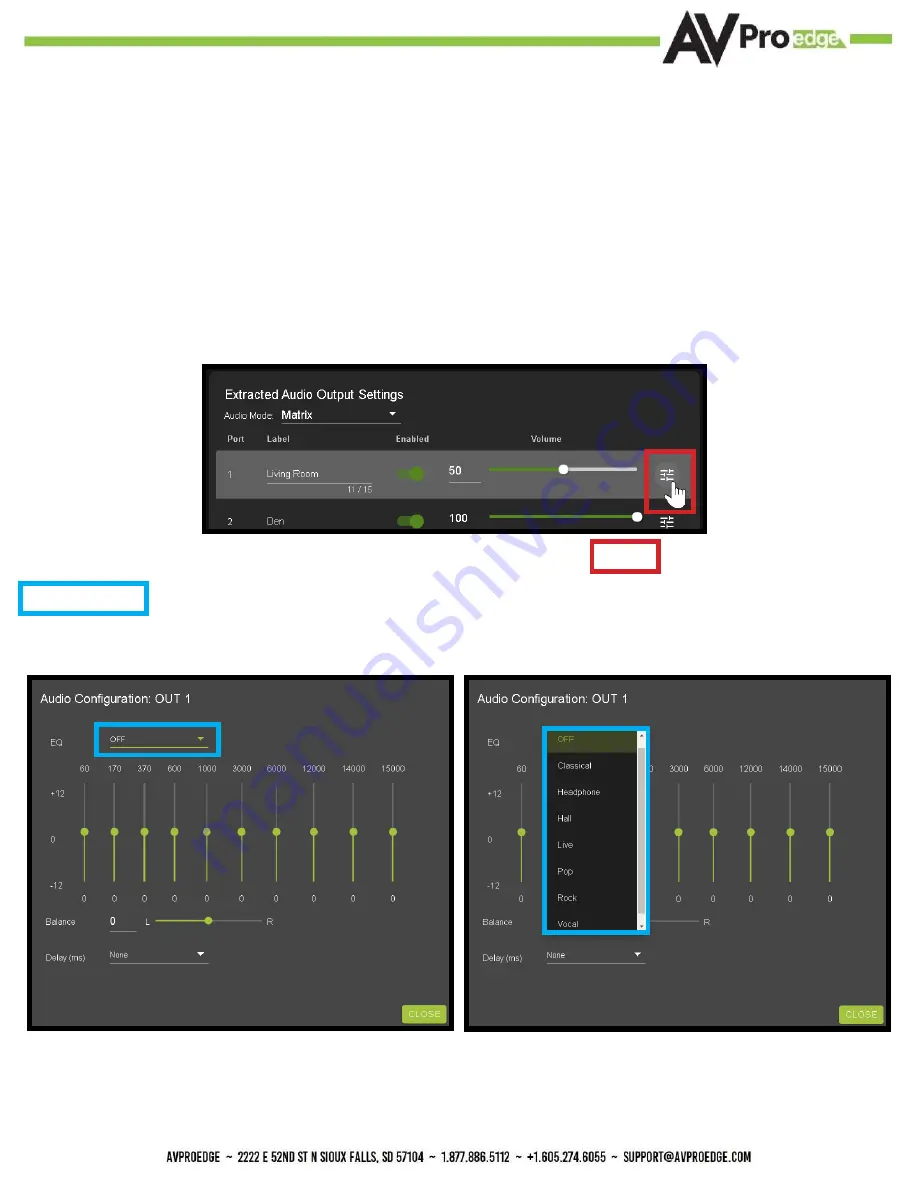
Output Settings EQ Settings

 - To open the EQ Settings click on the  symbol  next to the Volume slider. 

EQ Drop-down  contains 8 settings.  The default off, Classical, Headphone, Hall, Live, Pop, Rock, and Vocal.

Summary of Contents for AC-MX-44HDBT

Page 1: ...User Manual 18Gbps True 4K60 4 4 4 4x4 Matrix with four HDMI inputs as well as four mirrored HDBaseT outputs blocks AC MX 44HDBT 1...

Page 2: ...GS 18 WEBUI I O CONFIG INPUT SETTINGS CONT 19 WEBUI I O CONFIG OUTPUT SETTINGS 19 WEBUI I O CONFIG OUTPUT SETTINGS CONT 20 WEBUI I O CONFIG OUTPUT SETTINGS CONT 21 WEBUI I O CONFIG OUTPUT SETTINGS CON...

Page 3: ...RONT PANEL CONTROL NETWORK 36 FRONT PANEL CONTROL IR REMOTE 37 IR REMOTE CONTROL 37 IR CONTROL 38 IR CONTINUED 40 RS 232 AND TCP IP CONTROL 41 COMMAND LIST 42 COMMAND LIST CONTINUED 43 COMMAND LIST CO...

Page 4: ...management allows maximum flexibility with today s wide mixture of sources and displays Features HDMI 2 0 a b 18Gbps Uncompressed Bandwidth Support on HDMI 18 Gbps with ICT on HDBaseT outputs 4K60 4 4...

Page 5: ...Specifications 5...

Page 6: ...eceiver 70M 4k 60 4 4 4 HDR 100M 1080P AC CX100 RAMP 70M 4k 60 4 2 0 HDR 70M 1080P AC EX70 UHD R 40M 4k 30 4 4 4 4k 60 4 2 0 70M 1080P 6 Non AVPro HDBaseT Receivers may work but ICT our Invisible Comp...

Page 7: ...7 Front and Rear Panel Overview...

Page 8: ...address of the matrix 9 To Enable Disable DHCP press and hold INPUT 1 and INPUT 4 at the same time for 3 seconds With the matrix connected to the local network using a computer on the same network ope...

Page 9: ...vices enabled under the Hardware section click the Update Firmware button to check for new Firmware OTA over the air This will compare the firmware versions currently loaded on the AC MX 44HDBT and co...

Page 10: ...date will be skipped automatically Click the UPGRADE button to start 16 Once the progress bar hits 100 click the CLOSE button the firmware upgrade process is complete 17 With the Firmware up to date i...

Page 11: ...not detected If red verify that the input is powered on and that the HDMI cable is prop erly connected to the source and to the back of the matrix 22 Now verify the connections to the HDMI HDBaseT ou...

Page 12: ...I outputs or any of the 4 HDBaseT outputs then click the COPY button This will save that outputs EDID to the USER1 slot 3 Next use the drop down to select NO 3D or 3D depending on the displays capabil...

Page 13: ...DMI output and 3 settings for each HDBaseT output 10 Under State you can enable disable that port turn that port on or off and also enable a 1080P test pattern the Video Scaling mode HDMI you can choo...

Page 14: ...he Zones Matrix This mode allows you to matrix the extracted audio ports independently from the HDMI HDBaseT outputs In this mode you there will be a Tab for the extracted audio under the Matrix page...

Page 15: ...ight of the volume slider This will bring up the Audio Configuration Page Here you can choose from 8 different EQ settings change the Left Right balance and set the audio delay 6 Delay eight settings...

Page 16: ...eo INPUTS and OUTPUTS Click on the INPUT number to select example below shows IN 1 With the INPUT selected simply click on the OUTPUT you want to send that source to Note If you rename the INPUTS OUTP...

Page 17: ...nput default or Bind to Output then this tab will not be visible example below See Page 14 Advanced Setup WebUI Extracted Audio Output Settings for more info Click on the INPUT number to select exampl...

Page 18: ...80P_3D_6CH 6 1080P_3D_8CH 7 4K30HZ_3D_2CH 8 4K30HZ_3D_6CH 9 4K30HZ_3D_8CH 10 4K60HzY420_3D_2CH 11 4K60HzY420_3D_6CH 12 4K60HzY420_3D_8CH 13 4K60HZ_3D_2CH 14 4K60HZ_3D_6CH 15 4K60HZ_3D_8CH 16 1080P_2CH...

Page 19: ...he HDMI cable is properly connected to the source and to the back of the matrix Global Input Settings There are two settings available Supports Dolby MAT Check this box to enable Dolby MAT audio Requi...

Page 20: ...ator on the HDBaseT outputs shows the current state of the connected HDBaseT Receiver Green means HDBaseT receiver is detected red means that the receiver is not detected If red verify that the catego...

Page 21: ...fault this will be Enabled Green To change the setting simply click to switch Disabled Red there will be no Audio passed on that extracted au dio port both Toslink and balanced 5pin will be muted Outp...

Page 22: ...ce Use this slider to adjust the Left Right balance Note Default is 0 zero value can be 10 10 Output Settings Delay ms Audio delay drop down has eight available settings these are measured in millisec...

Page 23: ...to enter your own Network settings Once all fields have been filled out click the green Apply Button to set A prompt will appear to confirm the change click OK to confirm This area contains relevant n...

Page 24: ...the Up Down arrow buttons to increase decrease the number WebUI System Admin Web Interface This switch has two options Red Disabled Default and Green Enabled When enabled green there will be three fi...

Page 25: ...hange Default Username user Default Password user123 Once the desired Username and Password has been entered click the green APPLY button to set Note The web page will reload to the Log In page With b...

Page 26: ...e the System tab to check for new Firmware OTA over the air This will check the firmware versions currently loaded on the AC MX 44HDBT and compare to the latest available If it is up to date you will...

Page 27: ...r simply leave all files options selected If the version currently installed not newer then that update will be skipped automatically Once the progress bar hits 100 click the CLOSE button the firmware...

Page 28: ...nnection Input Settings EDID Use these four drop downs to select your preferred EDID The available combinations are as follows 1 1080P_2CH 2 1080P_6CH 3 1080P_8CH 4 1080P_3D_2CH 5 1080P_3D_6CH 6 1080P...

Page 29: ...will see a canned 1080P No 3D SDR 2CH EDID applied to IN 1 Any EDID change once applied will display here Signal Info shows the connected source s current output information This includes Timing Colo...

Page 30: ...Reset Connected Device EDID shows the connected sync s preferred EDID information and current state This includes Manufacturer Monitor Name Sink Device Type Preferred Timing Supported Audio Formats 3d...

Page 31: ...udes a REFRESH button and the following EDID information Manufacturer Monitor Name Sink Device Type Preferred Timing Supported Audio Formats 3d Support Deep Color Support Signal Info Signal Present In...

Page 32: ...aseT Receiver is marginal You may experi ence occasional failures like dropouts screen flashing or no video c Red Exceeds the HDBaseT Error threshold may experience frequent failures or no signal at a...

Page 33: ...n send device specific commands or use as a live monitor while sending commands from a control system helpful in troubleshooting Example 1 Click in the white box and type a GET STA Click the green arr...

Page 34: ...WITCH menu showing the current IN OUT routes Press the corresponding OUTPUT button top row to set Front Panel Control Scaling The AC MX 44HDBT has scalers built into every output The HDBaseT Ports can...

Page 35: ...scale STEP 2 Choose the scaler mode To Change the scaler settings 1 Press and hold the desired OUTPUT button 1 through 4 on the bottom row that corresponds with the OUTPUT Display or Sink Device you...

Page 36: ...om the default 1 Press and hold 3 sec BYPASS from the audio settings top right of machine 2 Toggle selection by pressing the UP and DOWN buttons 3 Once a desired selection is found quick press the BYP...

Page 37: ...r BYPASS to control the delay 4 The current setting will be indicated on the LCD screen Audio Matrix Control Once in Matrix mode for audio the extracted audio routing on the AC MX 44HDBT can be con tr...

Page 38: ...ID options by pressing up or down repeatedly 4 Press the INPUT you had selected in order to apply the EDID this will still be illuminated These are the pre defined EDID settings that you can toggle th...

Page 39: ...to quickly and immediately connect to the matrix switch 1 Connect the LAN port into an active router port 2 On most networks you can simply type the Default IP address into any web browser The De fau...

Page 40: ...between the Tx and Rx is in tact This light should ALWAYS ALWAYS be SOLID SOLID If this light is flashing or not present attempt following 15 Check the length The maximum distances are 70m 230ft on 4K...

Page 41: ...m 330ft on 1080P 16 Remove any coils of cable and make sure that there is not excess cabling 17 Bypass all patch panels and punch down blocks 18 Re terminate connectors Sometimes even if a cable teste...

Page 42: ...t port and the right arrow increments to the next input port The numbers are for selecting a desired INPUT IR Receiving Eye Set the switch to EYE to utilize a 3 5mm IR receiving eye Not Included The I...

Page 43: ...ll using the command SET IRC OUTx VS INy This can also be controlled by the Web Interface IR NOTES On the HDBaseT Receiver 1 IR OUT IR Emitter for sending signals to a Display or Projector Note Use Pr...

Page 44: ...y to use for sending commands to the machine For TCP IP control commands use Telnet Port 23 For RS 232 use a null modem serial cable adapter and set the serial communications to 57600 n 8 1 baud 57600...

Page 45: ...45 Command List Baudrate 57600 Checksum None Bit Num 8 Stop Bit 1...

Page 46: ...46 Command List Continued...

Page 47: ...47 Command List Continued...

Page 48: ...vailable to be able to route audio however you want This can be used as a separate zoned audio matrix with only using an amplifier Setting up Extracted Audio Routing You can set up Extracted Audio Rou...

Page 49: ...Down mixing on this version see AC AXION 4 Toslink Audio Port Toslink extracted audio ports support up to 5 1 digital audio You can use balanced analog outputs in a balanced system but you can also p...

Page 50: ...0 and 41 IR Issues Verify correct connections Page s 42 and 43 Note Visibly flashing Emitters may not function properly if you are experiencing issue try the IR Cables that come in the box Lights indi...

Page 51: ...ntly Repair of the equipment should only be carried out by qualified professionals as these prod ucts contain sensitive components that may be damaged by any mistreatment Only use this product in a dr...

Page 52: ...behind We really wanted to take all the red tape out of a warranty and just make is simple Our 10 YEAR NO BS warranty hinges on 3 elements 1 If you are having trouble call us We will attempt to troub...

Page 53: ...sories IR Cables RS 232 Power Supplies etc are not included in the warranty We will make ac ceptable effort to source and supply replacements for defective accessories at a discounted rate as needed O...

Page 54: ...ality issues product redevel opment is not an option Discontinued or out of production items will be credited at fair market value towards a current product of equal or comparable capabilities and cos...

Page 55: ...55...

Page 56: ...56...

Page 57: ...57 Thank you for choosing AVProEdge Please contact us with any questions we are happily at your service AVProEdge 2222 E 52nd St N Sioux Falls SD 57104 1 877 886 5112 605 274 6055 support avproedge co...

Reviews: