Avocent DSR 2161 Installer/User Manual Download Page 57


  Chapter 5: Local Port Operation 

51 

To reset the mouse and keyboard values

1. 

From the Commands menu, click 

Reset

.

2. 

A message box displays indicating that the mouse and keyboard have been 
reset. Click 

X

 to close the message box.

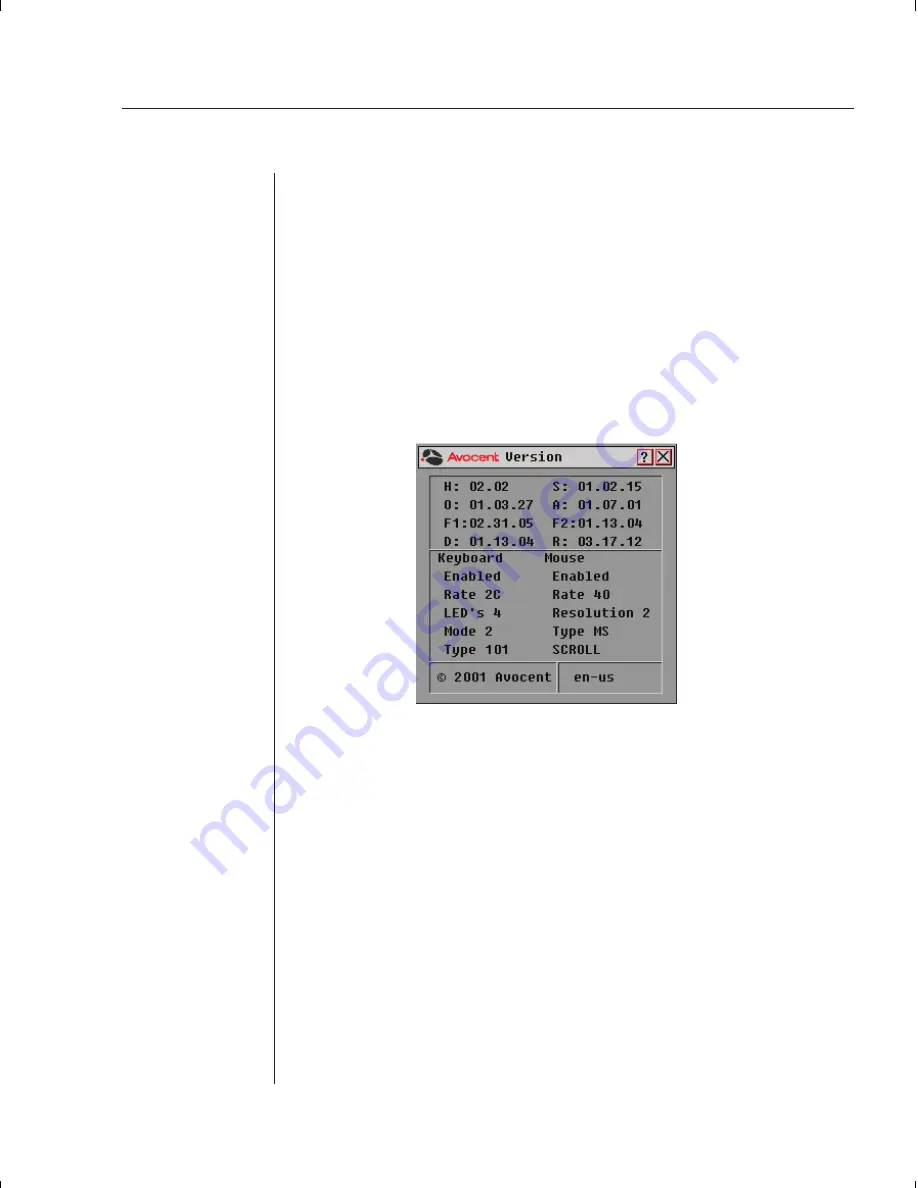
Displaying Version Information

Use the Version dialog box to display the version number of the DSR firmware 

and any auxiliary devices connected to the DSR as well as display keyboard 

and mouse information for the currently selected server.

This information facilitates system troubleshooting and support. For optimum 

performance, keep your firmware current.

To display version information

1. 

Click 

Version 

in the Commands dialog box. The Version dialog box is 

displayed.

2. Click 

X

 to close the Version dialog box.

Summary of Contents for DSR 2161

Page 1: ...DSR Installer User Guide DSR1161 DSR2161 DSR4160...

Page 2: ...equilateral triangle is intended to alert the user to the presence of uninsulated dangerous voltage within the product s enclosure that may be of sufficient magnitude to constitute a risk of electric...

Page 3: ...logo and The Power of Being There are trademarks of Avocent Corporation OSCAR is a registered trade mark of Apex Inc All other marks are trademarks or registered trademarks of their respective owners...

Page 4: ...dio communications Operation of this equipment in a residential area is likely to cause harmful interference in which case the user will be required to correct the interference at his own expense Cana...

Page 5: ...24 Chapter 4 Advanced Operations Changing the System Settings 29 Altering Authentication Server Settings 29 Altering DSView Settings 31 Macro Groups 34 Changing Cursor Settings 35 Adjusting Video Para...

Page 6: ......

Page 7: ...C H A P T E R Product Overview 1 Contents DSR Overview Features 3 Safety Precautions 4...

Page 8: ......

Page 9: ...a 100BaseT Ethernet connection or directly through a local port on the DSR for digital KVM and administration depending on the model selected The IP based DSR appliance gives you flexible server mana...

Page 10: ...undant user databases Once the topology is established the DSAuthentication Service software manages the system s user permissioning DSView polls the server for access permissions on power up and ever...

Page 11: ...not compromised Mechanical Loading Mounting of the equipment in the rack should be such that a hazardous condition is not achieved due to uneven mechanical loading Circuit Overloading Consideration sh...

Page 12: ......

Page 13: ...ion 2 Contents Getting Started 9 Installing the DSR Unit 10 Installing the DSAuthentication Service 13 Installing DSAdmin 14 Installing DSView 14 Adding a DSR to the System 15 Configuring Host PCs 16...

Page 14: ......

Page 15: ...nd activity reporting interface For more information see Chapter 5 The DSR system uses Ethernet networking infrastructure and TCP IP protocol to transmit keyboard video and mouse information between o...

Page 16: ...ate when the attached system is powered on The amber LED will illuminate when that port is selected by the DSView Client Setting up your network The DSR system uses IP addresses to uniquely identify t...

Page 17: ...est Approximately 10 seconds after it stops blinking press the Enter key to access the main menu B To configure the DSR hardware 1 You will see the Terminal Applications menu with six options Select O...

Page 18: ...DSRIQ cable to each server 1 Locate the DSRIQ cables for your DSR unit 2 Attach the appropriately color coded cable ends to the keyboard monitor and mouse ports on the first server you will be connect...

Page 19: ...hentica tion Server The installation will begin 3 Follow the on screen instructions Windows will determine if the Microsoft Windows Installer Service is available If it is not Windows will install it...

Page 20: ...wnloaded from Avocent The installation will begin 3 Follow the on screen instructions 4 During the installation a window will appear You will need to enter the name or IP address of the PC where the D...

Page 21: ...you have installed your hardware and software you will need to config ure the system for use To configure your system to add a DSR unit 1 Launch the DSAdmin software 2 Double click on the icons labele...

Page 22: ...gy and then Your Network Each IP address listed may be expanded by double clicking on it This will display the sixteen ports for the DSR corresponding to that address Each of these ports shares the DS...

Page 23: ...h as a description or emergency contact information pertaining to the selected port Rename Use this option to change the name of the port Permissions This option will allow you to configure an individ...

Page 24: ...and select Permissions This will activate the Permissions window 2 Click on Add button A menu will appear listing all users on the Windows domain network Double click on the user whose permissions yo...

Page 25: ...C H A P T E R Basic Operations 3 Contents Basic Operations Terminology 21 Keyboard Macros 23 Using the Session Window 24...

Page 26: ......

Page 27: ...ower will show that the unit is receiving power There are two LEDs above each port number on the front of your unit one green and one amber The green LED will illuminate when the attached system is po...

Page 28: ...y DSAuthentication Server the name of that server will appear in a status window If DSView is unable to communicate with the Primary Server it will attempt to com municate with the backup If DSView is...

Page 29: ...with numerous sequences pre configured for ease of operation Displaying Editing Macro Selection Buttons You can access a list of programmed keyboard macros by selecting Tools Keyboard Macros from your...

Page 30: ...the on screen macro buttons on and off Toolbar Macro Set Allows you to select alternate toolbar macro sets For more information see About Macro Groups in Chapter 4 Video Refresh Frame Forces a comple...

Page 31: ...t Used to change the keyboard emulation mode for the Host Computer It should not be changed from Scan Set 2 except in rare cases Video For more information see Adjusting Video Parameters in Chapter 4...

Page 32: ......

Page 33: ...R Advanced Operations 4 Contents Changing the System Settings 29 Altering Authentication Server Settings 29 Altering DSView Settings 31 Macro Groups 34 Changing Cursor Settings 35 Adjusting Video Par...

Page 34: ......

Page 35: ...selected users without Administrator access will only receive a message that the port is in use Automatic Deletion of Audit Logs Here administrators can determine how long logfiles are kept before the...

Page 36: ...ctivate the Configure Authentication Servers List window 2 Click the name of the Primary Server that you wish to change and select the Modify button on the right side of the window 3 You will be promp...

Page 37: ...o controlling a different topology a Full Resynchroniza tion should be performed This will force a check of all elements and should only be performed when necessary as it consumes a great deal of time...

Page 38: ...needs to be released before the next keystroke is entered double click the keystroke in the Double Click for Key Release window to move it to the Macro Created window If not leave this key in the Doub...

Page 39: ...ss Left Ctrl will appear in the third window 3 F1 F2 and F3 are pressed and released in order Locate F1 in the Double click for Key Press window and double click it It will move to the second window a...

Page 40: ...To create a Macro Group 1 From a DSView Session window select Keyboard Macro to activate the Keyboard Macro Configuration window 2 The subwindow titled Macro Groups contains eight macro groups avail...

Page 41: ...rnate cursor will look like move your mouse pointer over the area labeled Preview Area 5 When you have selected a new cursor click on the OK box at the bottom of the window Adjusting Video Parameters...

Page 42: ...in the Session window is not clear select Tools Video Auto Adjust first This command is also available in the Video Adjustments window In most cases this will correct video problems In those cases wh...

Page 43: ...ustments independently The Fine setting may be adjusted up or down in eight unit increments To save the Video Adjustment settings once you ve finished click on the OK button at the bottom of the Video...

Page 44: ......

Page 45: ...Local Port Operation Contents Controlling your System at the Local Port 41 Viewing and Selecting Ports and Servers 41 Configuring OSCAR 44 Resetting your Keyboard and Mouse 50 Displaying Version Info...

Page 46: ......

Page 47: ...names Viewing and Selecting Ports and Servers Use the Main dialog box to view configure and control the servers in the DSR system To access the Main dialog box Press Print Screen to start OSCAR and g...

Page 48: ...state with no server selected The status flag on your desktop displays Free Soft Switching After you press Print Screen to initially open the OSCAR GUI you can select servers without displaying OSCAR...

Page 49: ...text box it selects the text for editing and enables the left and right arrow keys to move the cursor Press Enter again to quit the edit mode Print Screen Backspace Toggles back to previous selection...

Page 50: ...menu 1 Press Print Screen The Main dialog box will appear 2 Click Setup in the Main dialog box The Setup menu appears Setup Features to Manage Routine Tasks for your Servers Menu Change the server li...

Page 51: ...r Select Port to display servers numerically by port number 2 Click OK If the servers are displayed by name the Name button is depressed in the Main dialog box and the indicator defaults in the Name c...

Page 52: ...tatus flag displays on your desktop and shows the name or port number of the selected server or the status of a particular port Use the Flag dialog box to display the flag by port number or by server...

Page 53: ...ty dialog box to set security on your local port console You can establish a screen saver mode that engages after your console remains unused for a user definable time delay Once engaged your console...

Page 54: ...6 Click OK To log in to your console 1 Press any key on the keyboard or move your mouse The Password dialog box appears Type your password and then click OK 2 Press Print Screen to start the OSCAR GU...

Page 55: ...ctivate the screen saver test which lasts 10 seconds then returns you to the Security dialog box 6 Click OK NOTE Activation of the screen saver mode disconnects the user from a server no server is sel...

Page 56: ...nsert a character space 2 Repeat step 1 for each server in the system 3 Click OK to save the names or Click Defaults then click OK to restore default settings or Click X or press Escape to exit the di...

Page 57: ...rsion dialog box to display the version number of the DSR firmware and any auxiliary devices connected to the DSR as well as display keyboard and mouse information for the currently selected server Th...

Page 58: ......

Page 59: ...C H A P T E R Terminal Operations Contents Accessing the Terminal Menu 55 6...

Page 60: ......

Page 61: ...twork configuration The DSR is configured for Network Access through this option When it is selected you will have access to the addressing that allows the DSR to be positioned in your network Securit...

Page 62: ...vailable from Avocent You may use the Toggle Boot Firmware command to switch from your current firmware back to the original factory firmware installed on your DSR unit For more information see Append...

Page 63: ...and a new one 3 Re enter the new password to verify CAUTION This password places your DSR Terminal in a secure mode This password should be guarded like any network password and care should be taken...

Page 64: ......

Page 65: ...Appendices Contents Appendix A FLASH Upgrades 61 Appendix B Technical Specifications 62 Appendix C Technical Support 63 Appendix D TCP Ports 64...

Page 66: ......

Page 67: ...If the DSR is not on turn it on now After approximately 10 seconds press any key to access the main menu 3 You will see the Terminal Applications menu with six options Select Option 3 Firmware managem...

Page 68: ...end and a country dependant plug on the power resource end AC Frequency 50 60 Hz Auto Sensing Temperature 32 to 104 degrees Fahrenheit 0 to 40 degrees Celsius operating 4 to 158 degrees Fahrenheit 20...

Page 69: ...stest possible service 1 Check the pertinent section of the manual to see if the problem can be resolved by following the procedures outlined 2 If you are unable to find a resolution recreate the prob...

Page 70: ...on a specific port to initi ate a KVM session with that port on the DS1800 The DSView client contacts the DSAuthentication Server which checks the permissions on the port again If the logged user has...

Page 71: ...P port 8192 until the DSView client closes the session If the DSView user wishes to establish a session with another DS1800 port the same process is used Avocent Service TCP IP Port 8191 TCP IP Port 2...

Page 72: ...IP port 2068 connection When the backup Authentication Service is active it communicates with the Primary Avocent Authentication Service via TCP port 8193 Changes to the topology are copied to and fr...

Page 73: ...nder load 2 If defect or malfunction was caused by abuse mishandling unauthorized repair or use other than intended 3 If unauthorized modifications were made to product 4 If unreported damages occurre...

Page 74: ...el 353 61 715 292 Fax 353 61 471 871 Avocent Asia Pacific Singapore Branch Office 100 Tras Street 15 01 2 Amara Corporate Tower Singapore 079027 Tel 65 227 3773 Fax 65 223 9155 Avocent Germany Gottlie...

Reviews: