


MLN-192 Option Card Installation
12
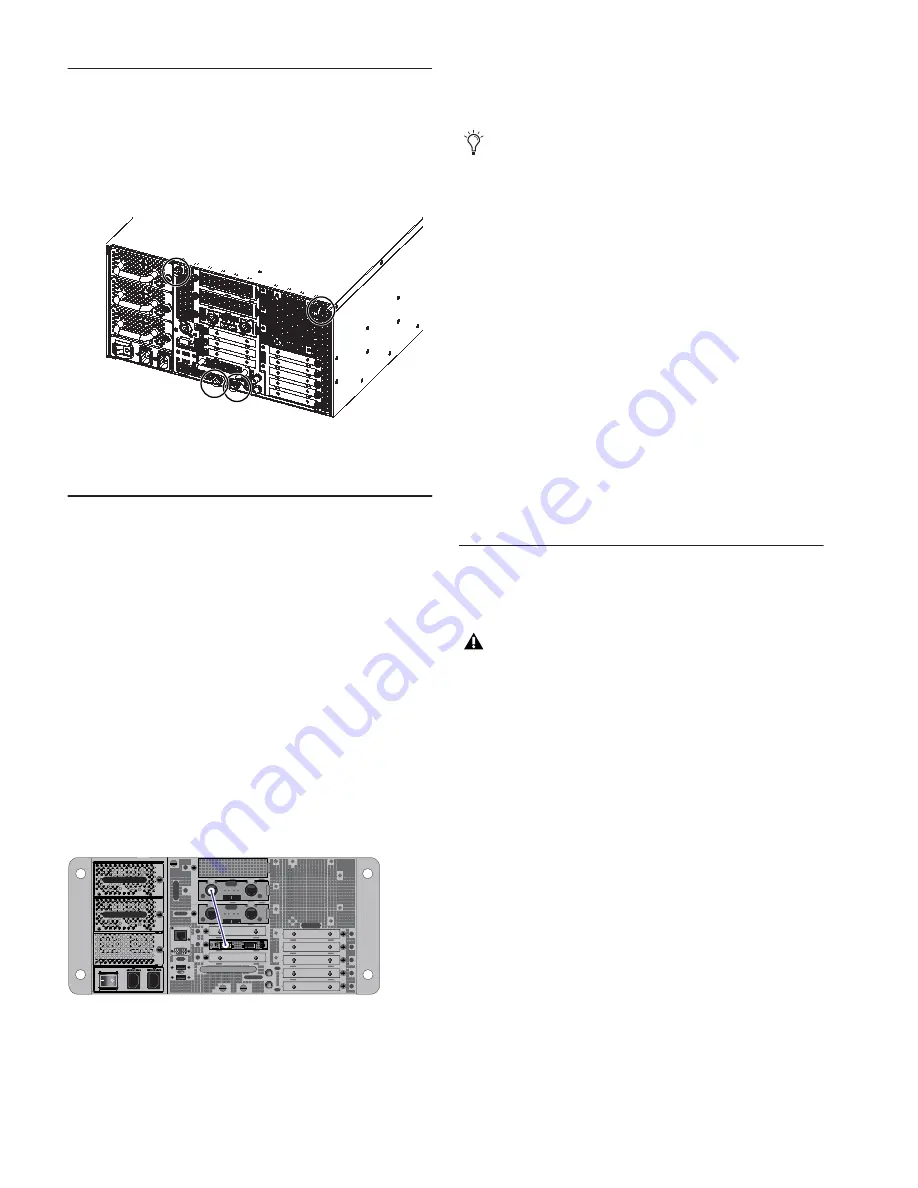
Re-install the E6L Engine Core
1
Slide the core back into the E6L chassis, making sure the con-
nectors face outward.
When the core is fully seated into the chassis, the two latches
at the bottom of the chassis should be fully collapsed.
2
Tighten the four thumbscrews to secure the core to the chassis.
3
Proceed to “Updating MLN-192 Firmware.”
Updating MLN-192 Firmware
After installing the MLN-192 Milan Option Card in your E6L en-
gine, do the following to update its firmware.
To update MLN-192 Milan Option Card firmware:
1
Make sure VENUE 7.0 is installed.
2
Connect and power up all components of the system.
3
Make sure all devices are connected in
Options > Devices
, and
that all component firmware updates have completed.
4
At the back of the E6L engine, disconnect one network cable
from top-most AVB card (Network 2 on systems with 2x
AVB-192 cards, or Master on engines with only 1x AVB-192
card).
5
Connect an Ethernet cable (Cat5e or better) from the AVB-192
port you just disconnected to either Ethernet port on the
MLN-192 card.
If the MLN-192 firmware needs to be updated a banner display
appears on screen (the firmware update begins automatically
when the cards are connected).
6
Let the firmware update complete. You can wait for the banner
display to indicate the update has finished, or go to
Options >
Devices
to view progress of the update.
7
After the firmware update has completed, shut down the entire
system.
8
Disconnect the Ethernet cable from the AVB-192 card and
MLN-192 card.
9
Make sure you reconnect any cables that may have been tem-
porarily disconnected from an AVB-192 card to perform the
MLN-192 firmware update.
10
Proceed to “Confirming Installation.”
Confirming Installation
After installing the MLN-192 card and updating firmware (if nec-
essary), confirm that the installation was successful.
To confirm installation:
1
Power on your engine, control surface, and State I/O units.
2
Go to the
Options > Devices
page. Your newly installed
MLN-192 card should appear in the appropriate slot in the
EX-
PANSION
column.
If the newly installed card does not appear in the
Options > Devices
page:
• Make sure VENUE 7.0 or higher is installed on your sys-
tem.
• If VENUE 7.0 or higher is installed and the card still does
not appear, refer to the previous instructions to remove the
E6L engine core, then check to make sure the card is fully
seated in its slot and that all cables are fully connected to the
correct ports on all cards.
• If problems persist, contact VENUE support.
For information on configuring and using the MLN-192 Card, see
the
VENUE S6L System Guide.pdf
.
Figure 51. Four thumbscrews on the back of the E6L
Ethernet connection between an AVB-192 card and MLN-192 card,
for firmware update (other network connections not shown)
IN
OUT
NETWORK
MASTER 1
WORD CLOCK
UTIL
EXPANSION
2
3
6
7
8
1
2
3
4
5
OK
OK
A
B
AVB-192
ACT
SIG
ACT
SIG
ACT SIG
ACT SIG
A
B
AVB-192
ACT
SIG
ACT
SIG
ACT SIG
ACT SIG
A
B
Not all MLN-192 cards will need their firmware updated. If
no firmware update appears to be taking place, go to Op-
tions > Devices, click to select the MLN-192 card in the
EXPANSION column, then click INFORMATION at the left
of the screen. MLN-192 cards with firmware version
7.0.0.63 or higher do not need to be updated (lower ver-
sions will need updating). Note that the system is only able
to query and display the current firmware version while the
MLN-192 card is connected to the AVB-192 card. You can
also check the firmware version from AVDECC controller
software such as Hive.
VENUE software version 7.0 or higher is required.


