


The Petite-X Revision B 03/2010
SERVICE MANUAL AVALON
La Petite-X
Single-Cup Brewer
63
Servicing Parts
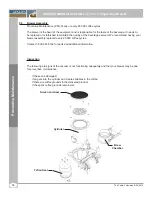
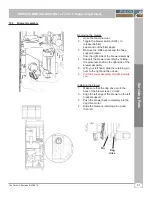
10.5 Main Board
Like all electronic main boards, they are very susceptible to power surges in the building. If this is your
reason for changing the main board and this persists, verify your power source. Use the necessary
precautions for handling static senistive devices.
Removing
1. Retrieve all your data;
2. Turn off the machine and unplug from the outlet;
3. Open the door and remove the lexan plate via the 4 screws;
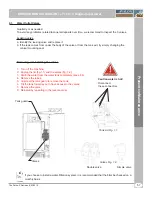
4. Unplug the connections:
(Clockwise from the top left corner);
-
MDB Port
(if coinco)
-
Main board
: J11, J12, J18, J27, J2, J19, J3, J6, J16,
J24, J8, J22
5. Unscrew 4 plastic 1” posts;
6. Remove the board.
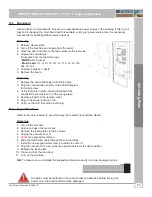
Replacing
1. Replace the board and fasten with the 4 posts;
2. Plug the connections and refer to the board diagram
for full size view;
3. Verify that all is in place, the board will fail if the
connections are reversed or in the wrong place;
4. Replace all parts in the reverse order;
5. Plug in the brewer and turn it on;
6. Verify on the LCD that all is functioning.
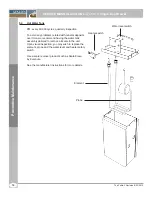
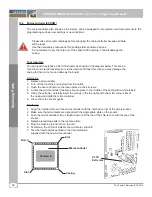
10.6 Keypad Membrane
Refer to the picture below to see which way the membrane should be placed.
Replacing
1. Turn off the machine;
2. Unlock and open the main door;
3. Remove the lexan plate via the 4 screws;
4. Unplug the connection J16;
5.
Unstick
the keypad membrane;
6. Slide the membrane cable through the door carefully ;
7. Install the new keypad membrane, be careful to center it;
8. Plug the connection J16 as it was (see picture below for the right position);
9. Replace the lexan plate;
10. Close and lock the main door;
11. Turn on the machine.
N.B.
To make sure you installed the keypad membrane correctly run a few beverage cycles.
All cables must be replaced in the correct order and direction before turning the
power on or the board will fail and be damaged.


