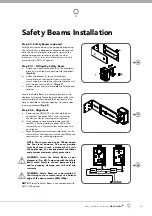
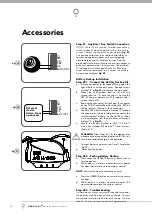
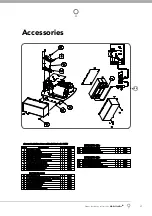
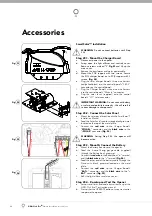
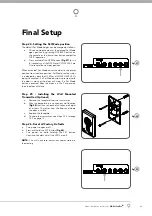
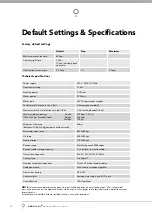
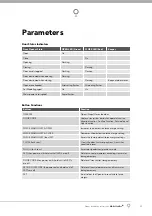


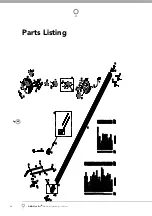

Owner Installation Instructions
GDO-11v2 Ero®
35
1. This Warranty is given by Automatic Technology (Australia)
Pty Ltd (ABN 11 007 125 368) (ATA), 6-8 Fiveways Boulevard,
Keysborough 3173, 1300 133 944, [email protected]
2. The Competition and Consumer Act 2010 (including the
Australian Consumer Law) and other relevant statutes provide a
set of statutory consumer guarantees and other legal rights that
cannot be excluded, restricted or modifi ed by contract. This
Warranty is in addition to and does not affect any of your rights
under the Australian Consumer Law and other relevant statutes.
3. Our goods come with guarantees that cannot be excluded
under the Australian Consumer Law. You are entitled to a
replacement or refund for a major failure and for compensation
of any other reasonably foreseeable loss or damage. You are
also entitled to have the goods repaired or replaced if the
goods fail to be of acceptable quality and the failure does not
amount to a major failure.
4. Subject to your non-excludable rights under the Australian
Consumer Law, ATA expressly excludes any liability for
consequential loss, incidental or indirect damages (including
but not limited to damages for loss of business profi ts, business
interruption and loss of business information) due to a defect of
the GDO-11 EroTM (Product). In particular any loss or damage
caused to other equipment or accessories used with the
product or any loss resulting from a delay in repair is excluded
to extent permitted by law.
5. Subject to all of the matters set out below, ATA warrants in
relation to the Product that:
(a) the Product’s overhead door opener drive units will be free of
any defects in material and workmanship for at least 24 months
after the date of purchase (as evidenced by the sales docket
receipt), or 5,000 cycles, which ever occurs fi rst; and
(b) the Product’s other components and accessories will be free of
any defects in material and workmanship for at least 12 months
after the date of purchase (as evidenced by the sales docket
receipt).
6. No additional warranty will apply for Products repaired during
the relevant warranty period.
7. For all Products repaired outside the warranty period, a six (6)
month warranty that the Product will be free of any defects in
material and workmanship will apply from the date of dispatch
of the Product to you. ATA may charge you for any repairs
undertaken outside the warranty period, and will provide you
with a quotation in relation to any such costs for your approval
before proceeding with any repairs.
8. This Warranty applies only where you:
(a) immediately notify ATA at the contact details provided
in paragraph 1 above or notify the or the retailer that you
purchased the Product from of the alleged defect;
(b) return the product to the retailer that you purchased the
Product from; and
(c) present the relevant sales docket and this Warranty document
to the retailer to confi rm the date of purchase.
9. Except for this Warranty, ATA gives no warranties of any kind
whatsoever (whether express or implied), in relation to the
product, and, subject to paragraph 1 above, all warranties of
whatsoever kind relating to the product are hereby excluded.
10. This Warranty excludes damage resulting from:
(a) normal wear and tear;
(b) accidental damage;
(c) incorrect installation of the Product;
(d) blown fuses, electrical surges, power surges or power spikes;
(e) theft, fi re, fl ood, rain, water, lightning, storms or any other acts
of God;
(f) any installation, confi guration or use of the Product contrary to
the instructions supplied with the Product;
(g) maximum continuous operating time exceeding 1 minute in 10;
(h) the operating force exceeding 15kg* (150 Newton) when moving
the door manually to the open or closed position;
(i) the door surface area exceeding 13.5m2;
(j) the door used with the Product not being in safe working order and
condition;
(k) repairs which are not authorised by ATA;
(l) any failure to install or maintain the Product in accordance with the
instructions supplied with the Product;
(m) any use which is not in accordance with the instructions provided
with the Product;
(n) deliberate or negligent damage to the Product;
(o) any unauthorised modifi cation to the Product;
(p) faulty or unsuitable wiring in the building in which the Product is
installed;
(q) damage caused by insects;
(r) any cost or expense relating to the recall of the Product;
(s) installation of a residential garage door opener in a commercial
or industrial premises or in a dwelling other than a single-family
dwelling;
(t) radio or electrical interference; or
(u) acts or omissions of any person (including service providers
approved by ATA) other than ATA.
11. ATA’s liability under this Warranty is limited, at ATA’s absolute
option, to replacing or repairing the product which ATA, in its
unfettered opinion, considers to be defective either in material
and/or workmanship or to credit the dealer with the price at which
the product was purchased by the dealer.
12. This Warranty does not extend to cover labour for installation of the
Product following repairs, the cost of which must be borne by you.
13. This Warranty is limited to Return-to-Base (RTB) repair and does
not cover labour for on-site attendance, the cost of which must be
borne by you.
14. Except as specifi ed in this Warranty, ATA will not charge you for any
repairs or replacements conducted under the Warranty. However,
ATA will charge you for any repairs which are not within the scope
of this Warranty (or which are not required to be undertaken free of
charge pursuant to the Australian Consumer Law).
15. This Warranty is void if the Product is not returned to the
manufacturer in original or suitably secure packaging.
16. This Warranty is only applicable for repairs to the product carried
out within Australia.
17. This Warranty does not cover consumable items including, without
limitation, globes, batteries and fuses.
18. This Warranty is not transferable.
19. Where the Product is retailed by any person other than ATA, except
for the warranty set out above, such person has no authority from
ATA to give any warranty or guarantee on ATA’s behalf in addition
to the warranty set out above.
20. Any provision of this Warranty that is prohibited or unenforceable
in any jurisdiction is ineffective as to that jurisdiction to the extent
of the prohibition or unenforceability. That does not invalidate
the remaining provisions of this Warranty nor affect the validity or
enforceability of that provision in any other jurisdiction.
21. Products presented for repair may be replaced by refurbished
goods of the same type rather than being repaired. Refurbished
parts may be used to repair the Product.
NOTES:
1. One (1) cycle = one (1) open and one (1) close action of the door.
2. This Warranty is to be read in conjunction with the owner’s copy of
the installation instruction manual.
3. * The door that the Product is used with should be balanced in such
a way that the user is able to open or close the door manually using
a force not greater than 150 Newton (15 kg), other than to initially
cause the door to start moving, which may require force in excess of
that specifi ed in this paragraph.
Warranty and Exclusion of Liability


