Auto Meter BVA-200s Operator'S Manual Download Page 6

6JIDB:I:G

7K6'%%h

HNHI:B6C6ANO:G

G:69NID8DCC:8I

19

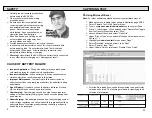
CONTROLS AND FUNCTIONS
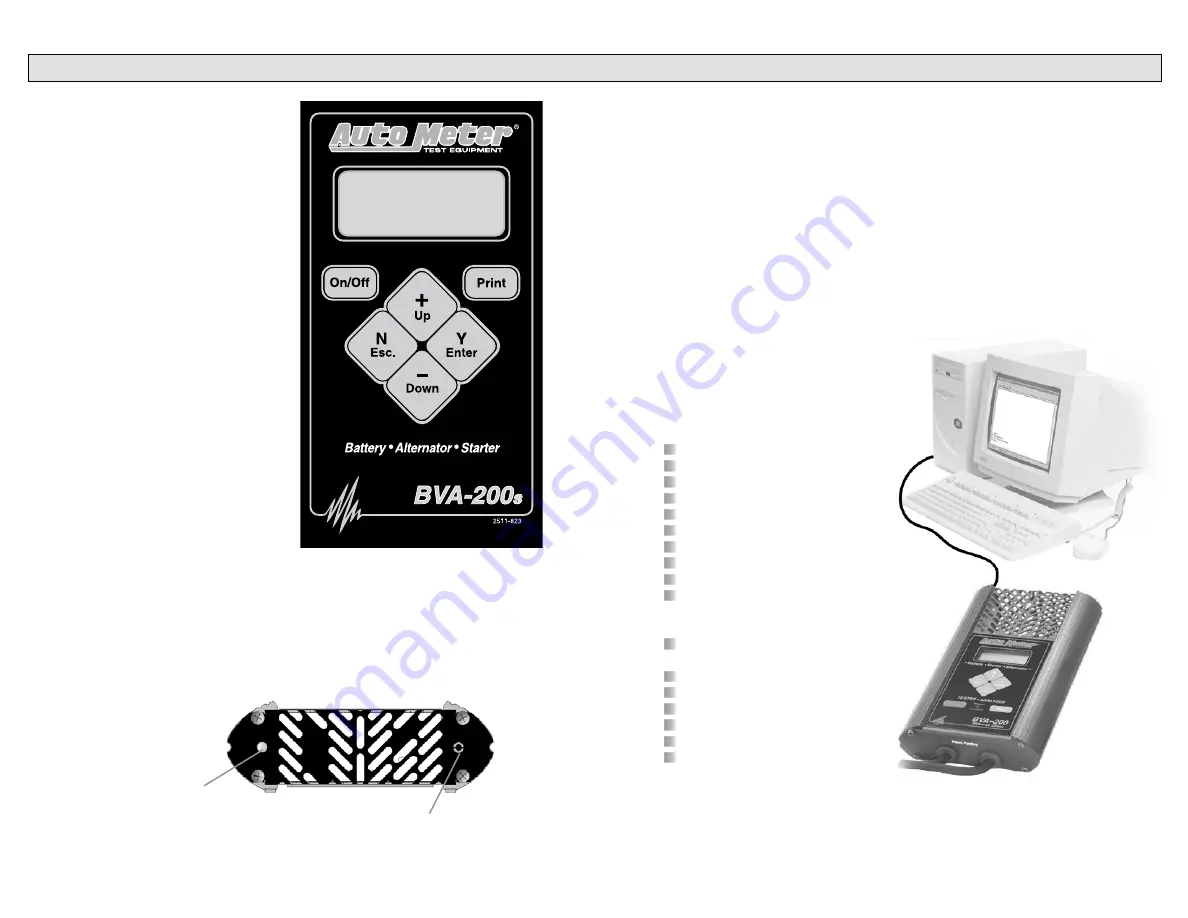
LCD: 

Displays menus and test results.  

KEYS: 

When each key is pressed, a beep 
sounds to assure contact has been 
made.

On/Off 

Key:


This is the manual on/off key. 
The display will show 

“Ready to 

Connect!” 

when the unit is turned on.

Y Enter 

Key: 

This key selects the next menu, the 
cursor line item and answers ‘

yes’

 to 

a test progression. 

+Up 

Key

This key moves the cursor up in 
order to select a menu line item and 
increments certain displayed values.  

-Down 

Arrow Key: 

This key moves the cursor down 
in order to select a menu line and 
decrements certain displayed values. 

N Esc 

Key: 

This key cancels a test or progression.  It also returns to the previous menu.

Print 

Key

Point the BVA-200s infrared print light towards the 

Optional AC-22

 infrared 

printer receiver and press the print key. Test results will be printed. 

PC Download Jack:  

Adapter cord inserted here.

Infrared Print Light: 

When the print button is pressed infrared data 
will be transmitted to the printer if pointed in the 
appropriate direction (up to 40 ft.).  

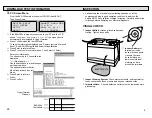
  Select Windows “Start”
  Then “Programs”
  Then “Accessories”
  Then “Communications”
  Then “Hyper Terminal”
  Double Click Hypetrm.exe Application
  Type in a name for your connection

  Select an icon for future identification

  Select OK
  Select the COM port number you have 

previously 

identified in step 1.

  Select OK and select the following from the 

pull down menus:

  Bits per second  9600
  Data bits             8
  Parity                  None
  Stop Bits             1
  Flow Control       None
  Select OK


Note:

 Most computers are configured with at least one serial port (identified as COM 1), 

and some have a second serial port, usually identified as (COM 2).  Check your computer 

manual to locate and identify a serial port connector.  Even if you have a physical COM 
port you need to make sure it is working properly before you proceed.  Consult your 

computer manual.  If your computer serial port is configured for 25 pin you will need to 

obtain an adapter from your computer store.  If your computer does not have an available 
serial port and you're planning on using

 Windows HYPER Terminal

 as illustrated below, 

you will need to buy and install an adapter card with a serial port. 

The BVA-200s will interface with any basic (ANSI) terminal emulation software. Most 
operating systems contain a program that will 
do this. For other operating systems consult the 
Manual for that system.

Using Auto Meter's optional adapter cord AC-12 insert the stereo plug into 
the jack on the BVA-200s (see page 6) and then plug the serial adapter 
into a free serial port on the rear of your computer.   

2. 

Opening Windows 

      HyperTerminal: 

PC INTERFACE

Summary of Contents for BVA-200s

Page 1: ...ortability in a professionally accurate load tester and system analyzer Rev C Auto Meter Products Inc 350 West Center Street Pleasant Grove Utah 84062 Service 801 785 0051 ext 223 Toll Free 866 883 TE...

Page 2: ...WARRANTY 12 MONTHS FROM DATE OF PURCHASE CABLES 90 DAYS The manufacturer warrants to the consumer that this product will be free from defects in material or workmanship for a period of twelve 12 mont...

Page 3: ...ing Test Results 17 Voltmeter 18 Setup 18 PC Interface 19 Opening Windows 98 Hyper Terminal 19 Downloading Test Information 20 Capturing Information in Microsoft Excel 21 Warranty Information 23 Conta...

Page 4: ...greatly reduce battery life and affect battery performance Age of Battery If the date code on the battery indicates it is fairly old the failure may be caused by natural causes Overcharging Overcharg...

Page 5: ...Est Output DOWNLOAD TEST INFORMATION 3 PC Screen Menu If the BVA 200s is properly connected to your PC and the LCD shows CONNECT ANALYZER TO A PC the menu should automatically be displayed in Hyper Te...

Page 6: ...e in a name for your connection Select an icon for future identification Select OK Select the COM port number you have previously identified in step 1 Select OK and select the following from the pull...

Page 7: ...g down make sure the red clamp wires are attached to the left buss and the black clamp is attached to the right buss Putting a little mineral spirits on the new cable ends will help with ease of inser...

Page 8: ...er jaw CHECK CONNECTIONS will flash Make sure the Infrared Printer is properly set up After a test is made with the BVA 200s make sure the results are displayed on the LCD Point the BVA 200s in the di...

Page 9: ...t test will be displayed Press N Esc to select previous test Press Up or Down key to select the desired test The optional AC 15 printer An invisible infrared beam links the BVA 200s to the printer fro...

Page 10: ...cally a ripple above 50mV indicates a bad diode If the system has a strong battery the ripple will be lower than if the system has a weak battery NOTE 2 If the LCD reads LOW OUTPUT or EST OUTPUT it is...

Page 11: ...eck belt condition and tension Check all cables and connections Check the battery for corrosion and dirty terminals Does the battery have a low state of charge See section 2 and 3 Make sure all electr...

Page 12: ...ngine After a few seconds the test result will appear Compare draw reading with manufactures specifications If manufacturer s specifications are not available the chart below can be used as a general...

Reviews: