background image

-  

installer


GIALIX 24 MA C -BC


manual

  -  

18

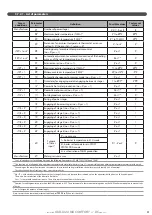
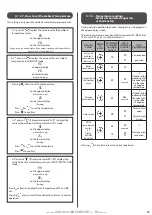
3.6.8 - Lowering the boiler temperature by disconnecting the heating elements

To supply power to the boiler using smaller fuses (see § «Setting the regulator»), it is necessary to permanently lower the boiler’s power level 

by disconnecting the heating elements as shown in the following diagrams: 

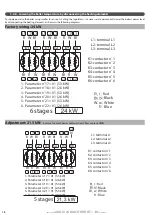
Factory wiring: 24kW

Black

Blue

White

W  w

6 stages

Bl

Bl

Bl

W

W

W

R

R

R

R

R

R

W

W

W

Bl

Bl

Bl

w

w

w

w

w

w

L1: terminal L1

L2: terminal L2

L3: terminal L3

K1: contactor n˚1

K2: contactor n˚2

K3: contactor n˚3

K4: contactor n˚4

K5: contactor n˚5

K6: contactor n˚6

1- Parameter n˚17 = 01 (5.3 kW)

2- Parameter n˚18 = 01 (2.6 kW)

3- Parameter n˚19 = 01 (5.3 kW)

4- Parameter n˚20 = 01 (2.6 kW)

5- Parameter n˚21 = 01 (5.3 kW)

6- Parameter n˚22 = 01 (2.6 kW)

Red

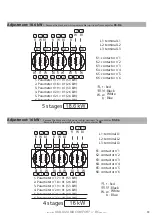
Adjustment: 21.3 kW: 

• Remove the black power cable upstream from contactor 

K6

1- Parameter n˚17 = 01 (5.3 kW)

2- Parameter n˚18 = 01 (2.6 kW)

3- Parameter n˚19 = 01 (5.3 kW)

4- Parameter n˚20 = 01 (2.6 kW)

5- Parameter n˚21 = 01 (5.3 kW)

6- Parameter n˚22 = 00 (0.0 kW)

5 stages

Black

Blue

White

W  w

Red

L1: terminal L1

L2: terminal L2

L3: terminal L3

K1: contactor n˚1

K2: contactor n˚2

K3: contactor n˚3

K4: contactor n˚4

K5: contactor n˚5

K6: contactor n˚6

R

R

R

W

W

W

Bl

Bl

Bl

Bl

Bl

Bl

W

W

W

R

R

R

w

w

w

w

w

w

Summary of Contents for 132616

Page 1: ...non contractual Auer reserves the right to modify all technical data for any equipment or appliance at any time without prior notice Gialix 24 MA Comfort Ref 132616 GIALIX 24 MA COMFORT Wall mounted electric boiler BC Electronic regulation 1 heating circuit dependent on exterior temperature 1 domestic hot water circuit ...

Page 2: ...uctors based on voltage supplied 16 3 6 4 Control circuit schematic diagram 16 3 6 5 Connection to the control circuit 17 3 6 7 Wiring diagram 18 3 6 8 Lowering the boiler temperature by disconnecting the heating elements 20 3 7 Set up 22 3 7 1 Filling the installation 22 3 7 2 Setting the regulator 22 3 7 2 1 List of parameters 23 3 7 2 2 Pairing of stages 24 3 7 2 3 Programming the boiler for ma...

Page 3: ... installer GIALIX 24 MA COMFORT BCmanual 3 ...

Page 4: ...heir current version in effect in the country of installation and use In France we conform specifically to the NFC 15 100 electrical installation standard Humidity and water splashes The appliance should be installed in an area where it is not exposed to humidity and without any risk of being splashed by water Applicable areas of use This appliance is intended for use as an appliance for the produ...

Page 5: ...for operation on a high temperature network from 22 to 80 C with a 100o C high temperature limiter radiator or underfloor heating with domestic hot water production application For a low temperature application of 21 to 50 C with a 60 C high temperature limiter Set parameter 02 TCMA to a value less than or equal to 50 C see Setting the regulator Remove the front panel Connect the 60 C aquastat The...

Page 6: ...oltage directive LVD 2014 35 UE Electromagnetic compatibility directive EMC 2014 30 UE Directive for the setting of eco design requirements for energy related products 2009 125 CE Restriction of hazardous substances in electrical electronic equipment directive ROHS 2011 65 UE Designation Gialix 24 MA Comfort 400Vthree phase Maximum heat output P1 factory wired 24 kW Number of power stages 6 400V t...

Page 7: ...pressure under 0 3 bars re engaged when over 0 5 bars Signals faulty sensor code pressure or temperature Green LED winter mode Fixed Signals operation in winter mode heating DHW Flashing Signals a switch to winter mode in progress Green LED summer mode Fixed Signals operation in summer mode Flashing Signals a switch to summer mode in progress button Increases the value being set Allows the reading...

Page 8: ...CS Domestic hot water sensor V3V 3 way valve with counter spring ECS Domestic hot water LTP Underfloor heating 65 C temperature limiter with manual reset mandatory or or Radiator circuit Underfloor heating circuit Electric boiler Domestic hot water production tank OR Backflow prevention device French law requires that a backflow prevention device be fitted onto the installation Please check the cu...

Page 9: ...n e g adifferentialvalve It is imperative to refer to the installation instructions for the placement and mounting of the ambient temperature thermostat to ensure satisfactory operation Purging Periodically chack that air is being purged from the high points of the hydraulic installation 3 3 1 Filling water 3 3 2 Treatment of the heating circuit The materials used for the production of a heting ci...

Page 10: ...ew installations the formation of sludge and the proliferation of bacteria in low temperature networks algae prevents the formation of hydrogen eliminates the sound of the generators Treatment products from other manufacturers can be used if they guarantee that the product is appropriate for all the materials used in the appliance and offers efficient resistance to corrosion To find this informati...

Page 11: ...ated at least 300mm above any obstacles to allow for the removal of the heating elements from beneath the appliance It must be placed at least 100mm beneath the ceiling to allow space for the hydraulic connections Embedding The boiler must be at least 10mm away from side walls 3 4 3 Placement of the boiler 3 4 3 1 Removing the front panel 3 4 3 2 Wall mounting Pin for Ø8 lag bolt Pin for Ø8 lag bo...

Page 12: ...lements to the proper terminals the general power supply for the power circuit the different control circuits The Gialix electric boiler must be protected by an all pole protective device with a minimum contact gap of 3mm EN 60 335 1 with fuses or a thermal magnetic circuit breaker which is sized based on the heating capacity of the boiler 3 6 1 Current consumption Number and cross sections of pow...

Page 13: ...dth of the largest supply cable 3 6 1 3 Fuse size 3 6 2 Electrical connection terminals The terminal strips are spring loaded CAGE CLAMPs For handling For 2 5mm control terminals use a 3 5 x 0 5 mm flathead screwdriver For 10mm or 16mm mains power terminals use a 5 5 x 0 8 mm flathead screwdriver For 4mm intermediary power terminals use a 3 5 x 0 5 mm flathead screwdriver Placement of the cable cl...

Page 14: ...ound L1 Phase N Neutral F Fuse A4 size 5x20 C1 Electronic board with display CC 3 speed circulator TA ou SA Ambient temperature thermostat or sensor AqECS DHW aquastat or SECS DHW sensor SExt Exterior sensor SC Boiler sensor V3V ECS DHW 3 way valve counter spring AQS1 60 C safety aquastat with manual reset AQS2 100 C safety aquastat with manual reset K1 to K6 20A power contactors DT Total load she...

Page 15: ...ting 65 C temperatue limiter with manual reset mandatory see Description 12 13 Partial load shedding DP1 remove the yellow jumper 4 15 Partial load shedding DP2 remove the yellow jumper 20 21 Timer Topreventdisturbancesinsensor readingsbytheregulator independentlywirethecablesforthe electricalnetwork raceways cable channels andavoidjunctionboxes Theconductorsmustbemadeofelectrolytic copper nooxidi...

Page 16: ... GIALIX 24 MA COMFORT BCmanual 16 3 6 7 Wiring diagram black purple red orange yellow white red blue black Timer TRANSFORMER black red white white red black blue blue brown brown pink pink grey grey orange black ...

Page 17: ...t water aquastat or SECS Domestic hot water sensor SExt Exterior sensor SC Boiler sensor H Timer V3V DHW 3 way valve with counter spring AQS1 60 C safety aquastat with manual reset AQS2 100 C safety aquastat with manual reset K1 to K4 20A contactor T1 and T2 6kW heating elements black purple red orange yellow white black red white white red black blue blue red white black red white black red white...

Page 18: ... n 2 K3 contactor n 3 K4 contactor n 4 K5 contactor n 5 K6 contactor n 6 1 Parameter n 17 01 5 3 kW 2 Parameter n 18 01 2 6 kW 3 Parameter n 19 01 5 3 kW 4 Parameter n 20 01 2 6 kW 5 Parameter n 21 01 5 3 kW 6 Parameter n 22 01 2 6 kW Red Adjustment 21 3 kW Remove the black power cable upstream from contactor K6 1 Parameter n 17 01 5 3 kW 2 Parameter n 18 01 2 6 kW 3 Parameter n 19 01 5 3 kW 4 Par...

Page 19: ...2 6 kW 6 Parameter n 22 00 0 0 kW 5 stages Bl Bl Bl W W W R R R R R R W W W Bl Bl Bl w w w w w w Adjustment 16 kW Remove the black and white power cables upstream from contactor K5 K6 Remove the red power cable upstream from contactor K5 Black Blue White W w L1 terminal L1 L2 terminal L2 L3 terminal L3 K1 contactor n 1 K2 contactor n 2 K3 contactor n 3 K4 contactor n 4 K5 contactor n 5 K6 contacto...
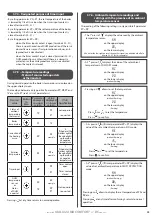
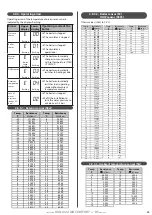
Page 20: ...display screen example 12 C The pressure in bars will appear on the lower display screen Check that the pressure is above 0 5 bars If this is not the case adjust the filling of the boiler without exceeding 3 bars of pressure Functiondesignedtobeusedbythe installeronly Press and 3 sec to switch to programming mode for 4 minutes àDisplay of parameter no 01 on the upper display flashing Press or 0 se...

Page 21: ...e 2 no 0 yes 1 0 or 1 1 if 16 0 19 Engaging of stage 3 no 0 yes 1 0 or 1 1 if 16 0 20 Engaging of stage 4 no 0 yes 1 0 or 1 1 if 16 0 21 Engaging of stage 5 no 0 yes 1 0 or 1 1 if 16 0 22 Engaging of stage 6 no 0 yes 1 0 or 1 1 23 Purpose of timer input 0 no purpose 0 1 2 or 3 0 1 boiler set temperature in ECO mode 2 boiler set temperature in FROST PROTECTION mode 3 authorisation of DHW production...

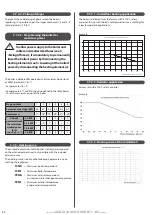
Page 22: ...ing curve is built on the following 4 parameters see Setting the regulator TCMA Maximum boiler temperature TCMI Minimum boiler temperature TEMA Maximum exterior temperature or summer winter changeover temperature TEMI Minimum exterior temperature or base exterior temperature 3 7 3 1 Underfloor heating application The boiler is delivered from the factory with a 100 C safety aquastat for use with th...

Page 23: ...per display without flashing 15 on the lower display flashing Press or to set the temperature Press to confirm A 4th press of if timer parameter 23 02 displays the value of set ambient temperature in FROST PROTECTION mode AH on the upper display without flashing 08 on the lower display flashing Pressing on allows to display the set temperature of CC and AU etc Pressing at any time after confirming...

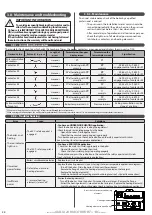
Page 24: ...safety aquastat until it clicks see Settings for a low temperature application Unwanted power failures Boiler scircuitbreakerdefective Replace the circuit breaker Defect of one or more heating elements Replace the heating element s see Settings for a low temperature application diagrams Turn off the boiler Drain the boiler Disconnect the resistances Remove the flange Extract the heating element s ...

Page 25: ...47 90 919 91 891 92 865 93 840 94 815 95 792 96 769 97 747 98 725 99 705 100 685 Temp Resistance C Ω kOhms 40 412 135 39 383 178 38 356 477 37 331 840 36 309 092 35 288 075 34 268 645 33 250 672 32 234 035 31 218 627 30 204 347 29 191 106 28 178 821 27 167 415 26 156 821 25 146 974 24 137 818 23 129 298 22 121 367 21 113 980 20 107 095 19 100 675 18 94 686 17 89 097 16 83 876 15 78 999 14 74 439 1...

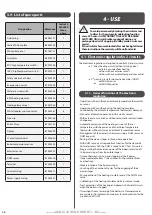
Page 26: ...es adjustable from 1 to 6 minutes with protection from overheating Weekly rotation of the 6 power stages Counting of the number of cycles for the engaging of the 6 power stages Post operation of the heating circulator and of the DHW 3 way valve Unblocking of the heating circulator while in summer mode Frost protection of the heating and domestic hot water circuits when the boiler is stopped Timer ...

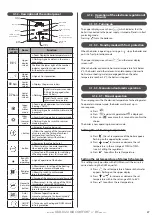
Page 27: ...irm the set temperature Button or LED Name Function 8 8o C Upper display screen Fixed Display the boiler temperature in o C Flashing Signals a defect in the sensor connection The on the lower right of the number indicates operation in manual mode without exterior sensor _ _ o c Upper display screen Signals Frost protection 88 bars Lower display screen Displays the pressure in bars 0 2 bars Lower d...

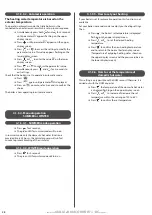
Page 28: ...ds The green LED for summer mode will turn on In summer mode only the domestic hot water function is provided Every 24 hours the circulator pump will run for 1 minute to prevent blocking of the circulator 4 1 3 4 2 WINTER mode operation Press for 3 seconds The green LED for winter mode will turn on 4 1 3 5 How to set your heating If your boiler is set for automatic operation this function is not a...

Page 29: ... set the temperature ac on the upper display without flashing 20 on the lower display flashing Press or to set the temperature Press to confirm A 1st press of displays the value read by the ambient temperature sensor SA on the upper display 20 on the lower display the point on the bottom right of the number signals an additional half of a degree 20 5 C in this example A 2nd press on displays the v...

Page 30: ...ods lightning ice hailstones hurricanes or any other natural disaster Movement imbalance collapse or settling of the ground or of the structure where the appliance is installed Any other damage which is not due to defects in the product The boiler is not guaranteed against Variations in the colour of the appliance or damage caused by air pollution exposure to chemical products or changes brought a...

Page 31: ... installer GIALIX 24 MA COMFORT BCmanual 31 ...

Page 32: ...e de la République CS 40029 80210 Feuquières en Vimeu Spare parts department Tel 03 22 61 21 21 Fax 03 22 61 33 35 E mail pieces auer fr Technical assistance E mail sav auer fr Technical assistance service is reserved for professionals ...

Reviews: