background image

AT-ANC-108D

18

The AMS Interface

Discovery using AMS

It is recommended that the Atlona Management System (AMS) be used to configure and control the AT-ANC-108D.

AMS is free and can be downloaded from https://www.atlona.com/ams.

By default, the AT-ANC-108D is set to DHCP mode, allowing a DHCP server (if present) to assign the encoder an IP 

address.  Once an IP address has been assigned, the Atlona Management System (AMS) can be used to manage the 

product on the network.  Note that AMS will only be able to the AT-ANC-108D if they are on the same VLAN.

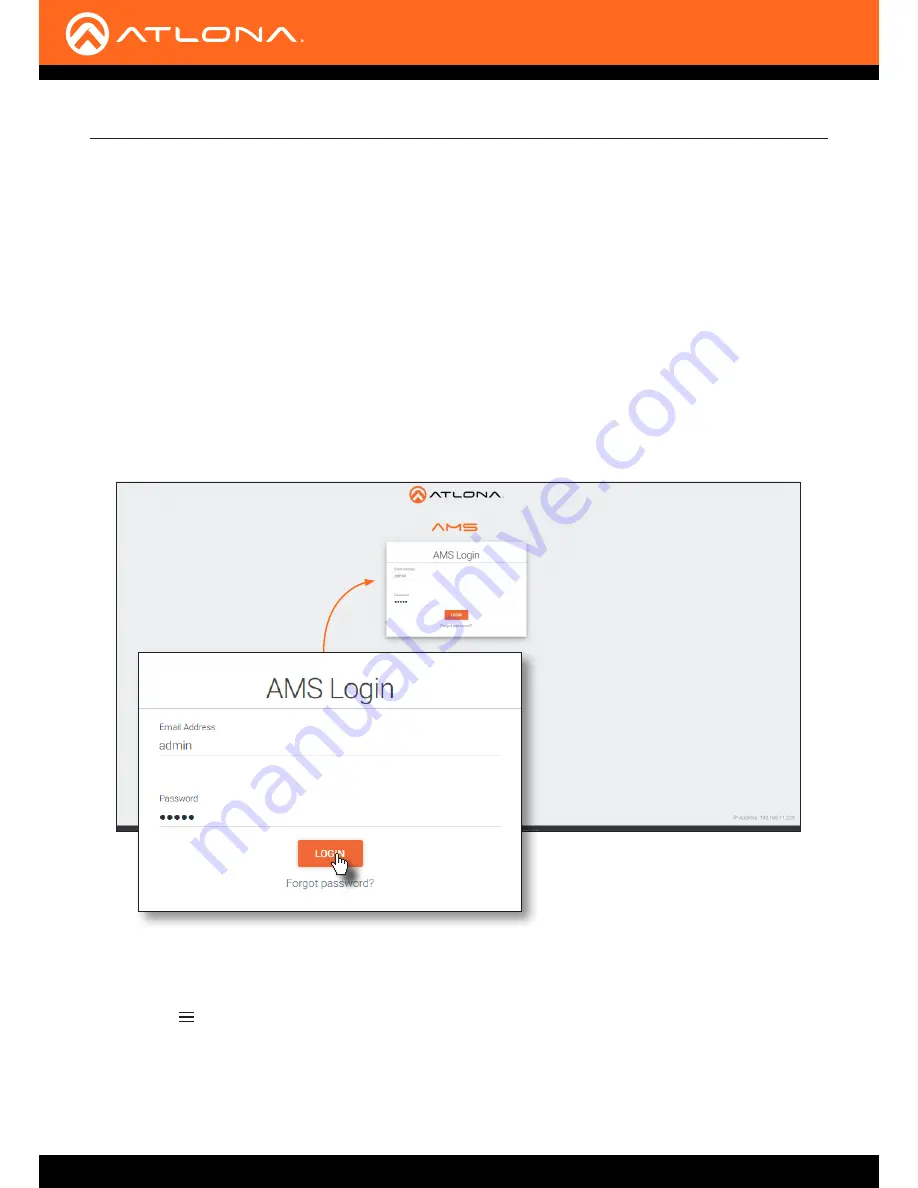
Accessing AMS

1. 

Launch a web browser and enter the IP address of AMS, in the address bar.

2.  Enter the required login credentials.

3.  Click the 

Login

 button.

4.  The AMS Dashboard will be displayed.

5.  Click the        icon, in the upper-left corner of the AMS Dashboard.

Summary of Contents for AT-ANC-180D

Page 1: ...AtlonaManuals Control Management AT ANC 180D Network Control Panel 8 Button ...

Page 2: ...AT ANC 108D 2 Version Release Date Notes 1 06 18 New format updated to include AMS 2 0 Version Information ...

Page 3: ...voluntary and failure to register will not affect the product warranty To register your product go to http www atlona com registration Sales Marketing and Customer Support Welcome to Atlona Operating Notes IMPORTANT Visit http www atlona com product AT ANC 108D for the latest firmware updates and User Manual Main Office Atlona Incorporated 70 Daggett Drive San Jose CA 95134 United States Office 1 ...

Page 4: ...duct Warranty Terms New Products 10 years from proof of purchase date for hardware electronics products purchased on or after June 1 2013 3 years from proof of purchase date for hardware electronics products purchased before June 1 2013 Lifetime Limited Product Warranty for all cable products Limited Product Warranty Terms Refurbished B Stock Products 3 years from proof of purchase date for all Re...

Page 5: ...ts or states do not allow the exclusion or limitation of relief special incidental consequential or indirect damages or the limitation of liability to specified amounts so the above limitations or exclusions may not apply to you Exclusive Remedy To the maximum extent permitted by law this limited product warranty and the remedies set forth above are exclusive and in lieu of all other warranties re...

Page 6: ...5 Do not use this product near water 6 Clean only with a dry cloth 7 Do not block any ventilation openings Install in accordance with the manufacturer s instructions 8 Do not install or place this product near any heat sources such as radiators heat registers stoves or other apparatus including amplifiers that produce heat 9 Do not defeat the safety purpose of a polarized or grounding type plug A ...

Page 7: ...late Installation 13 Basic Operation 14 IP Configuration 14 Resetting to Factory Defaults 14 Button Mapping 15 Proper Orientation 15 Mapping a Device to the AT ANC 108D 15 The AMS Interface 18 Discovery using AMS 18 Accessing AMS 18 Device Info page 21 Network page 22 Configuration page 23 Appendix 24 Compatibility Table 24 Specifications 25 Index 26 Table of Contents ...

Page 8: ...08D working with AMS meets both of these demands Regardless of the Atlona IP based switcher designed into the meeting space or classroom with the ANC 108D the AV operator will always have a consistent control interface from room to room Combined with Atlona IP controllable switching products for huddle spaces classrooms and conference rooms the network control panel acts as a remote control to sen...

Page 9: ...ethod for updating the AT ANC 108D is AMS Refer to for more information 3 Reset Button Press this button to reset the unit Refer to Resetting to Factory Defaults page 14 for more information 4 LAN Connect an Ethernet cable from this port to the Local Area Network LAN 5 DC 5V Connect the optional 5V DC power supply not included to this port if necessary If the AT ANC 108D is connected to a PoE capa...

Page 10: ...er supply contact Atlona Locate the included orange 2 pin captive screw terminal block and wire the included captive screw terminal block as shown below Do not use high torque devices when securing the wires to the terminal block as this may damage the screws and or the block 1 Insert the wires into the correct terminal on the included captive screw terminal block as shown below 2 Tighten the scre...

Page 11: ...ly AT PS POE Use this option if the system endpoint is not capable of supplying power to the AT ANC 108D Connection Instructions Installation 3 Complete the installation of the AT ANC 108D into the electrical box or mud ring Refer to the Wallplate Installation page 13 if necessary IMPORTANT Stranded or patch cable is not recommended due to performance issues Sheilded cables are strongly recommende...

Page 12: ... ER I O MIR ACA ST WiF i AU X AU DIO OU T L R IN USB C1 COM C2 RX P TX USB USB USB DC 48V RS 2 32 HDB ase T IN HDM I OU T RX TX AT UHD EX 100CE RX PSE H D M I UHD HD Display AT ANC 108D Network Control Panel D i s p l a y P o r t H D M I AT UHD SW 510W E t h e r n e t P o E H D B a s e T U S B C E t h e r n e t LAN Laptop Laptop Laptop ...

Page 13: ...y 2 Connect the HDBaseT cable to the LAN port on the rear of the AT ANC 108D 3 Install the AT ANC 108D into the mud ring electrical box using the two included screws and secure it in place with a regular screwdriver Do not overtighten or use high torque devices to secure the wallplate to prevent damage to the wall plate and or the AT ANC 108D mounting plates Wall cross section Wallplate holes ...

Page 14: ...ng AMS page 18 for more information Resetting the AT ANC 108D requires that the wallplate be removed Refer to Wallplate Installation page 13 for more information If no DHCP server is found after a factory reset then AT ANC 108D will be assigned the default static IP address of 192 168 1 50 1 Remove the wallplate from the AT ANC 108D 2 Press and hold the upper right button 3 Press the Reset button ...

Page 15: ...ed in the Configuration page of AMS on the right matches the numbering scheme of each button on the AT ANC 108D The first column of buttons is numbered 1 through 4 and the second column of buttons is numbered 5 through 8 Basic Operation LAN AT ANC 108D DC 5V Proper Orientation Mapping a Device to the AT ANC 108D Button 1 AT ANC 108D front view AMS Button Mapping Button 8 1 Login to AMS Refer to Ac...

Page 16: ...e Available Devices drop down list to select the device to be mapped Note that the number of available devices for that particular model will be listed in parentheses The IP address of the device will also be listed next to the model name 7 Click the UPLOAD button to upload the configuration file to the AT ANC 108D ...

Page 17: ...le below shows the AT UHD CLSO 612ED mapped to the AT ANC 108D 1 Toggles power on off 2 Toggles between Input 5 and Input 6 3 Selects Input 1 as the active input 4 Selects Input 3 as the active input 5 Increases volume 6 Decreases volume 7 Selects Input 2 as the active input 8 Selects Input 4 as the active input ...

Page 18: ... present to assign the encoder an IP address Once an IP address has been assigned the Atlona Management System AMS can be used to manage the product on the network Note that AMS will only be able to the AT ANC 108D if they are on the same VLAN Accessing AMS 1 Launch a web browser and enter the IP address of AMS in the address bar 2 Enter the required login credentials 3 Click the Login button 4 Th...

Page 19: ...ices from the fly out menu 7 Click the All option AMS will identify all known devices in the AMS Device List window 8 Click the icon near the top right portion of the screen 9 Click Scan Network from the fly out menu Click to display fly out menu ...

Page 20: ... the process is complete the Scan Network dialog will close 11 Click the AT ANC 108D device under the AMS Device List window 12 The Device Info screen will be displayed as shown If no AT ANC 108D units are found then verify that both the AT ANC 108D and the computer that is running AMS are connected to the same network The AMS Interface ...

Page 21: ... AT ANC 108D Alias An optional name for the AT ANC 108D can entered in this field Model The model number of the unit IP Address Displays the IP address of the AT ANC 108D MAC Address Displays the MAC address of the AT ANC 108D FACTORY RESET Click this button to reset the AT ANC 108D to factory default settings ...

Page 22: ...he toggle switch will be green When disabled the IP Address Subnet and Gateway fields can be specified IP Address Displays the current IP address of the AT ANC 108D Subnet Displays the current subnet mask of the AT ANC 108D Gateway Displays the current gateway IP address of the AT ANC 108D Port Displays the Telnet listening port of the of the AT ANC 108D This value cannot be changed SAVE Click thi...

Page 23: ...ig Files Click this drop down list to select the configuration file This drop down list will be populated once the device is selected from the Device Type drop down list Available Devices Displays the number of available devices detected by AMS Device List AT HD SC 500 AT UHD HDVS 300 AT HDVS 200 TX AT UHD SW 5000ED AT HDVS 200 TX WP AT UHD SW 510W AT UHD CLSO 601 AT UHD SW 52 AT UHD CLSO 612 AT U...

Page 24: ...and VGA with Ethernet Enabled HDBaseT Output AT HDVS 200 TX WP BLK Two Input Wallplate Switcher for HDMI and VGA with Ethernet Enabled HDBaseT Output Black AT UHD CLSO 601 4K UHD Six Input Multi Format Switcher with Mirrored HDMI HDBaseT Outputs AT UHD CLSO 612ED 4K UHD Six Input Multi Format Switcher with Two HDBaseT Inputs and Mirrored HDMI HDBaseT Outputs AT UHD HDVS 300 C KIT Soft Codec Confer...

Page 25: ...pe Distance Feet Meters Per hop of Ethernet cable 330 100 Temperature Fahrenheit Celsius Operating 32 to 104 0 to 40 Storage 4 to 140 20 to 60 Humidity RH 20 to 90 non condensing Power Consumption 3 3 W Supply 5 V 2 6 A DC Dimensions Inches Millimeters H x W x D 4 49 x 2 71 x 1 50 114 x 69 x 38 Weight Pounds Kilograms Device 0 33 0 15 Certification Device CE FCC Power Supply CE FCC Level VI RoHS c...

Page 26: ...onnection diagram 12 instructions 11 Contents package 8 Customer support 3 D Description front rear panel 9 Device mapping 15 F FCC statement 6 Features 8 I Installation wallplate 13 IP configuration 14 M Mapping button 15 O Operating notes 3 P Panel descriptions 9 PoE compatible switch 11 power injector 11 R Resetting factory defaults 14 S Safety information 6 Specifications 25 W Warranty 4 ...

Page 27: ... registered trademarks of Atlona Inc All other brand names and trademarks or registered trademarks are the property of their respective owners Pricing specifications and availability subject to change without notice Actual products product images and online product images may vary from images shown here ...

Reviews: