ROG STRIX B650E-F GAMING WIFI
2-7
Chapter 2
2.1.4
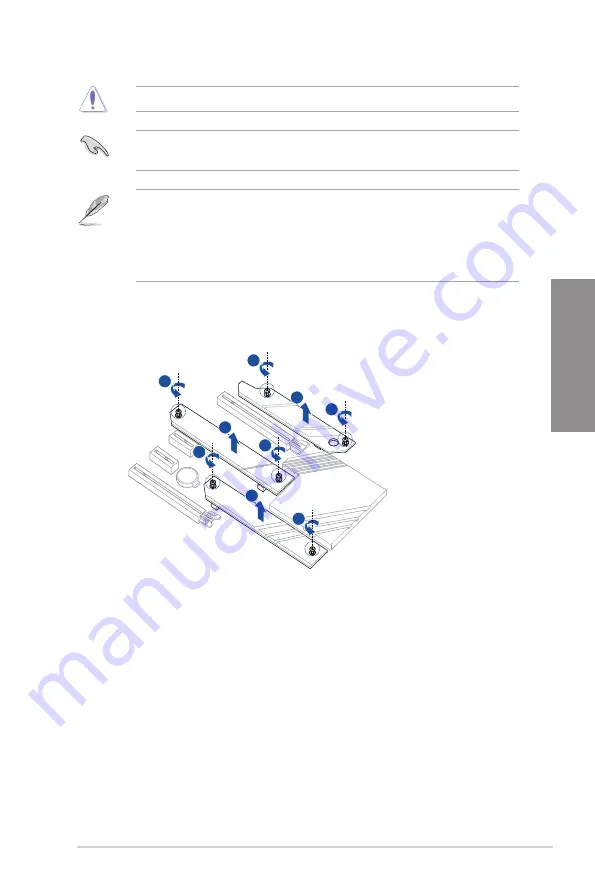
M.2 installation
1
1
2
2
1
1
1
1
2
1.
Remove the screws from the M.2 heatsink.
2.
Lift and remove the heatsink.
Supported M.2 type varies per motherboard.
If the thermal pad on the M.2 heatsink becomes damaged, we recommend replacing it
with the bundled thermal pad or a thermal pad with a thickness of 1.25mm.
•
The illustrations only show the installation steps for a single M.2 slot, the steps are
the same for the other M.2 slots if you wish to install an M.2 to another M.2 slot.
•
Use a Phillips screwdriver when removing or installing the screws or screw stands
mentioned in this section.
•
The M.2 is purchased separately.
Summary of Contents for ROG STRIX B650E-F GAMING WIFI
Page 1: ...Motherboard ROG STRIX B650E F GAMING WIFI ...
Page 36: ...1 24 Chapter 1 Product Introduction Chapter 1 ...
Page 38: ...2 2 Chapter 2 Basic Installation Chapter 2 ...
Page 42: ...2 6 Chapter 2 Basic Installation Chapter 2 2 1 3 DIMM installation To remove a DIMM ...
Page 49: ...ROG STRIX B650E F GAMING WIFI 2 13 Chapter 2 2 1 7 SATA device connection OR ...
Page 66: ...3 6 Chapter 3 BIOS and RAID Support Chapter 3 ...


