background image

ASUS P5QL/EPU

1-5

1.5.

Motherboard.overview

Before you install the motherboard, study the configuration of your chassis to ensure that the 

motherboard fits into it. 

Ensure that you unplug the power cord before installing or removing the motherboard. 

Failure to do so can cause you physical injury and damage motherboard components.

1.5.1.

Placement.direction

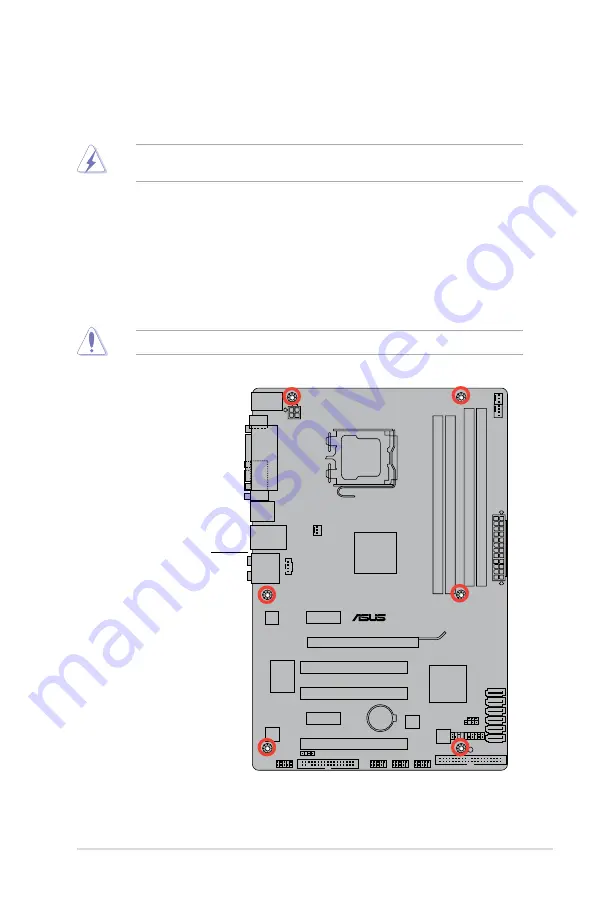
When installing the motherboard, make sure that you place it into the chassis in the correct 

orientation. The edge with external ports goes to the rear part of the chassis as indicated in 

the image below.

1.5.2.

Screw.holes

Place six screws into the holes indicated by circles to secure the motherboard to the chassis.

Do not overtighten the screws! Doing so can damage the motherboard.

P5QL/EPU

Place.this.side.towards.

the.rear.of.the.chassis

Summary of Contents for P5QL/EPU - Motherboard - ATX

Page 1: ...Motherboard P5QL EPU ...

Page 2: ...MERCHANTABILITY OR FITNESS FOR A PARTICULAR PURPOSE IN NO EVENT SHALL ASUS ITS DIRECTORS OFFICERS EMPLOYEES OR AGENTS BE LIABLE FOR ANY INDIRECT SPECIAL INCIDENTAL OR CONSEQUENTIAL DAMAGES INCLUDING DAMAGES FOR LOSS OF PROFITS LOSS OF BUSINESS LOSS OF USE OR DATA INTERRUPTION OF BUSINESS AND THE LIKE EVEN IF ASUS HAS BEEN ADVISED OF THE POSSIBILITY OF SUCH DAMAGES ARISING FROM ANY DEFECT OR ERROR ...

Page 3: ...t direction 1 5 1 5 2 Screw holes 1 5 1 5 3 Motherboard layout 1 6 1 5 4 Layout contents 1 7 1 6 Central Processing Unit CPU 1 7 1 6 1 Installing the CPU 1 8 1 6 2 Installing the CPU heatsink and fan 1 10 1 6 3 Uninstalling the CPU heatsink and fan 1 11 1 7 System memory 1 11 1 7 1 Overview 1 11 1 7 2 Memory configurations 1 12 1 7 3 Installing a DIMM 1 16 1 7 4 Removing a DIMM 1 16 1 8 Expansion ...

Page 4: ...BIOS 3 utility 2 5 2 2 BIOS setup program 2 7 2 2 1 BIOS menu screen 2 8 2 2 2 Menu bar 2 8 2 2 3 Navigation keys 2 8 2 2 4 Menu items 2 9 2 2 5 Sub menu items 2 9 2 2 6 Configuration fields 2 9 2 2 7 Pop up window 2 9 2 2 8 Scroll bar 2 9 2 2 9 General help 2 9 2 3 Main menu 2 10 2 3 1 System Time 2 10 2 3 2 System Date 2 10 2 3 3 Legacy Diskette A 2 10 2 3 4 SATA1 6 2 10 2 3 5 Storage Configurat...

Page 5: ... Support 2 18 2 6 4 APM Configuration 2 19 2 6 5 Hardware Monitor 2 19 2 7 Boot menu 2 21 2 7 1 Boot Device Priority 2 21 2 7 2 Boot Settings Configuration 2 21 2 7 3 Security 2 22 2 8 Tools menu 2 23 2 8 1 ASUS EZ Flash 2 2 23 2 8 2 Express Gate 2 23 2 8 3 AI NET 2 2 24 2 8 4 ASUS O C Profile 2 24 2 9 Exit menu 2 24 ...

Page 6: ...na Increase the separation between the equipment and receiver Connect the equipment to an outlet on a circuit different from that to which the receiver is connected Consult the dealer or an experienced radio TV technician for help Canadian Department of Communications Statement This digital apparatus does not exceed the Class B limits for radio noise emissions from digital apparatus set out in the...

Page 7: ...ailer Operation safety Before installing the motherboard and adding devices on it carefully read all the manuals that came with the package Before using the product make sure all cables are correctly connected and the power cables are not damaged If you detect any damage contact your dealer immediately To avoid short circuits keep paper clips screws and staples away from connectors slots sockets a...

Page 8: ... to yourself when trying to complete a task CAUTION Information to prevent damage to the components when trying to complete a task NOTE Tips and additional information to help you complete a task IMPORTANT Instructions that you MUST follow to complete a task Typography Bold text Indicates a menu or an item to select Italics Used to emphasize a word or a phrase Key Keys enclosed in the less than an...

Page 9: ...e actual usable memory for the OS can be about 3GB or less For effective use of memory we recommend that you install a 64 bit Windows OS when having 4GB or more memory installed on the motherboard Expansion slots 1 x PCIe x16 slot 2 x PCIe x1 slots 3 x PCI slots Storage Intel ICH10 southbridge supports 6 x Serial ATA 3 0Gb s ports JMB368 PATA controller supports 1 x UltraDMA 133 100 66 for up to 2...

Page 10: ...ctors 3 x USB connectors support 6 additional USB ports 1 x Floppy disk drive connector 1 x IDE connector 6 x Serial ATA connectors 1 x CPU 1 x Chassis 1 x Power fan connectors 1 x S PDIF Out header 1 x Chassis intrusion connector 1 x Front panel audio connector 1 x CD audio in connector 1 x 24 pin ATX power connector 1 x 4 pin ATX 12V power connector 1 x System panel connector BIOS features 8Mb F...

Page 11: ...ation User Manual If any of the above items is damaged or missing contact your retailer 1 3 Special features 1 3 1 Product highlights Green ASUS This motherboard and its packaging comply with the European Union s Restriction on the use of Hazardous Substances RoHS This is in line with the ASUS vision of creating environment friendly and recyclable products packaging to safeguard consumers health w...

Page 12: ... world Serial ATA 3Gb s technology This motherboard supports hard drives based on the Serial ATA SATA 3Gb s storage specifications delivering enhanced scalability and doubling the bus bandwidth for high speed data retrieval and save 1 3 2 ASUS unique features ASUS AI Life Features Express Gate Taking only 5 seconds to go online from bootup Express Gate is the one stop gateway to instant fun It s a...

Page 13: ...ty Simply launch this tool and update BIOS from a USB flash disk before entering the OS You can update your BIOS only in a few clicks without preparing an additional floppy diskette or using an OS based flash utility See page 2 3 for details 1 3 3 ASUS Stylish features ASUS MyLogo2 This feature allows you to convert your favorite photo into a 256 color boot logo for a more colorful and vivid image...

Page 14: ...ent place it on a grounded antistatic pad or in the bag that came with the component Before you install or remove any component ensure that the ATX power supply is switched off or the power cord is detached from the power supply Failure to do so may cause severe damage to the motherboard peripherals and or components Onboard LED The motherboard comes with a standby power LED that lights up to indi...

Page 15: ...nd damage motherboard components 1 5 1 Placement direction When installing the motherboard make sure that you place it into the chassis in the correct orientation The edge with external ports goes to the rear part of the chassis as indicated in the image below 1 5 2 Screw holes Place six screws into the holes indicated by circles to secure the motherboard to the chassis Do not overtighten the scre...

Page 16: ...C KBMS SPDIF_O 8Mb BIOS JMB 368 SB_PWR CLRTC CHASSIS 20 3cm 8 0in Intel ICH10 Intel P43 DDR2 DIMM_A1 64bit 240 pin module DDR2 DIMM_A2 64bit 240 pin module DDR2 DIMM_B1 64bit 240 pin module DDR2 DIMM_B2 64bit 240 pin module SATA1 SATA2 SATA3 SATA4 SATA5 SATA6 AUDIO LPT COM1 LAN1_USB12 USB34 30 5cm 12 0in PRI_IDE LGA775 PANEL 1 2 6 3 4 5 7 8 10 9 11 12 13 14 15 Refer to 1 10 Connectors for more inf...

Page 17: ...rboard comes with a surface mount LGA775 socket designed for the Intel Core 2 Extreme Core 2 Quad Core 2 Duo Pentium Dual Core Celeron Dual Core Celeron processors Ensure that all power cables are unplugged before installing the CPU Connect the chassis fan cable to the CHA_FAN connector to ensure system stability Upon purchase of the motherboard make sure that the PnP cap is on the socket and the ...

Page 18: ...To prevent damage to the socket pins do not remove the PnP cap unless you are installing a CPU 2 Press the load lever with your thumb A then move it to the left B until it is released from the retention tab 4 Lift the load plate with your thumb and forefinger to a 100º angle 4A then push the PnP cap from the load plate window to remove 4B 3 Lift the load lever in the direction of the arrow to a 13...

Page 19: ...s into your eyes or touches your skin ensure that you wash it off immediately and seek professional medical help Some heatsinks come with pre applied thermal paste If so skip this step To prevent contaminating the paste DO NOT spread the paste with your finger directly 7 Close the load plate A then push the load lever B until it snaps into the retention tab The motherboard supports Intel LGA775 pr...

Page 20: ...nstall the heatsink and fan assembly Ensure that you have installed the motherboard to the chassis before you install the CPU fan and heatsink assembly The type of CPU heatsink and fan assembly may differ but the installation steps and fucntions should remain the same The illustration above is for reference only To install the CPU heatsink and fan 1 Place the heatsink on top of the installed CPU m...

Page 21: ... a time in 4 Carefully remove the heatsink and fan assembly from the motherboard 1 7 System memory 1 7 1 Overview The motherboard comes with four Double Data Rate 2 DDR2 Dual Inline Memory Modules DIMM sockets The figure illustrates the location of the DDR2 DIMM sockets P5QL EPU P5QL EPU 240 pin DDR2 DIMM sockets DIMM_A1 DIMM_A2 DIMM_B1 DIMM_B2 Channel Sockets Channel A DIMM_A1 and DIMM_A2 Channel...

Page 22: ...al usable memory for the OS can be about 3GB or less For effective use of memory we recommend that you install a 64 bit Windows OS when having 4GB or more memory installed on the motherboard This motherboard supports up to 16GB on a Windows XP Professional x64 and Windows Vista x64 Edition You may install a maximum of 4GB DIMM on each slot The default memory operation frequency is dependent on its...

Page 23: ...ndor Part No CL Chip Brand SS DS Chip No DIMM support A B C 1G Kingston KHX6400D2LL 1G N A Kingston DS Heat Sink Package 512MB Kingston KHX6400D2LLK2 1GN N A Kingston SS Heat Sink Package 512MB Kingston KVR800D2N5 512 N A Promos SS V59C1512804QCF25SY0324 06PECPA 512MB Kingston KVR800D2N6 512 N A Elpida SS E5108AJBG 8E E 1G Kingston KVR800D2N5 1G N A Elpida DS E5108AJBG 8E E 1G Kingston KVR800D2N6 ...

Page 24: ...k Package 2G GEIL GE28GB800C5QC 5 GEIL DS Heat Sink Package 2G GEIL GE28GB800C4QC 4 GEIL DS Heat Sink Package 2G GEIL GX22GB6400CUSC 4 GEIL DS Heat Sink Package 2G GEIL GE24GB800C4DC 4 GEIL DS Heat Sink Package 1G Super Talent T800UB1GC4 4 Super Talent DS Heat Sink Package 1G G SKILL F2 6400CL5D 2GBNQ 5 G SKILL DS Heat Sink Package 1G G SKILL F2 6400CL4D 2GBPK 4 G SKILL DS Heat Sink Package 1G G S...

Page 25: ...ranscend 506010 4894 5 Elpida DS E5108AJBG 6E E 512MB ADATA M2OAD5G3H3160Q1C52 N A ADATA SS AD29608A8A 3EG20813 2G ADATA M2OAD5H3J4170I1C53 N A ADATA DS AD20908A8A 3EG 30724 512MB PSC AL6E8E63J 6E1 5 PSC SS A3R12E3JFF717B9A00 1G PSC AL7E8E63J 6E1 5 PSC DS A3R12E3JFF717B9A01 1G PSC AL7E8F73C 6E1 5 PSC SS A3R1GE3CFF734MAA0J 2G PSC AL8E8F73C 6E1 5 PSC DS A3R1GE3CFF733MAA00 512MB Nanya NT512T64U88A1BY...

Page 26: ...ith a notch so that it fits in only one direction DO NOT force a DIMM into a socket to avoid damaging the DIMM 3 Firmly insert the DIMM into the socket until the retaining clips snap back in place and the DIMM is properly seated 1 7 4 Removing a DIMM To remove a DIMM 1 Simultaneously press the retaining clips outward to unlock the DIMM 2 Remove the DIMM from the socket Support the DIMM lightly wit...

Page 27: ...ou removed earlier 6 Replace the system cover 1 8 2 Configuring an expansion card After installing the expansion card configure it by adjusting the software settings 1 Turn on the system and change the necessary BIOS settings if any See Chapter 2 for information on BIOS setup 2 Assign an IRQ to the card 3 Install the software drivers for the expansion card When using PCI cards on shared slots ensu...

Page 28: ... process and enter BIOS setup to re enter data Except when clearing the RTC RAM never remove the cap on CLRTC jumper default position Removing the cap will cause system boot failure If the steps above do not help remove the onboard battery and move the jumper again to clear the CMOS RTC RAM data After the CMOS clearance reinstall the battery You do not need to clear the RTC when the system hangs d...

Page 29: ...ata activity GREEN 1 Gbps connection SPEED LED ACT LINK LED LAN port 4 Center Subwoofer port orange This port connects the center subwoofer speakers 5 Rear Speaker Out port black This port connects the rear speakers in a 4 channel 6 channel or 8 channel audio configuration 6 Line In port light blue This port connects the tape CD DVD player or other audio sources 7 Line Out port lime This port conn...

Page 30: ...M port This port is for pointing devices or other serial devices 13 Optical S PDIF Out port This port connects an external audio output device via a optical S PDIF cable 14 USB 2 0 ports 5 and 6 These two 4 pin Universal Serial Bus USB ports are available for connecting USB 2 0 devices 1 10 2 Internal connectors 1 Floppy disk drive connector 34 1 pin FLOPPY This connector is for the floppy disk dr...

Page 31: ...lack and gray Connect the blue connector to the motherboard s IDE connector then select one of the following modes to configure your device Drive jumper setting Mode of device s Cable connector Single device Cable Select or Master Black Two devices Cable Select Master Black Slave Gray Master Master Black or gray Slave Slave Pin 20 on the IDE connector is removed to match the covered hole on the Ul...

Page 32: ...he right angle side of SATA cable to the onboard SATA port to avoid mechanical conflict with huge graphics cards right angle side 5 CPU chassis and power fan connectors 4 pin CPU_FAN 3 pin CHA_FAN 3 pin PWR_FAN The fan connectors support cooling fans of 350 mA 2000 mA 24 W max or a total of 1 A 7 A 84 W max at 12V Connect the fan cables to the fan connectors on the motherboard making sure that the...

Page 33: ...1 USB 5V USB_P12 USB_P12 GND NC USB 5V USB_P11 USB_P11 GND USB1112 USB78 PIN 1 USB 5V USB_P8 USB_P8 GND NC USB 5V USB_P7 USB_P7 GND USB910 PIN 1 USB 5V USB_P10 USB_P10 GND NC USB 5V USB_P9 USB_P9 GND Never connect a 1394 cable to the USB connectors Doing so will damage the motherboard The USB module cable is purchased separately 7 Optical drive audio connector 4 pin CD These connectors allow you t...

Page 34: ...ont panel audio module to this connector set the Front Panel Type item in the BIOS setup to HD Audio if you want to connect an AC 97 front panel audio module to this connector set the item to AC97 By default this connector is set to HD Audio See section 2 5 3 Onboard Devices Configuration for details 9 Chassis intrusion connector 4 1 pin CHASSIS This connector is for a chassis mounted intrusion de...

Page 35: ...2 Volts 3 Volts 3 Volts 12 Volts 12 Volts 5V Standby Power OK GND 5 Volts GND 5 Volts GND 3 Volts 3 Volts ATX12V PIN 1 12V DC 12V DC GND GND For a fully configured system we recommend that you use a power supply unit PSU that complies with ATX 12 V Specification 2 0 or later version and provides a minimum power of 400 W Do not forget to connect the 4 pin EATX12V power plug otherwise the system wil...

Page 36: ...DE_LED This 2 pin connector is for the HDD Activity LED Connect the HDD Activity LED cable to this connector The IDE LED lights up or flashes when data is read from or written to the HDD System warning speaker 4 pin SPEAKER This 4 pin connector is for the chassis mounted system warning speaker The speaker allows you to hear system beeps and warnings ATX power button soft off button 2 pin PWRSW Thi...

Page 37: ...rivers for better compatibility and system stability 1 11 2 Support DVD information The Support DVD that came with the motherboard package contains the drivers software applications and utilities that you can install to avail all motherboard features To run the Support DVD Place the Support DVD to the optical drive The DVD automatically displays the Drivers menu if Autorun is enabled in your compu...

Page 38: ...1 28 Chapter 1 Product introduction ...

Page 39: ...n the future Copy the original motherboard BIOS using the ASUS Update or AFUDOS utilities 2 1 1 ASUS Update utility The ASUS Update is a utility that allows you to manage save and update the motherboard BIOS in Windows environment The ASUS Update utility allows you to Save the current BIOS file Download the latest BIOS file from the Internet Update the BIOS from an updated BIOS file Update the BIO...

Page 40: ...ASUSUpdate ASUSUpdate 2 Select Update BIOS from a file from the drop down menu then click Next 3 Locate the BIOS file from the Open window then click Open 4 Follow the screen instructions to complete the update process 2 1 2 Creating a bootable floppy disk 1 Do any one of the following to create a bootable floppy disk DOS environment a Insert a 1 44MB floppy disk into the drive b At the DOS prompt...

Page 41: ... floppy disk USB flash disk that contains the BIOS file to the floppy disk drive or the USB port Press Alt F2 during POST to display the following ASUSTek EZ Flash 2 BIOS ROM Utility V3 24 Current ROM Update ROM A Note FLASH TYPE MXIC 25L8005 PATH A BOARD P5QL EPU VER 0319 H 00 B 03 DATE 12 03 2008 BOARD Unknown VER Unknown DATE Unknown Enter Select or Load Tab Switch V Drive Info Up Down Home End...

Page 42: ... not more than eight alphanumeric characters for the main filename and three alphanumeric characters for the extension name Main filename Extension name A afudos oOLDBIOS1 rom then press Enter to copy the current BIOS file to the floppy disk 4 The utility returns to the DOS prompt after copying the current BIOS file Updating the BIOS file To update the BIOS file using the AFUDOS utility 1 Visit th...

Page 43: ...h disk that contains the updated BIOS file Prepare the motherboard support DVD the floppy disk or the USB flash disk containing the updated motherboard BIOS before using this utility Always connect the SATA cable to the SATA1 SATA 2 connector otherwise the utility will not function Recovering the BIOS from a floppy disk To recover the BIOS from a floppy disk 1 Turn on the system 2 Insert the flopp...

Page 44: ...g file P5QLEPU ROM Completed Start flashing 4 Restart the system after the utility completes the updating process The recovered BIOS may not be the latest BIOS version for this motherboard Visit the ASUS website www asus com to download the latest BIOS file Recovering the BIOS from a USB flash disk To recover the BIOS from a USB flash disk 1 Insert a USB flash disk that contains BIOS file to the U...

Page 45: ...ou wish to enter Setup after POST reboot the system by doing any of the following procedures Restart using the OS standard shut down procedure Press Ctrl Alt Del simultaneously Press the reset button on the system chassis Press the power button to turn the system off then back on Using the power button reset button or the Ctrl Alt Del keys to force reset from a running operating system can cause d...

Page 46: ...lds Menu items 2 2 2 Menu bar The menu bar on top of the screen has the following main items Main For changing the basic system configuration Ai Tweaker For configuring system performance settings Advanced For changing the advanced system settings Power For changing the advanced power management APM configuration Boot For changing the system boot configuration Tools For configuring options for spe...

Page 47: ...d 04 16 2008 Legacy Diskette A 1 44M 3 5 in SATA 1 Not Detected SATA 2 Not Detected SATA 3 Not Detected SATA 4 Not Detected SATA 5 Not Detected SATA 6 Not Detected Storage Configuration System Information ENTER to select floppy type Options Disabled 720K 3 5 in 1 44M 3 5 in Pop up window Scroll bar 2 2 7 Pop up window Select a menu item then press Enter to display a pop up window with the configur...

Page 48: ...ows you to set the system time 2 3 2 System Date Day xx xx xxxx Allows you to set the system date 2 3 3 Legacy Diskette A 1 44M 3 5 in Sets the type of floppy drive installed Configuration options Disabled 720K 3 5 in 1 44M 3 5 in 2 3 4 SATA1 6 While entering Setup the BIOS automatically detects the presence of IDE devices There is a separate sub menu for each IDE device Select a device item then ...

Page 49: ...Configuration options Disabled Enabled 2 3 5 Storage Configuration The items in this menu allow you to set or change the configurations for the SATA devices installed in the system Select an item then press Enter if you want to configure the item SATA Configuration Enhanced Configuration options Disabled Compatible Enhanced Configure SATA as IDE Sets the configuration for the Serial ATA connectors...

Page 50: ...to Memory Over voltage Auto NB OverVoltage Auto CPU VTT 1 2V SB 1 5V Voltage 1 5V CPU Vcore offset Auto Phase Operating Control Auto MANUAL Auto Overclock Profile Ai Overclock Tuner Auto Allows selection of CPU overclocking options to achieve desired CPU internal frequency Select either one of the preset overclocking configuration options Manual allows you to manually set overclocking parameters A...

Page 51: ...lock 15 Overclock 20 Overclock 30 Test Mode DRAM Frequency Auto Allows you to set the DDR2 operating frequency Configuration options Auto DDR2 667MHz DDR2 800MHz DDR2 1066MHz Memory Over voltage Auto Allows you to set the memory over voltage The value ranges from 1 85000V to 2 24375V with a 0 00625V interval Configuration options Auto NB OverVoltage Auto Allows you to set the NB voltage manually o...

Page 52: ...or CPUs with extended CPUID functions Configuration options Disabled Enabled Intel Virtualization Technology Enabled Enables or disables Intel Virtualization Technology Virtualization enhanced by Intel Virtualization Technology allows a platform to run multiple operating systems and applications in independent partitons With virtualization one computer system can function as multiple virtual syste...

Page 53: ...able this option only when you install 64 bit operating system Configuration options Disabled Enabled Memory Hole Disabled Allows you to configure the memory hole Configuration options Disabled 15MB 16MB DRAM Timing Control Auto Allows you to configure the DRAM timing control Configuration options Auto Manual Execute Disable Bit Capability Enabled Allows you to enable or disable the No Execution P...

Page 54: ...ler to use as the primary boot device Configuration options PCI PEG PEG PCI 2 5 3 Onboard Devices Configuration High Definition Audio Enabled Allows you to enable or disable the High Definition Audio The following item appears only when you enable this item Configuration options Enabled Disabled Front Panel Type HD Audio Allows you to set the front panel audio connector AAFP mode to legacy AC 97 o...

Page 55: ...ration options Enabled Disabled USB 2 0 Controller Mode HiSpeed Allows you to set the USB 2 0 controller mode to HiSpeed 480 Mbps or FullSpeed 12 Mbps This item appears only when you enable the USB 2 0 Controller item Configuration options FullSpeed HiSpeed Legacy USB Support Auto Allows you to enable or disable support for legacy USB devices Setting to Auto allows the system to detect the presenc...

Page 56: ...eep state the system appears suspended and stays in a low power mode The system can be resumed at any time S3 Only Enables the system to enter the ACPI S3 Suspend to RAM sleep state default In S3 sleep state the system appears to be off and consumes less power than in the S1 state When signaled by a wake up device or event the system resumes to its working state exactly where it was left off Auto ...

Page 57: ... the first try Turning an external modem off and then back on while the computer is off causes an initialization string that turns the system power on Power On By PCI Devices Disabled Allows you to enable or disable the PME to wake up from S5 by PCI devices Configuration options Disabled Enabled Power On By PCIE Devices Disabled Allows you to enable or disable the PCIE devices to generate a wake e...

Page 58: ...ardware monitor automatically detects and displays the chassis fan speed in rotations per minute RPM If the fan is not connected to the motherboard the field shows N A Power Fan Speed xxxxRPM or Ignored N A The onboard hardware monitor automatically detects and displays the power fan speed in rotations per minute RPM If the fan is not connected to the motherboard the field shows N A VCORE Voltage ...

Page 59: ...iguration Quick Boot Enabled Enabling this item allows the BIOS to skip some power on self tests POST while booting to decrease the time needed to boot the system When set to Disabled BIOS performs all the POST items Configuration options Disabled Enabled Full Screen Logo Enabled This allows you to enable or disable the full screen logo display feature Configuration options Disabled Enabled Set th...

Page 60: ...eal Time Clock RTC RAM See section 2 6 Jumpers for information on how to erase the RTC RAM After you have set a supervisor password the other items appear to allow you to change other security settings User Access Level Full Access This item allows you to select the access restriction to the Setup items Configuration options No Access View Only Limited Full Access No Access prevents user access to...

Page 61: ...te Enabled Allows you to enable or disable the ASUS Express Gate feature The ASUS Express Gate feature is a unique instant on environment that provides quick access to the Internet browser and Skype Configuration options Enabled Disabled Enter OS Timer 10 Seconds Sets countdown duration that the system waits at the Express Gate s first screen before starting Windows or other installed OS Choose Pr...

Page 62: ...lure 2 9 Exit menu The Exit menu items allow you to load the optimal or failsafe default values for the BIOS items and save or discard your changes to the BIOS items Exit system setup after saving the changes F10 key can be used for this operation Select Screen Select Item Enter Go to Sub screen F1 General Help F10 Save and Exit ESC Exit Exit Options Exit Save Changes Exit Discard Changes Discard ...

Page 63: ...card the selections you made and restore the previously saved values After selecting this option a confirmation appears Select OK to discard any changes and load the previously saved values Load Setup Defaults This option allows you to load the default values for each of the parameters on the Setup menus When you select this option or if you press F5 a confirmation window appears Select OK to load...

Page 64: ...2 26 Chapter 2 BIOS setup ...

Reviews: