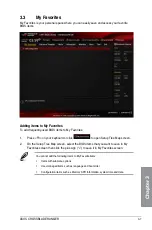


ASUS CROSSBLADE RANGER
3-21
Chapter 3
OnChip SATA Channel [Enabled]
Enables or disables onboard channel SATA port. Configuration options: [Disabled] [Enabled]
OnChip SATA Type [AHCI]
Allows you to set the SATA configuration.
[IDE]
Set to [IDE] when you want to use the Serial ATA hard disk drives as
Parallel ATA physical storage devices.
[RAID]
Set to [RAID] when you want to create a RAID configuration from the SATA
hard disk drives.
[AHCI]
Set to [AHCI] when you want the SATA hard disk drives to use the AHCI
(Advanced Host Controller Interface). The AHCI allows the onboard storage
driver to enable advanced Serial ATA features that increases storage
performance on random workloads by allowing the drive to internally
optimize the order of commands.
SATA Port 5, 6, 7, 8 [AHCI]
This item only appears when
OnChip SATA Type
is set to [AHCI]. If SATA ports 5,
6, 7 and 8 are configured as [AHCI], the ports can only be used under OS with driver
installed. Set to [IDE] instead of [AHCI] to access devices on SATA ports 5, 6, 7 and 8
before entering OS. Configuration options: [AHCI] [IDE]
OnChip SATA MAX Speed [SATA 6.0Gb/s]
For better HDD compatibility, set the SATA speed to [SATA 3.0Gb/s] to support SATA
3.0Gb/s HDDs or [SATA 6.0Gb/s] to support SATA 6.0Gb/s HDDs. Configuration options:
[SATA 6.0Gb/s] [SATA 3.0Gb/s]
S.M.A.R.T. Status Check [Enabled]
S.M.A.R.T. (Self-Monitoring, Analysis and Reporting Technology) is a monitoring system that
shows a warning message during POST (Power-on Self Test) when an error occurs in the
hard disks. Configuration options: [Disabled] [Enabled]
SATA ESP on Port1~8 [Disabled]
Enable this item to support ESATA. Configuration options: [Enabled] [Disabled]
SATA6G_1 (Red) - SATA6G_8 (Red)
Press <Enter> to rename the AMD SATA ports.
Summary of Contents for Crossblade Ranger
Page 1: ...Motherboard CROSSBLADE RANGER ...
Page 61: ...ASUS CROSSBLADE RANGER 2 5 Chapter 2 To uninstall the APU heatsink and fan assembly 5 3 1 4 2 ...
Page 62: ...2 6 Chapter 2 Basic Installation Chapter 2 1 2 3 To remove a DIMM 2 1 4 DIMM installation B A ...
Page 63: ...ASUS CROSSBLADE RANGER 2 7 Chapter 2 2 1 5 ATX Power connection 1 2 OR ...
Page 64: ...2 8 Chapter 2 Basic Installation Chapter 2 2 1 6 SATA device connection 2 OR 1 ...
Page 72: ...2 16 Chapter 2 Basic Installation Chapter 2 Connect to 7 1 channel Speakers ...
Page 74: ...2 18 Chapter 2 Basic Installation Chapter 2 ...
Page 121: ...ASUS CROSSBLADE RANGER 3 47 Chapter 3 ...
Page 155: ...4 34 Chapter 4 Software support Chapter 4 Function Keys Shortcut ...
Page 165: ...4 44 Chapter 4 Software support Chapter 4 ...
Page 177: ...A 6 Appendices Appendices ...