


ASUS CROSSBLADE RANGER
3-11
Chapter 3
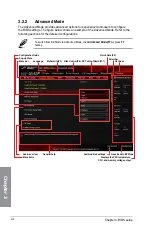
address/command drive strength [Auto]
Configuration options: [Auto] [1.00x] [1.25x] [1.50x] [2.00x]
MEMCLK drive strength [Auto]
Configuration options: [Auto] [1.00x] [1.25x] [1.50x] [2.00x]
Data drive strength [Auto]
Configuration options: [Auto] [0.75x] [1.00x] [1.25x] [1.50x]
DQS drive strength [Auto]
Configuration options: [Auto] [0.75x] [1.00x] [1.25x] [1.50x]
Processor on-die termination [Auto]
Configuration options: [Auto] [240 ohms +/- 20%] [120 ohms +/- 20%]
[80 ohms +/- 20%] [60 ohms +/- 20%]
CKE setup time [Auto]
Configuration options: [Auto] [1/2 MEMCLK DELAY] [1 MEMCLK DELAY]
CKE fine delay [Auto]
Configuration options: [Auto] [0]
CS/ODT setup time [Auto]
Configuration options: [Auto] [1/2 MEMCLK DELAY] [1 MEMCLK DELAY]
CS/ODT fine delay [Auto]
Configuration options: [Auto] [0]
address/command setup time [Auto]
Configuration options: [Auto] [1/2 MEMCLK DELAY] [1 MEMCLK DELAY]
address/command fine delay [Auto]
Configuration options: [Auto] [0]
GPU.DIMM Post
Automatically detects and displays the information about the devices or memory installed on
the PCIe and DIMM slots. The field shows N/A if there are no devices installed on the slots.
DIGI+ Power Control
CPU Load Line Calibration [Auto]
Load Line is defined by AMD
®
specification and affects CPU power voltage. The CPU
working voltage decreases proportionally to CPU loading. Higher Load Line calibration
could get higher voltage and good overclocking performance, but increases the CPU
and VRM thermal conditions. This item allows you to adjust the voltage range from the
following percentages to boost the system performance: 0% (Regular), 20% (Medium),
40% (High) and 100% (Extreme). Configuration options: [Auto] [Regular] [Medium]
[High] [Extreme]
The actual performance boost may vary depending on your CPU specification.
DO NOT remove the thermal module. The thermal conditions should be monitored.
Summary of Contents for Crossblade Ranger
Page 1: ...Motherboard CROSSBLADE RANGER ...
Page 61: ...ASUS CROSSBLADE RANGER 2 5 Chapter 2 To uninstall the APU heatsink and fan assembly 5 3 1 4 2 ...
Page 62: ...2 6 Chapter 2 Basic Installation Chapter 2 1 2 3 To remove a DIMM 2 1 4 DIMM installation B A ...
Page 63: ...ASUS CROSSBLADE RANGER 2 7 Chapter 2 2 1 5 ATX Power connection 1 2 OR ...
Page 64: ...2 8 Chapter 2 Basic Installation Chapter 2 2 1 6 SATA device connection 2 OR 1 ...
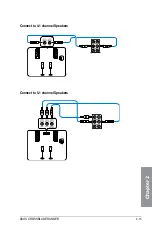
Page 72: ...2 16 Chapter 2 Basic Installation Chapter 2 Connect to 7 1 channel Speakers ...
Page 74: ...2 18 Chapter 2 Basic Installation Chapter 2 ...
Page 121: ...ASUS CROSSBLADE RANGER 3 47 Chapter 3 ...
Page 155: ...4 34 Chapter 4 Software support Chapter 4 Function Keys Shortcut ...
Page 165: ...4 44 Chapter 4 Software support Chapter 4 ...
Page 177: ...A 6 Appendices Appendices ...