background image

18

AP100 Hardware Reference Guide

II. System Components

II. Components

Circulation / Speaker

Air Circulation System

The server’s air circulation system is comprised of one 3 inch (8 cm) fan mounted
on the inside rear of the chassis and another one mounted on the front of the
chassis, as well as the power supply itself. The air circulation system cools the
internal system by bringing fresh air in from the back and forcing the hot air out
through the front. It is important to keep the air surrounding the hard disk drives
below 122˚F (50˚C) to prevent hard disk failures.

IMPORTANT:

 The chassis panels must be installed for proper air flow.

Fan Replacement

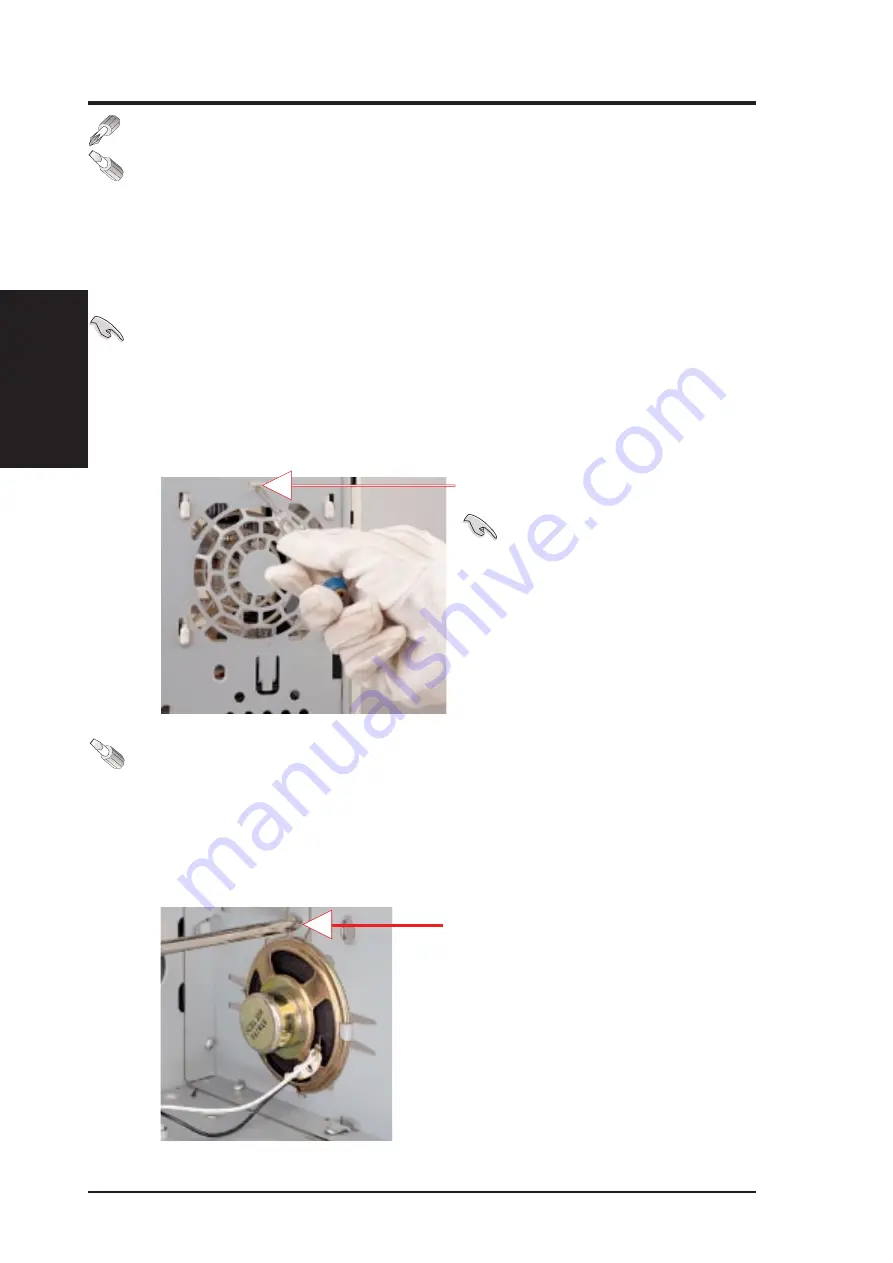
The two individual fans are secured by plastic housings. The fan housings
can be removed by pressing in the clip and sliding the housing upward.

System Speaker

This server has a standard speaker for error notifications and other alerts.
For computer audio capability, an audio card and external speakers are nec-
essary. The standard system speaker mounts in the chassis as shown here.
To remove the speaker, press the metal clip (or pry from front) with a screw-
driver and lift the speaker upward.

 IMPORTANT:

 When replac-

ing the fans, be sure that both fans
rotate in the same direction. Use the
manufacturer’s sticker on one side
of the fan as a reference. The air
should flow from the rear of the
chassis to the front of the chassis.

Press clip with screw driver to release

Press clip (or pry from front)
with screwdriver to release

Summary of Contents for AP100

Page 1: ...R AP100 Pentium II Startup Server Hardware Reference Guide ...

Page 2: ...is manual may or may not be regis tered trademarks or copyrights of their respective companies and are used only for identification or explanation and to the owners benefit without intent to infringe Intel LANDesk and Pentium are registered trademarks of Intel Corporation IBM and OS 2 are registered trademarks of International Business Machines MS DOS Windows WindowsNT are registered trademarks of...

Page 3: ...ATIONAL Marketing Address 6737 Mowry Avenue Mowry Business Center Building 2 Newark CA 94560 USA Fax 1 510 608 4555 Email info usa asus com tw Technical Support Fax 1 510 608 4555 BBS 1 510 739 3774 Email tsd usa asus com tw WWW www asus com FTP ftp asus com tw pub ASUS ASUS COMPUTER GmbH Marketing Address Harkort Str 25 40880 Ratingen BRD Germany Telephone 49 2102 445011 Fax 49 2102 442066 Email ...

Page 4: ...quired 11 Preparation 11 Front View 12 Chassis Stabilization 12 Back View 13 Chassis Security 13 Side View 14 Side Panel 15 Stabilizing Link Bar 15 Motherboard Mounting 16 Panel Connections 16 Front Panel 17 Device Bay Covers 17 Air Circulation System 18 Fan Replacement 18 System Speaker 18 Device Cage 3 5 19 Device Cage 3 5 Floppy Mounting 19 Floppy Disk Drive 1 44MB 20 Device Cage 5 25 20 CD ROM...

Page 5: ...SI Disk Drive 24 External SCSI Terminator 24 Device Connections 25 Device Cable Connections 25 IDE Cabling 25 Power Supply 26 Power Supply On and Off 26 Power Supply Mounting 26 Starting the Server 27 LED Indicators 27 III Power Information 28 Power Supply ST 251HR 28 Input 28 Output 28 Protection 29 Environment 29 Hi Pole 29 Certifications 29 SCSI Cable Limits 30 SCSI Connection Examples 31 Gloss...

Page 6: ...ular installation If this equipment does cause harmful inter ference to radio or television reception which can be determined by turn ing the equipment off and on the user is encouraged to try to correct the interference by one or more of the following measures Reorient or relocate the receiving antenna Increase the separation between the equipment and receiver Connect the equipment to an outlet o...

Page 7: ...tion This section gives general and startup information and features for this server II Components This is the main section which gives descriptions of each server component III Power Information This section gives specifications on the power supply used in this server IV Appendix This section gives you information to help plan your server Symbols A few symbols are used throughout this guide that ...

Page 8: ...nents for a server Standard components Chassis ASUS T 10 Tower Power Supply 350W ATX Motherboard ASUS P2B S CD ROM Drive ASUS 34X Floppy Drive 1 44MB Cables Power IDE Floppy 50 68pin SCSI CD audio cable SCSI Terminator Passive terminator for 68pin SCSI cables User s Manuals CD ROM SCSI Motherboard Drivers Utilities SCSI CD ROM Motherboard Required components you may purchase fromASUS or from a thi...

Page 9: ... with ECC Up to 33MB Sec IDE transfers with UltraDMA 33 support Intel 440BX supports up to 100MHz front side bus for fast data transfer AGP slot supports an AGP graphics card for fast hardware 3D acceleratoin Three onboard connectors to independently connect 68 pin Ultra2 SCSI devices 68 pin Fast Ultra Wide SCSI devices or 50 pin Fast Ultra Nar row devices Onboard hardware monitor provides informa...

Page 10: ... connect cables for display stations print ers telephones or station protectors for communications lines To prevent electrical shock hazard disconnect the power cable from the electrical outlet before relocating the system WARNING This product is equipped with a three wire power cable and plug for the user s safety Use the power cable in conjunction with a prop erly grounded electrical outlet to a...

Page 11: ...unauthorized access Open the side panel 3 Install final server components such as CPU Memory Hard Disk Drives expansion cards Use this hardware reference guide along with your motherboard manual in order to make these installations 4 Connect a Keyboard and Mouse purchased separately 5 Connect a VGA compatible monitor purchased separately 6 Connect a printer to the parallel port if desired 7 Connec...

Page 12: ...t they are perpendicular to the sides of the chassis as shown above If the chassis is supported by other structures such as tables a wall or cabinets then use the stabilizing feet that are not obstructed WARNING Because servers contain many more components compared to personal computers servers are much heavier Stabilization is necessary at all times to prevent damage and injury from falling over ...

Page 13: ...Close up Pad lock not provided Power Supply Switch Voltage Selection Right Panel Left Panel Top Panel Chassis Security To protect the server chassis from unauthorized intrusion the chassis side panel is lockable using a standard padlock An optional light detecting sen sor connected to the motherboard s chassis connector allows monitoring of the chassis panels open close status The motherboard s on...

Page 14: ...ional Fan Module Motherboard Power Supply CD ROM Hard Drive Speaker Long Card Guide Floppy Drive Hard Disk Drive 5 25 Device Cage 3 5 Device Cage Stabilizing Link Bar WARNING Always remove the power cord when working on the server internal components to prevent electrical shocks or damage to electrical components ATX power supplies that are plugged into anAC outlet always have standby power even w...

Page 15: ...ward from the bottom Stabilizing Link Bar The stabilizing link bar needs to be removed in order to access the mother board or remove the 3 5 device cage To remove the stabilizing link bar grasp the bar at the back end with the right hand and with the right thumb press the back of the chassis toward your fingers or using the palm of your left hand press on the back of the chassis The bar then relea...

Page 16: ...ns Panel Connections Several wires should be connected to the motherboard for the IDE SCSI activity power and message indicators on the front panel Panel connec tions also allow for an ATX power button reset switch and speaker Con nect the chassis front panel wires as illustrated H D D LED White Red Power SW Black Red Turbo LED Yellow White White Black Speaker Connector for Optional Infrared Modul...

Page 17: ...el over the edge of a table or book if working upright Reach your fingers up into the front panel and pull the front panel away from the chassis Device Bay Covers With the front panel removed the device bay covers can be removed or installed Device Bay Removal Procedure 1 With your thumb push the tab out ward against the side of the front panel 2 With your other hand push the device cage cover inw...

Page 18: ...lacement The two individual fans are secured by plastic housings The fan housings can be removed by pressing in the clip and sliding the housing upward System Speaker This server has a standard speaker for error notifications and other alerts For computer audio capability an audio card and external speakers are nec essary The standard system speaker mounts in the chassis as shown here To remove th...

Page 19: ...S 120 MO or ZIP disk drive and two hard disk drives Before devices can be installed or removed from the 3 5 device cage you must remove the device cage from the chassis 3 5 Device Cage Removal Procedure 1 Remove the stabilizing link bar if not already removed 2 Rotate the locking lever clockwise using a screwdriver inserted from the top of the lever It is very difficult to turn it with your finger...

Page 20: ...ng the progress so that proper alignment and insertion is made Be careful bent pins are very difficult to straighten Device Cage 5 25 The 5 25 device cage is used for mounting three 5 25 devices such as CD ROM tape or hard disk drives The 5 25 device cage can be removed for mounting or unmounting devices With the 3 5 device cage and front panel removed the 5 25 device cage can be pulled out from t...

Page 21: ...al 2 Switch off your system and all peripheral de vices and remove the main power cord 3 Remove the side panel to the chassis 4 Find an unused expansion slot on the mother board and unscrew the metal cover plate from the slot and put the screw to one side 5 Ensure the jumpers if any are correctly set on your expansion card 6 Align the card s connector with the expansion slot on the motherboard and...

Page 22: ...ermination for devices in between the SCSI chain Ultra2 devices do not have a termination jumper and must be terminated using a terminator on the SCSI cable The terminator must always be on the end of the cable which means that you cannot connect a device on the last connector SCSI ID Jumpers All SCSI devices including this motherboard with onboard SCSI must have a SCSI identification number that ...

Page 23: ...ys CAUTION Adequate cooling cannot be made for high speed SCSI hard disk drives mounted in the 5 25 device cage therefore it is not recommended Top of the Power Supply A small hard disk drive carrier plate on top of the power supply is used to hold a 1 hard disk drive The underside of the hard disk drive mounts to the bottom of the carrier plate There is nothing else to fasten since the side panel...

Page 24: ... g category 5 LAN cabling External SCSI Terminator In order to prevent SCSI signal loss the provided external SCSI terminator must be used at the end of the 68pin SCSI cable 50 pin SCSI cables may also use terminators but usually use termination jumpers on the device it self Currently Wide SCSI devices have termination jumpers but Ultra2 devices do not Some manufacturers ship SCSI devices with the...

Page 25: ...gned for Ultra2 SCSI speeds and may be used for both Wide SCSI and Ultra2 SCSI devices IDE Cabling Proper IDE device operation requires that the cable does not exceed 18 inches If only one IDE device is used connect it to the end of the cable Remove unused cables from the IDE connector for proper signal quality and strength IMPORTANT You must use Ultra2 SCSI ribbon cables for Ultra2 devices Ultra2...

Page 26: ...o ac commodate 220V 240V or 110 120V but this power supply must be set manually The factory default should be on 230V to accommodate the higher voltage but it is safer to visually inspect the switch yourself in case it is not IMPORTANT For countries using 110V 120V you must slide the switch to 115V or else power up is not possible but no damage will occur Power Supply On and Off Normal powering On...

Page 27: ...e to setup your hard disk Insert a bootable floppy diskette and select Save Exit Setup from the BIOS main menu Once your server has properly booted an A prompt will appear Use the boot diskettes provided with the server operating system or with MSDOS FDISK EXE Reboot your server with the operating system boot disk in order to install drivers for your devices such as CD ROM and SCSI devices and ins...

Page 28: ...Control PS On TTL Low Close DC Outputs are to be Enabled PS Off TTL High Open DC Outputs are to be Disabled Line Regulation 3 3V 1 Max 5 0V 1 Max Load Regulation 3 3V 5 Max 5 0V 5 Max Cross Regulation 5V 20A 4 75V Min and 12V 1 2A 12 60V Max 5V 2A 5 25V Max and 12V 12A 11 40V Min Temperature Arrangements 1 Max Slow Start Time 5ms to 50ms Power Good Time 100ms to 500ms Hold up Time 20ms Min at Nomi...

Page 29: ...C to 50 C AmbientOperationRelativeHumidity 20 to 80 Insulation Resistance Input to Ground 50M Input to Output 50M Dimension LxWxH 150mm x 140mm x 86mm Weight 1 8Kgs Hi Pole Input to Output 1 800VAC 3Sec Input to Ground 1 800VAC 3Sec Certifications Approval Date Safety Approval Certificate Number 1997 08 14 CE Nemko 9708001E 1997 08 28 CB 4052 1997 08 28 VDE 95325 199X XX XX UL pending 199X XX XX C...

Page 30: ...1 5m Narrow Ultra SCSI 50 pin 20MB Sec 4 7 5 3m 9 8ft Narrow Fast SCSI 50 pin 10MB Sec 7 Notes for the above chart 1 Atotalof15 Ultra2 SCSI devices ID0 ID15 maybeconnectedtothe68 pin Ultra2 connector on the motherboard NOTE If connecting Fast Ultra devices with Ultra2 devices on the Ul tra2 connector the entire SCSI bus will be limited to the Ultra SCSI conditions listed above Mixing SCSI devices ...

Page 31: ...o the chassis slot opening for connection of an external 4GB Ultra Wide Hard disk drive and a Wide SCSI CD recorder for archives SCSI Examples 68 pin Ultra2 Hard Disks IDE Hard Disk Drive 68 pin Ultra2 Cable 50 pin SCSI Tape Drive Terminated IDE CD ROM Drive Terminator 50 pin Fast Ultra Narrow Cable 68 pin Fast Ultra Wide Cable 68 pin Fast Ultra Wide Cable 68 pin external SCSI connector 68 pin Wid...

Page 32: ...s a 32 bit data bus interface PCI is a standard widely used by expansion card manufacturers Peripherals Peripherals are devices attached to the computer via I O ports Peripheral devices allow your computer to perform an almost limitless variety of specialized tasks POST Power On Self Test When you turn on the computer it will first run through the POST a series of software controlled diagnostic te...

Reviews: