ASTRO AstroJet 1000 Installation And Operating Manual Download Page 17


13 

By clicking on the RED numbers to the left of the layout you can move the print band positions on the 
layout. 

The drop down menu bar consists of the following items: 

File 


View   

Fields   

Setup   

Tools   

Help 

Each of these menus provides choices that perform the tasks required for setting up the job.  The 
second line contains icons that represent the basic tasks required to set up the job.  For the purpose of 
this tutorial, we will use both the icon buttons and the menu bar to set up a sample job. 

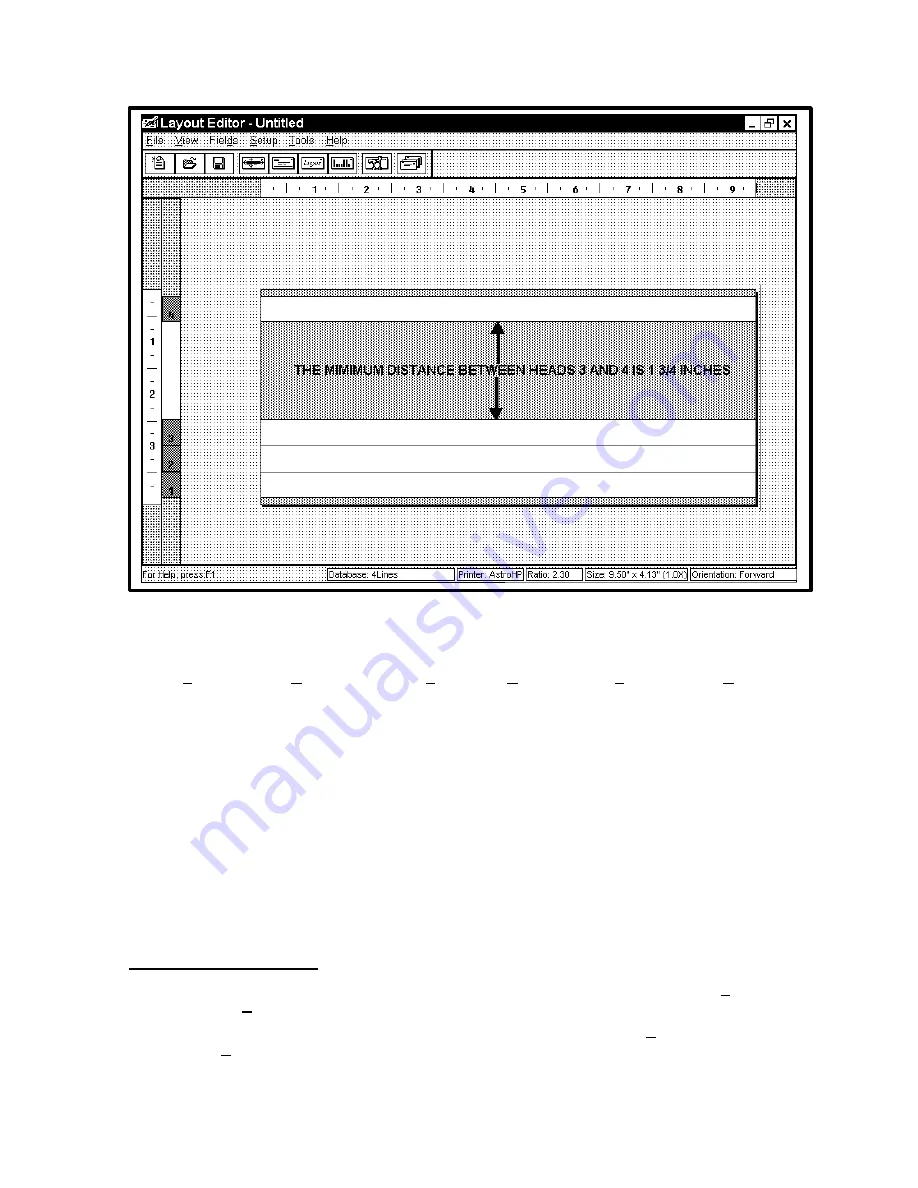
To the left of the media image are numbers.  These correspond to the printheads and are marked with 
the same numbers on the AstroJet 1000 Printer.  When the numbers are in RED the print direction is 
Forward and when the numbers are in BLUE the print direction is Reverse.  To the right of the media 
image is a line.  This guideline can be moved to any point on the layout to assist you in lining up the 
fields or information that you will be adding.  To get all of the information to line up on a particular bank 
move the line close to the position desired for the text fields and right click on the mouse while the 
guideline is selected. 

At the bottom of the window is the information line.  It displays the database in use, the printer being 
used, the ratio of the length of the piece to its height, the size of the piece in inches, and the 
orientation of the print direction either forward or reverse. 

Setting up the Job 

It is a good idea to get into the habit of naming and saving your Layout at this point. Select 

File

, then 

Save Template As…

 and then type the name “SAMPLE”.  Then click 

Save

If you wish to change the type or size of the envelope before beginning, use the 

Setup 

menu and click 

on 

Envelope Size

 or click on the Envelope Size icon on the menu bar 


Summary of Contents for AstroJet 1000

Page 1: ...ASTRO AstroJet 1000 Inkjet Printer Installation and Operating Manual...

Page 2: ...s Covers enclose hazardous parts that should only be accessed by a qualified service representative Report any damage of covers to your service representative This machine requires periodic maintenanc...

Page 3: ...ng up the Job 13 Saving the Template 18 Saving the Job 18 Section 4 Running the Job 21 The Computer Control Panel 21 Running a Job 23 Printer Settings 24 Types of Media 26 Databases 27 Searching for a...

Page 4: ...ii Notes...

Page 5: ...CKING LEVER This lever locks and releases the sheet separators Item 3 3 SHEET SEPARATORS There are four sheet separators that help separate the media as it is being fed See Setting Up the Job page 6 4...

Page 6: ...d independent of the other heads You can move the two printing banks from side to side to position the information properly on the media with the following restrictions Heads 1 2 and 3 print a band 1...

Page 7: ...problem with the printing process 5 RESET This key does not function 6 NEXT When the AstroJet 1000 is in the menu mode this key will scroll to the next selection When the selection is unlocked with t...

Page 8: ...4 Notes...

Page 9: ...sunlight Connecting the AstroJet 1000 Plugging in the Printer Make sure that the main power switch of the AstroJet 1000 Printer is in the OFF position 1 Connect one end of the power cord to the rear...

Page 10: ...Do not force the lever into place See the diagram Repeat the above for the remaining cartridges NOTE For optimum image quality during the run refer to Cleaning the Printhead on page 34 The ink in the...

Page 11: ...aintenance for instructions on how to change them Installing the Software on the Computer The AstroJet 1000 is not supplied with a computer The computer that you use with your AstroJet 1000 System sho...

Page 12: ...ur CD ROM drive Click on Install Printer Software 2 Select Windows 95 3 Select ODBC95 and follow the instructions in the windows to install DCOM95 for Windows 95 When this is installed Restart your co...

Page 13: ...to two parts The AstroJet Layout Editor and the AstroJet Control Panel When the AstroJet Printer Software was loaded on the computer the two icons shown below were placed on the desktop In addition th...

Page 14: ...UP LABELS TXT Highlight 4Lines TXT and click on Open to continue The 4Lines txt database is included in the software and is indexed DATABASE FILES Before we proceed there are a few things about the wa...

Page 15: ...will automatically re index the file the next time you open the template The 4Lines txt database in the software is indexed The next screen to appear is the Database View 4lines window displaying the...

Page 16: ...xt select Change Database and when the Warning window appears click OK The Select Database window will open Select the database you wish to use and click OK Immediately select Save As from the File me...

Page 17: ...ght of the media image is a line This guideline can be moved to any point on the layout to assist you in lining up the fields or information that you will be adding To get all of the information to li...

Page 18: ...on the Text Field Properties icon the Layout Editor Text Field Properties window will open This window permits you to enable up to 24 text fields of information and or data One button for each of the...

Page 19: ...The box at the right of the window contains the names of the fields Click on each field name to add it to the layout You may combine fields on a single text field or click Enter after each entry to c...

Page 20: ...ss to the layout double click on the text filed your placed in the return address area on your layout The following window will appear Type the information as shown in that window Each data or text fi...

Page 21: ...taller than 300 pixels NOTE Store all your logos in the LOGO folder in BMP format Once you have found the logo you wish to use click OK The screen will return to the Layout Editor and the logo will a...

Page 22: ...Data Line from the blotter area to the location you wish the Barcode to appear on the layout Double click on the Data Line and then click on the Barcode icon in the Text Field Editor and select the p...

Page 23: ...oint it is possible to select a specific range of records to be output To set the range select the starting record that you wish to use by using the database advance buttons Click on the left 4 4 to c...

Page 24: ...20 Notes...

Page 25: ...ke sure that the AstroJet 1000 is connected to the computer and that it is turned on If it is not the software can not establish communication with the printer When the AstroJet 1000 is started proper...

Page 26: ...the job and the record being printed AstroHP45 must display Ready in order to print 8 The bar shows the progress rendering and downloading the job 9 You can access the Layout Template at any time to...

Page 27: ...cards They carry the part number 90 103 09S 3 Move the separator locking lever up to lock the separators in place 4 Adjust the side guides to the width of the media and adjust the back guide so that...

Page 28: ...The AstroJet 1000 will begin by rendering the fonts and logos then download them to the printer Depending on the complexity of the page this process may take up to a few minutes Once a font or logo is...

Page 29: ...appear and MACH CYCLES with a number will appear 4 To reset this to 0 turn the AstroJet power OFF and then ON 5 Press the SELECT key again to exit then press the STAND BY key to return the AstroJet 10...

Page 30: ...cement to the top line of the display 3 Press the SELECT key and then press the PREVIOUS key to get NO to appear in the display 4 Press the SELECT key again so that the asterisk appears and locks in t...

Page 31: ...ro value specifies searches are sensitive to the case of letters 0 calls for case insensitive searches Search direction All 0 Specifies a search the entire database Non zero value forces searches of t...

Page 32: ...Bundle and Bag Breaks A Bundle and a Bag Break feature are available in the AstroJet Control Panel Software This feature will permit you to stop the AstroJet printer in order to separate the pieces ac...

Page 33: ...sed for bag break and for bundle break Once you have loaded your job in the control panel select Properties then select Bag Break the above window will appear Click on the Enable Bag Breaks to select...

Page 34: ...tween the feeding of each piece regardless of the resolution of the print selected Align Heads When printing addresses and particularly logos that stretch across several heads it may be necessary to a...

Page 35: ...ck to lock the printhead bands Click Apply then OK to close the Control Panel Properties window Cache The Cache tab is used to control the rendering and caching of the logos and fonts When you run a j...

Page 36: ...32 If you open the control panel while the printer is turned off the Control Panel software will ask you if you want to disable the printer for this session This is the same as checking the box...

Page 37: ...late or the gold printhead Remove the protective tape from the printhead The cartridges are held in place by a lever mounted on the inkjet cartridge holder Release the lever by raising it vertical Wit...

Page 38: ...he Printhead To maintain good print quality it is important that the printheads are kept clean During the printing process ink spray paper fibers and dust can cause a build up on the printheads This b...

Page 39: ...AstroJet 1000 4 Envelopes that are caught under the flap of another envelope or stuck to one another may cause jamming Removing Jammed Media 1 It may be necessary to move one or more of the printhead...

Page 40: ...th a vacuum that has a soft brush attachment to help loosen the dust particles Take care not to damage the PC Boards or electrical wiring The exterior of the machine may be cleaned with any standard h...

Page 41: ...nt Cartridges CONDITION PROBLEM SOLUTION Cartridge will not print Sheet is blank even after it has gone underneath cartridge s Check to make sure the tape is off the printhead Remove and reinsert the...

Page 42: ...a sensor Extra lines losing data Data base problem Check data in data base program Not printing on media Media not positioned properly 1 Adjust print band vertically 2 Adjust media margin setting on A...

Page 43: ...Click Next again and then save the job with a new name Click on Cancel to return to the Control Panel and select another job file Template View Warning Due to the design of the database management sof...

Page 44: ...on on the mailing piece Printing too far to the Left or Right Make sure that the size of the mailing piece entered in the Setup Menu is correct Make sure that the piece on the Layout Screen looks EXAC...

Page 45: ...nkjet Cartridge NUMBER OF CARTRIDGES 4 cartridges INKJET CARTRIDGE LIFE approximate Addressing High Quality 1 050 000 characters Standard Quality 2 100 000 characters Draft Quality 4 200 000 character...

Page 46: ...of 10 Megabytes of free hard disk space 4 At least 16 Megabytes of RAM 32 Megabytes for Windows 2000 and NT 5 A 2X CD ROM or better 6 An 800 X 600 SVGA Monitor or better 7 Parallel Centronics printer...

Page 47: ...your Astro Machine Distributor Supplies Black Inkjet Cartridge HP 51645A Fast Drying Black Inkjet Cartridge HP 6195A Yellow Inkjet Cartridge HPC6173A Red Inkjet Cartridge HPC6168A Green Inkjet Cartrid...

Page 48: ...g tree HKEY_CURRENT_USER Software Astro Machine Corp AstroJet 1000 Options Windows Char Set 3 Double Click on Windows Char Set icon 4 Change 0 to 1 Then Click OK 5 Click on Registry then Exit to exit...

Page 49: ...yout Editor and select the database you wish to use as you would for forward printing 2 The layout screen will appear with eight print heads 3 From the Setup menu select Envelope Direction and then se...

Page 50: ...this template require a database Then click OK The Layout Editor Stock Properties window will open Select the size of the envelope and click OK as you normally would Click on Setup and then Print head...

Page 51: ...the blotter area Click on this and drag it to the place that you wish the information to appear on the layout just as you would with a database field When the Data line 1 is positioned on the layout d...

Page 52: ...Copies window will open This window is used to select the number of copies to be printed If you leave the Unlimited job stops when Stop button pressed selected the printer will continue to print until...

Page 53: ...k on to your layout as Hr Min AM or PM Example 3 30 PM Seq This special insert will display the count of the records from 1 to the last record run regardless of the direction the database is run and p...

Page 54: ...will appear in the Control Panel requesting that something be added prior to printing In order to set the job up do the following Create a job just as you would normally Then create a Text Field for t...

Page 55: ...51...

Page 56: ......

Page 57: ...Copyright 2001 Astro Machine Corporation Elk Grove Village Illinois 60007 06 30 2001...

Reviews: