Astro Machine AstroJet 5000 Operator'S Manual Download Page 33


APPENDIX A 


29 

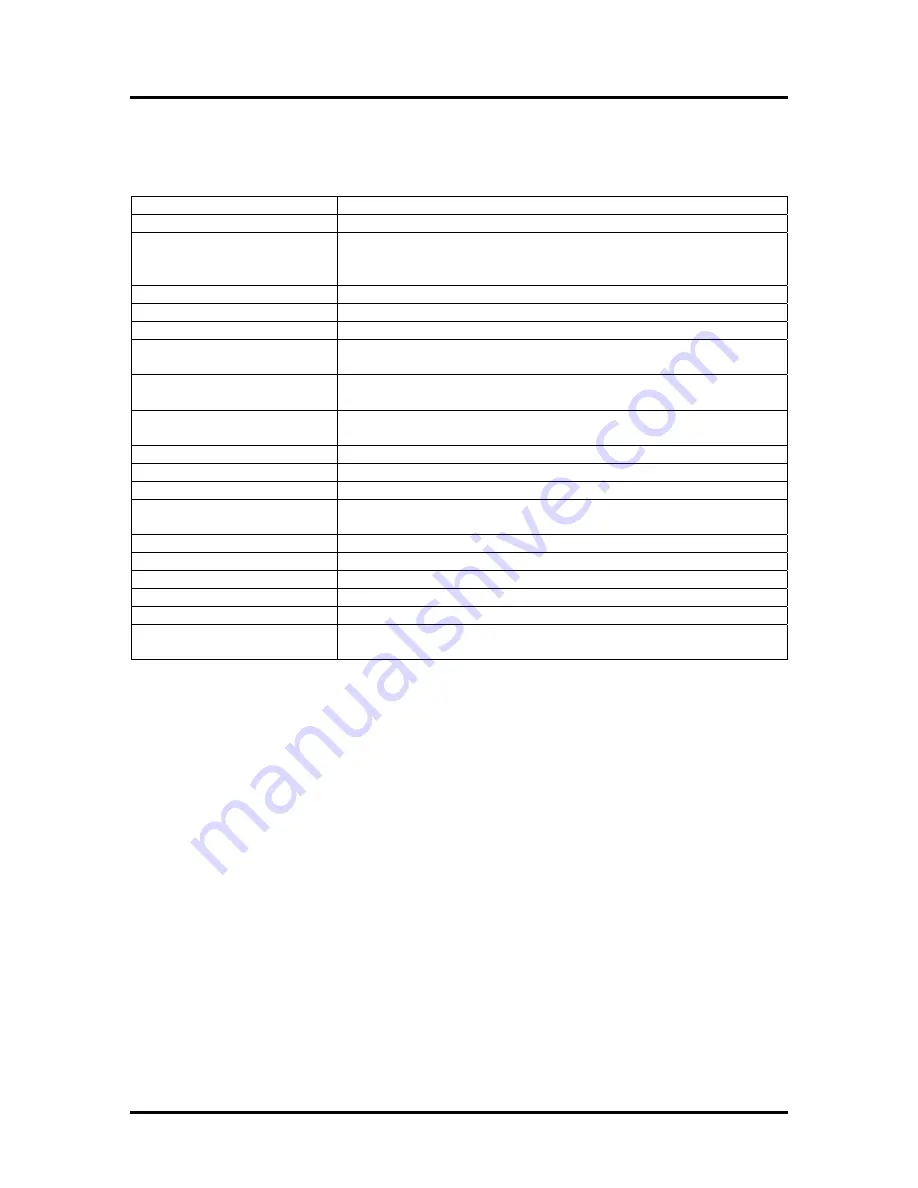
Appendix A – AstroJet 5000 Specifications 

PRINT TECHNOLOGY 

Inkjet, one HP 57 Color and one HP 56 or HP 58 Black cartridge 

ADDRESS SPEED 

Up to 4,000 #10 envelopes per hour  

PRINT QUALITY 

(Dots Per Inch) 

High Quality  


1200 dpi 

Standard Quality   

  600 dpi 

Draft Quality 


  300 dpi 

IMAGE AREA 

8.5 inches X 16 inches (215.9 mm x 406.4 mm) 

PRINT ORIENTATION 

Portrait and Landscape 

FONTS 

All TrueType fonts available on PC 

GRAPHICS, LOGOS, AND 
BARCODES 

Allows printing of graphics, logos, and barcodes 

MATERIAL SIZE 

Minimum: 3” x 5” (76 mm x 127 mm) 
Maximum: 11” x 17”(279.4 mm x 431.8 mm) 

MATERIAL THICKNESS 

Minimum: 0.006” (0.2 mm) 
Maximum: 0.0625” (1.5 mm) 

FEEDER CAPACITY 

Up to 300 #10 envelopes 

PRINT COLORS 

HP 57 full color, HP 56 and 58 black only 

INK 

Water based may require drying assistance for coated stock 

SOFTWARE  

Windows

TM

 Printer Drivers for Windows

TM

   98, 2000, NT, ME, and 

XP 

FIRMWARE UPDATE 

Via PC interface in flash proms. 

PC INTERFACE 

Parallel and USB (1.1) 

DIMENSIONS 

19.5” W x 22” L x 17.125” H (49.5 cm W x 55.9 cm L x 43.5 cm H)  

WEIGHT 

40 lbs. (18.2 kg.) 

ELECTRICAL  

115VAC or 240VAC 50/60 Hz 

OPTIONS 

HP Versatile fast dry Black, and Red, Blue, Green, or Yellow, 
Conveyor

/

Stacker, Drop Tray 

All Specifications Subject To Change Without Notice 

Summary of Contents for AstroJet 5000

Page 1: ...AstroJet 5000 Shuttle Head PRINTER OPERATOR MANUAL ASTRO MACHINE CORP 630 Lively Blvd Elk Grove Village IL 60007 Phone 847 364 6363 Fax 847 364 9898 www astromachine com ...

Page 2: ...iture 9 DO NOT remove covers Covers enclose hazardous parts that should only be accessed by a qualified service representative Report any damage of covers to your service representative 9 This machine requires periodic maintenance Contact your authorized service representative for required service schedules 9 To prevent overheating do not cover the vent openings 9 Use this equipment only for its i...

Page 3: ...ver 3 3 5 5 6 7 8 Section 3 Operating the AstroJet 5000 13 Setting Up a Job in MS Word Printer Driver Properties Paper Quality Tab Finishing Tab Effects Tab Basics Tab Color Tab Service Tab 13 15 15 17 17 17 18 19 Section 4 Maintenance 23 The Inkjet Cartridge Jams in the Printer Replacing the Sheet Separators Cleaning 23 24 25 25 Section 5 Trouble Shooting 27 HP Inkjet Print Cartridges The Printer...

Page 4: ...____ ______________________________________________________ ______________________________________________________ ______________________________________________________ ______________________________________________________ ______________________________________________________ ______________________________________________________ ______________________________________________________ __________...

Page 5: ...this switch will cancel the job being printed When the light is flashing the printer is out of ink or a cartridge is missing 3 Adjustable Media Guide This guide holds the paper against the fixed register guide 4 Fixed Media Guide All printing is registered against this guide 5 Soft Power Button Pressing and holding this button will reset the printer s software This button lights when the job is se...

Page 6: ...ed ON 4 Power Connection The printer s power pack is connected here Use only the power supply shipped with the printer 5 Clear Machine Button Operates the motor to help clear media from the machine 6 Rear Guide Support Supports the paper 7 Adjustable Media Guide This guide holds the paper against the fixed register guide 8 Rear Guide Holds the media against the front plate 9 Fixed Media Guide All ...

Page 7: ...e Printer Driver Choose a Location The AstroJet 5000 should be placed on a sturdy worktable or cabinet at least 9 inches from any walls Protect the AstroJet 5000 from excessive heat dust and moisture avoid placing it in direct sunlight Unpacking and Setup Remove the Printer and its parts from the carton Remove all packing tape The screws that attach the various parts of the guides to the printer a...

Page 8: ...e using the two screws 2 provided Attach the Rear Paper Support using the two knobs 3 provided NOTE the large slots fit over the socket head screws Install the Back Guide using the thumbscrew and washer 4 provided The washer goes between the screw and the Rear Paper Support ...

Page 9: ...PLUG OR EXTENSION CORD TO CONNECT THE PRINTER TO THE WALL RECEPTACLE DO NOT USE OUTLETS CONTROLLED BY WALL SWITCHES DO NOT USE AN OUTLET THAT SHARES THE SAME CIRCUIT WITH LARGE ELECTRICAL MACHINES OR APPLIANCES Connecting to the Computer The Printer has both a USB and a Parallel Port 1 connection The two ports are located one above the other as shown If you use the parallel printer cable from your...

Page 10: ...e top cover and press the soft power button 1 the button will light The printhead carriage will move side to side and the printhead wiper mechanism will move to its downward position Wait until the mechanism stops moving Then open the two printhead latching covers 2 by lifting them from the front 2 Inset the cartridge in their appropriate positions as shown The color cartridge goes on the left 3 P...

Page 11: ...ce the media under the separators The media is always placed against the fixed paper guide Loosen the separator locking screw Place the separator on the media and tighten the locking screw 4 Adjust the movable side guide so that it about 1 32 inch from the sides of the media Tighten the locking screws on the side guide Place some media in the machine 5 The rear support guide is adjustable by loose...

Page 12: ...ocedure for the AJ5000 driver is different for USB and Parallel Ports Follow the instructions below for installing the printer with a USB port Instructions for installing the printer on a Parallel Port follow the instructions below Install the disk supplied with the printer in your CD drive If the Window s Explorer window opens close it USB Port Installation 1 Connect the printer to the computer v...

Page 13: ...ew Hardware Wizard window will appear Click FINISH 5 The installation is complete when the Found New Hardware box appears in the lower right hand corner of your screen Parallel Port Installation 1 Connect the printer to the computer via the Parallel port LPT1 and turn the printer ON If the disk loads and the Welcome to the Found New Hardware wizard opens CLOSE it 2 Click on START and then Printers...

Page 14: ...lly detect and install my Plug and Play printer buttons in the Local or Network Printer window Then click NEXT 5 The Welcome to the Found New Hardware Wizard window will then open Click on No not at this time and then click NEXT 6 In the Found New Hardware Wizard window that appears next click on Install the software automatically Recommended button and then click NEXT ...

Page 15: ...ou will see the Hardware Installation window Click on the Continue Anyway button to continue the installation of the software 9 When the Completing the Found New Hardware Wizard window opens click FINISH 10 The New Printer Detection window opens It is a good idea to print a test page at this point to confirm that the printer driver and the printer are communicating Load a sheet of 8 1 2 X 11 paper...

Page 16: ... THE PRINTER 12 11 Once the test page is printed the Completing the Add Printer Wizard window will display information about the printer Click FINISH to close the window 12 Restart the computer to complete the installation ...

Page 17: ... and the paper sizes it can handle The maximum print area for the AstroJet 5000 Printer is 8 5 inches wide by 17 inches long The maximum paper size that the printer can feed is 11 inches wide by 17 inches long The diagram on the right illustrates this difference When setting up for the maximum print area for an 11 inch by 17 inch document always set the paper size as 9 5 inches wide by 17 inches l...

Page 18: ...paper orientation and then select the Paper tab 2 When you select the Paper Tab select Paper Size Custom 1 and then set the paper Width to 9 5 inches and the paper Height to 4 13 inches Then click on the OK button NOTE You must use a custom size to get the correct orientation of the envelope Do not use the standard 10 envelope selection 3 The last step is to go to print from the File menu and sele...

Page 19: ...on the right will open Paper Quality Tab If you then click on the Properties button the Properties window will open Click on Size is box to select the size of the material to be printed You can enter up to five custom sizes if the paper size you are printing on is not listed The next step is to click on the Paper Length box to select either Automatic Detection or Select from above Automatic Detect...

Page 20: ...ting is approximately 1200 dpi and is used where high quality images are required Finally there is the Maximum DPI setting This setting is used when printing photos and has a correction routine available under the Real Life Digital Photography button to help improve the quality of photos you print On this and subsequent pages in the Properties window you will notice at the top the Print Task Quick...

Page 21: ...e document in the size you selected regardless of the size of the paper The Watermarks option prints a light background watermark in the paper while printing the original document When this option is selected the First page only option will let you print the watermark on the first page but not subsequent pages The Edit button takes you to a second window that allows customization of the watermark ...

Page 22: ...f you wish to print in black only click on the Print in grayscale and select one of the three options that are available The second option Print in sepia will print a sepia colored color image You can not click on both the Print in grayscale and the Print in sepia boxes together The default setting for Color space is sRGB sYCC The other choices are AdobeRGB and Managed by application Unless you ar...

Page 23: ... Tab The service tab allows you to perform maintenance and check functions on the printer Clicking on the Print a Test Page button will print a sample page on the printer as shown Clicking on the Print a Diagnostic button will print the pattern shown ...

Page 24: ...isplay Ink Level button will show you an approximation of the amount of ink remaining in the cartridges This only works if you start with a new cartridge and do not remove it during its use Click OK to exit this function The Calibrate the Device button is used to calibrate the relationship between the black and color cartridges to make sure they line up with each other This function is usually per...

Page 25: ...SECTION 3 OPERATING THE ASTROJET 5000 21 The Calibrate Color button has no function Pressing it will return the window on the right ...

Page 26: ...________________________________________________________________________________ ______________________________________________________________________________________ ______________________________________________________________________________________ ______________________________________________________________________________________ __________________________________________________________...

Page 27: ...er Remove the new inkjet cartridge from its packaging taking care not to touch the copper contacts the metal plate or the gold printhead Remove the protective tape from the printhead Slide the new cartridge into its holder and latch the locking lever Do not force the lever into place CAUTION NEVER SHAKE DROP OR HIT THE CARTRIDGE AGAINST THE PALM OF YOUR HAND OR ANY OTHER HARD SURFACE SHAKING THE P...

Page 28: ... may cause jamming Failure to Feed Paper Stoppages If a sheet feeds but does not get into the proper position to feed you can clear it from the machine by pressing the Green Clear Machine Button This switch will operate the drive motor and rollers but not feed any additional paper Removing Jammed Media It may be necessary to remove one or more of the paper guides to gain access to the jammed media...

Page 29: ...hen remove the separator D by prying it out of the holder 5 Install a new separator in place and replace the separator support and screw Cleaning The AstroJet 5000 WARNING THE PRINTER IS A PRECISION MACHINE THAT SHOULD BE CLEANED REGULARLY TO INSURE MANY YEARS OF SERVICE BEFORE PERFORMING ANY MAINTENANCE DISCONNECT THE MACHINE FROM ITS POWER SOURCE The Printer must be cleaned regularly of accumula...

Page 30: ...nd Forwarding Rollers The feed and forwarding rollers can become glazed with paper lint and ink from the media They should be regularly cleaned with a mild abrasive household cleaner on a damp cloth Avoid using solvents on the rubber rollers ...

Page 31: ...BLEM SOLUTION Black streaks in text Lint or paper dust on printhead Replace the ink cartridge Cartridge will not print Sheet is blank even after it has gone underneath cartridge s Check to make sure the tape is off the printhead Remove and reinsert the cartridge into the carriage holder Install a new print cartridge White streaks in text or graphics Poor contact between printhead and printhead hol...

Page 32: ...ections on off switch and fuse on back Print too light or missing character dots Clogged or dirty printheads Running out of ink Replace inkjet cartridges Blurry address Image is not sharp Replace the inkjet cartridge or change the printer resolution setting Check media thickness Split line of type A line of type does not match up Check media thickness The minimum thickness for material is 0 006 In...

Page 33: ...inimum 3 x 5 76 mm x 127 mm Maximum 11 x 17 279 4 mm x 431 8 mm MATERIAL THICKNESS Minimum 0 006 0 2 mm Maximum 0 0625 1 5 mm FEEDER CAPACITY Up to 300 10 envelopes PRINT COLORS HP 57 full color HP 56 and 58 black only INK Water based may require drying assistance for coated stock SOFTWARE WindowsTM Printer Drivers for WindowsTM 98 2000 NT ME and XP FIRMWARE UPDATE Via PC interface in flash proms ...

Page 34: ...l Hardware The following supply items and optional hardware are available from your Astro Machine Distributor Supplies Black Inkjet Cartridge HP 56 Photo Black Ink Cartridge HP 58 Color Cartridge HP 57 Optional Hardware Conveyor Stacker Drop Tray ...

Page 35: ...uide 2 I Ink Level check 20 Inkjet Cartridge Cleaning 24 Inkjet Cartridge Disposal 23 Inkjet Cartridge Replacing 23 Inkjet Cartridge Storage 23 Inkjet Cartridges 5 30 Installing Inkjet Cartridges 6 Installing Printer 3 Installing Printer Driver 8 J Jams in Printer 24 Job Saving 16 L Losing Data 28 M Main Power Switch 2 Maintenance 23 Media Jams 28 Misfeeds 25 MS Word 13 O Operating 13 Options 30 P...

Page 36: ...INDEX 32 Soft Power Button 1 Specifications 29 Storing Inkjet Cartridge 23 T Troubleshooting 27 U Unpacking 3 USB Port 8 USB Port Connection 2 ...

Page 37: ......

Page 38: ...Copyright 2007 ASTRO MACHINE CORP Elk Grove Village IL 60007 12 04 2007 Part Number 200 AJ5000 Rev C ...

Reviews: