29
ixi gas pool and spa heater
Installation Manual
28
ixi gas pool and spa heater
Installation Manual
Note:
that the IXI interface is not IP rated so must be
installed in this location.
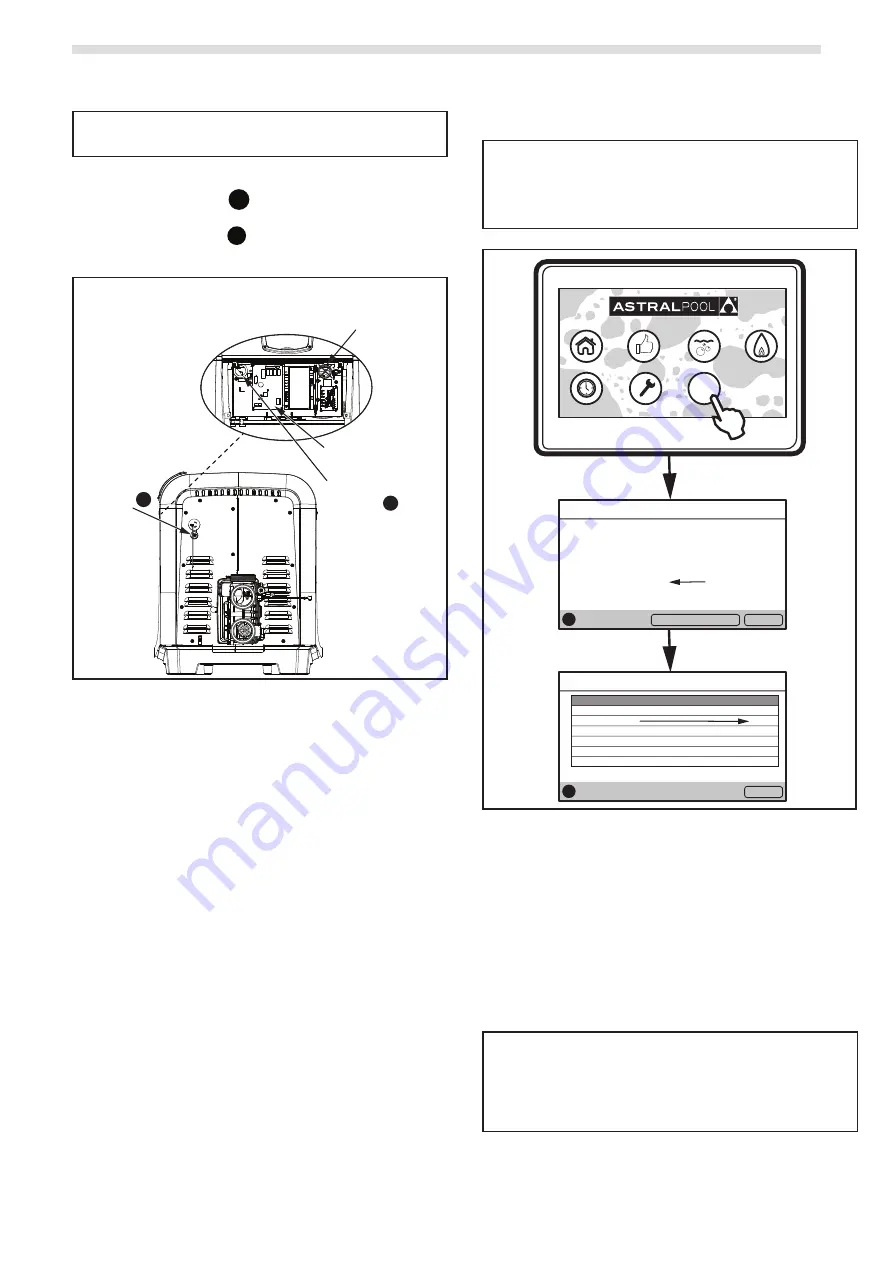
6. Run the included RJ12 cable through the low
voltage knockout
a
of the IXI heater and
through the low voltage grommet on the flip-
up cable raceway
b
then connect to the IXI
Interface.
Low Voltage
Knockout
Control PCB
Low Voltage
Grommet
Note:
Do
NOT
route wires
through the high voltage
grommet on raceway.
Raceway Detail
a
b
Figure 22.
Low Voltage Knockout Location for Connection
7. Connect the other side of the RJ12 cable to one
of the six (6) RJ12 connectors located on the Viron
Connect 10.
8. Reassemble the IXI gas heater front heater panel
and tighten the 4 screws back in place.
9. Connect the IXI gas heater to one of the two
constant 240V outlets on the Viron Connect 10.
See Figure 19.
When the heater turns on, the screen will display
“REMOTE ONLINE PUSH MENU TO DISABLE”. The
heater control panel is now disabled allowing the
Connect 10 to control functionality.
a. To temporarily use the heater controls, press
MENU and all functionality will return to the
heater control panel.
b. To return functionality to the Viron Connect
10, press MENU for 5 seconds to enter the
user set-up mode and then enable the remote
connection again. Turning the heaters main
power off and then back on again will also
accomplish the same outcome.
Connect 10 Touchscreen Setup
Note:
The colour touchscreen must be revision 3.9 or
greater.
The Connect10 button pcb must be revision be V2.2
or greater. This was introduced to production in
November 2015.
Timers
Home
Timers
Favorites
Pool & Spa
Heating
Setup
Help
?
List of Connected Devices...
Fri 1:18
Internet Gateway
5.0
Connect 8/10
2.5
Viron Chlorinator
5.6
IXI Gas Heater Interface
1.0
Help
?
Menu
Page: 1/1
Help...
Fri 1:17
For support and service, please contact AstralPool.
Ph: 1300 186 875
Colour Touchscreen V3.9
Help
?
Connected Devices
Menu
Figure 23.
Viron Connect 10 Versions Check Process
To check system revision numbers on the
touchscreen:
• P
ress Help to display the colour touch screen
revision,
• P
ress the Connected Devices button to display the
revisions of all connected devices. The Connect 10
button PCB revision number will appear as Connect
8/10 in the list.
Note:
Connect 10 button PCBs that require updating
must be completed by an authorized AstralPool
representative. Only Colour touchscreens Revision 3 or
above can be upgrade to revision 3.9. To download the
firmware and view instructions, visit www.astralpool.
com.au/connectmypool.
A Viron Connect 10 comes preconfigured to
communicate with AstralPool-branded heaters in
SYSTEM mode. If replacing a non-AstralPool branded


