background image

Astraada DRV-22 inverters                                                                                                                        Function Parameters                                                                   

36 

Function 

code 

Name 

Detailed instruction of parameters 

Default 

value 

Modify 

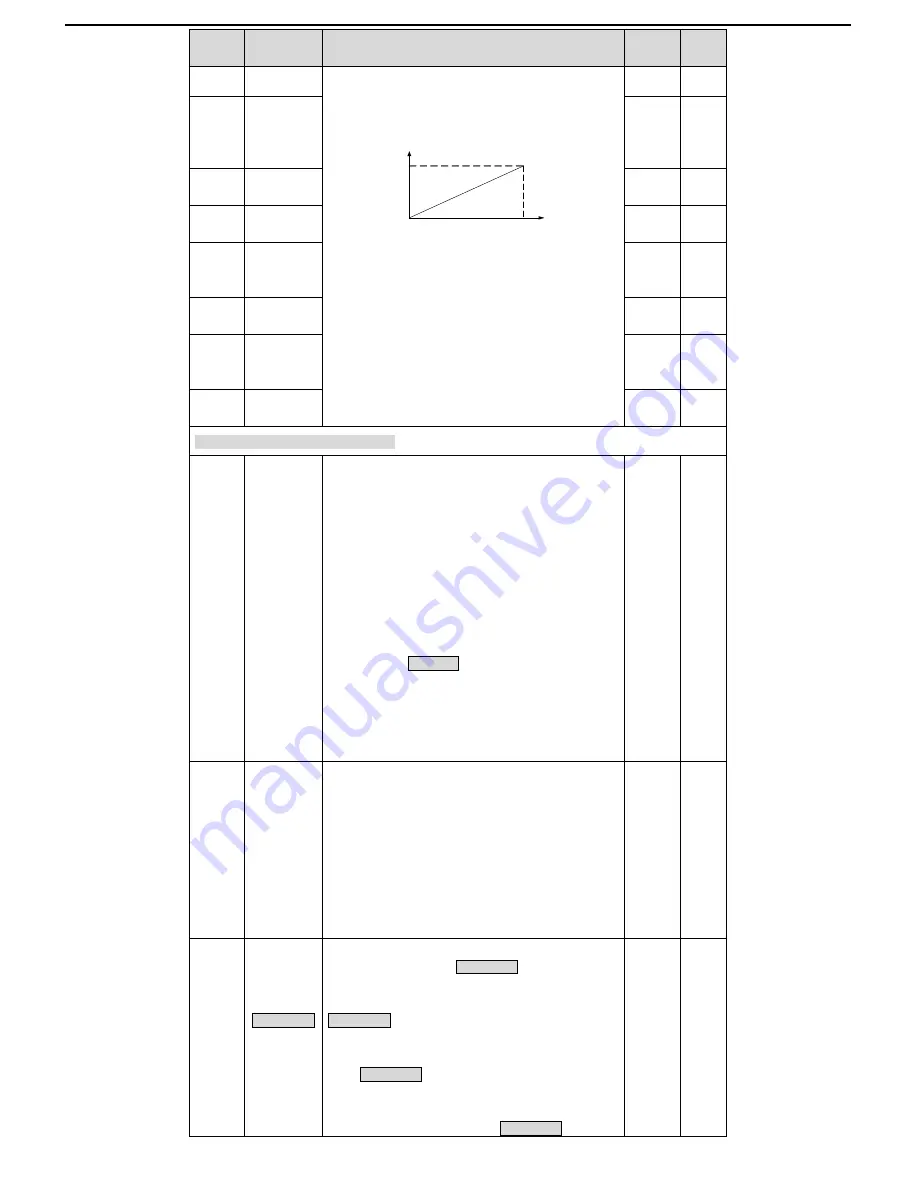
AO1 output 

0.5V. 

In different cases, the corresponding analog output of 100% 

of the output value is different. Please refer to each 

application for detailed information.   

10 V (20m A )

0.0%

10 0.0%

A O


Setting range of P06.17:-100.0%~ P06.19 

Setting range of P06.18:0.00V~10.00V   

Setting range of P06.19:P06.17~100.0% 

Setting range of P06.20:0.00V~10.00V 

Setting range of P06.21:0.000s~10.000s 

Setting range of P06.22:-100.0%~ P06.24 

Setting range of P06.23:0.00V~10.00V 

Setting range of P06.24:P06.22~100.0% 

Setting range of P06.25:0.00V~10.00V 

Setting range of P06.26:0.000s~10.000s


P06.20 

The 

corresponding 

AO1 output to 

the upper limit 

10.00V 


P06.21 

AO1 output 

filter time 

0.000s 


P06.22 

Lower limit of 

AO2 output 

0.0% 


P06.23 

Corresponding 

AO2 output to 

the lower limit 

0.00V 


P06.24 

Upper limit of 

AO2 output 

100.0% 


P06.25 

Corresponding 

AO2 output to 

the upper limit 

10.00V 


P06.26 

AO2 output 

filter time 

0.000s 


P07 Group    Human-Machine Interface


P07.00 

User’s 

password 

0~65535 

The password protection will be valid when setting any 

non-zero number.     

00000: Clear the previous user’s password, and make the 

password protection invalid.   

After the user’s password becomes valid, if the password is 

incorrect, users cannot enter the parameter menu. Only 

correct password can make the user check or modify the 

parameters. Please remember all users’ passwords.   

Retreat editing state of the function codes and the password 

protection will become valid in 1 minute. If the password is 

available, press PRG/ESC to enter into the editing state of 

the function codes, and then “0.0.0.0.0” will be displayed. 

Unless input right password, the operator can not enter into 

it.   

Note: Restoring to the default value can clear the 

password, please use it with caution. 

○ 

P07.01 

Parameter 

copy 

0:No operation 

1:Upload the local function parameter to the keypad   

2:Download the keypad function parameter to local 

address(including the motor parameters) 

3:Download the keypad function parameter to local address 

(excluding the motor parameter of P02 and P12 group) 

4:Download the keypad function parameters to local 

address (only for the motor parameter of P02 and P12 

group) 

Note: After finish 1~4, the parameter will restore to 0 and 

the uploading and downloading does not include P29. 

◎ 

P07.02 

QUICK/JOG 

function 

selection 

0:No function   

1: Jogging running. Press QUICK/JOG to begin the jogging 

running.     

2: Shift the display state by the shifting key. Press 

QUICK/JOG to shift the displayed function code from right 

to left.   

3: Shift between forward rotations and reverse rotations. 

Press QUICK/JOG to shift the direction of the frequency 

commands. This function is only valid in the keypad 

commands channels.   

4: Clear UP/DOWN settings. Press QUICK/JOG to clear the 

◎ 

Summary of Contents for DRV-22

Page 1: ...Operation Manual The owner of Astraada brand is ASTOR Sp z o o Astraada DRV 22 Frequency inverters ...

Page 2: ...Type designation key 8 2 5 Rated specifications 8 2 6 Structure diagram 8 3 Installation Guidelines 9 3 1 Mechanical installation 9 3 2 Standard wiring 10 3 3 Layout protection 13 4 Keypad Operation Procedure 13 4 1 Keypad introduction 13 4 2 Keypad displaying 15 4 3 Keypad operation 16 5 Function Parameters 17 6 Fault Tracking 56 6 1 Maintenance intervals 56 6 1 1 Cooling fan 57 6 1 2 Capacitors ...

Page 3: ...endix A Technical Data 73 A 1 Ratings 73 A 2 CE 73 A 3 EMC regulations 73 Appendix B Dimension Drawings 74 B 1 External keypad optional structure 74 B 2 Inverter chart 74 Appendix C Peripheral Options and Parts 75 C 1 Peripheral wiring 75 C 2 Power supply 77 C 3 Cables 77 C 4 Breaker and electromagnetic contactor 77 C 5 Reactors 77 C 6 Filter 78 C 7 Braking components 79 Appendix D Further Informa...

Page 4: ...ot sides Sides of the device may become hot Do not touch Note Note Physical hurt may occur if not follow the relative requirements Note 1 3 Safety guidelines Only qualified electricians are allowed to operate on the inverter Do not carry out any wiring and inspection or changing components when the power supply is applied Ensure all input power supply is disconnected before wiring and checking and...

Page 5: ...t for at least the time designated on the inverter after disconnection Take measures to avoid screws cables and other conductive matters to fall into the inverter during maintenance and component replacement Note Please select proper torque to tighten screws Keep the inverter parts and components away from combustible materials during maintenance and component replacement Do not carry out any isol...

Page 6: ...aterials and the calorific accessories reactors and brake resistors are away from flammable materials 4 Check that all control cables and power cables are run separately and the routation complies with EMC requirement 5 Check that all grounding systems are properly grounded according to the requirements of the inverter 6 Check that the free space during installation is sufficient according to the ...

Page 7: ...etc Peripheral interface Analog input 1 AI2 0 10V 0 20mA and 1 AI3 10 10V Analog output 2 AO1 AO2 0 10V 0 20mA Digital input 4 common inputs the Max frequency 1kHz 1 high speed input the Max frequency 50kHz Digital output 1 Y1 terminal output 2 programmable relay outputs Relay output 2 programmable relay outputs RO1A NO RO1B NC RO1C common terminal RO2A NO RO2B NC RO2C common terminal Contact capa...

Page 8: ...V20C7 0 75 9 3 4 2 AS22DRV21C5 1 5 15 7 7 5 AS22DRV22C2 2 2 24 10 AS22DRV40C7 0 75 3 4 2 5 AS22DRV41C5 1 5 5 0 3 7 AS22DRV42C2 2 2 5 8 5 5 2 6 Structure diagram Below is the layout figure of the inverter take the inverter of 0 75kW as the example 6 12 8 10 7 3 2 5 1 9 11 4 Figure 2 3 Product structure Serial No Name Illustration 1 External keypad port Connect the external keypad 2 Port cover Prote...

Page 9: ...ture of the inverter is above 40 C derate 3 for every additional 1 C It is not recommended to use the inverter if the ambient temperature is above 50 C In order to improve the reliability of the device do not use the inverter if the ambient temperature changes frequently Please provide cooling fan or air conditioner to control the internal ambient temperature below the required one if the inverter...

Page 10: ...s 36 6mm and W is 35 0mm 3 2 Standard wiring 3 2 1 Connection diagram of main circuit Figure 3 3 Connection diagram of main circuit Note The fuse braking resistor input reactor input filter output reactor output filter are optional parts Please refer to Peripheral Optional Parts for detailed information 3 2 2 Terminals figure of main circuit Figure 3 4 1PH terminals of main circuit Terminal Termin...

Page 11: ...el at the input side of the inverter 3 2 3 Wiring of terminals in main circuit 1 Fasten the grounding conductor of the input power cable with the grounding terminal of the inverter PE by 360 degree grounding technique Connect the phase conductors to L1 L2 and L3 terminals and fasten 2 Strip the motor cable and connect the shield to the grounding terminal of the inverter by 360 degree grounding tec...

Page 12: ...3 Voltage or current input can be setted by dip switch 4 Resolution the minimum AI2 AI3 is 10mV 20mV when 10V corresponds to 50Hz AI3 COM Analog reference ground Analog reference ground CME Common terminal of the open collector output AO1 Analog output 1 Output range 0 10V or 0 20mA 2 The voltage or the current output is depended on the dip switch 3 Deviation 1 25 C when full range AO2 Relay outpu...

Page 13: ... If the inverter is connected to multiple motors a separate thermal overload switch or a circuit breaker must be used for protecting each cable and motor These devices may require a separate fuse to cut off the short circuit current 3 3 3 Implementing a bypass connection It is necessary to set power frequency and variable frequency conversion circuits for the assurance of continuous normal work of...

Page 14: ... control LED off means that the inverter is in the keypad operation state LED blinking means the inverter is in the terminals operation state LED on means the inverter is in the remote communication control state TRIP LED for faults LED on when the inverter is in the fault state LED off in normal state LED blinking means the inverter is in the pre alarm state 2 Unit LED Mean the unit displayed cur...

Page 15: ...ter is in the stopping state the keypad will display stopping parameters which is shown in figure 4 2 In the stopping state various kinds of parameters can be displayed Select the parameters to be displayed or not by P07 07 See the instructions of P07 07 for the detailed definition of each bit In the stopping state there are 14 stopping parameters can be selected to be displayed or not They are se...

Page 16: ...third level menu if the parameter has no flickering bit it means the function code cannot be modified The possible reasons could be 1 This function code is not modifiable parameter such as actual detected parameter operation records and so on 2 This function code is not modifiable in running state but modifiable in stop state Example Set function code P00 01 from 0 to 1 Figure 4 3 Sketch map of mo...

Page 17: ...meter is the real detection value which can not be modified Function code Name Detailed instruction of parameters Default value Modify P00 Group Basic function group P00 00 Speed control mode 0 SVC 0 No need to install encoders Suitable in applications which need low frequency big torque for high accuracy of rotating speed and torque control Relative to mode 1 it is more suitable for the applicati...

Page 18: ...otentiometer while AI2 is the voltage current option 0 10V 0 20mA which can be shifted by jumpers while AI3 is voltage input 10V 10V Note when analog AI2 select 0 20mA input the corresponding voltage of 20mA is 10V 100 0 of the analog input setting corresponds to the maximum frequency function code P00 03 in forward direction and 100 0 corresponds to the maximum frequency in reverse direction func...

Page 19: ...frequency is the set frequency 5 Min A B The lower one between A frequency command and B frequency is the set frequency Note The combination manner can be shifted by P05 terminal function 0 P00 10 Keypad set frequency When A and B frequency commands are selected as keypad setting this parameter will be the initial value of inverter reference frequency Setting range 0 00 Hz P00 03 the Max frequency...

Page 20: ...uency the inverter needs to derate 20 for each additional 1k carrier frequency Setting range 1 0 15 0kHz Depend on model P00 15 Motor parameter autotuning 0 No operation 1 Rotation autotuning Comprehensive motor parameter autotune It is recommended to use rotation autotuning when high control accuracy is needed 2 Static autotuning 1 autotune totally It is suitable in the cases when the motor can n...

Page 21: ...uency If the set frequency is lower than the starting frequency the inverter will stop running and keep in the stand by state The starting frequency is not limited in the lower limit frequency Setting range 0 0 50 0s 0 0s P01 03 The braking current before starting The inverter will carry out DC braking at the braking current set before starting and it will speed up after the DC braking time If the...

Page 22: ...aking If the time is 0 the DC braking is invalid The inverter will stop at the set deceleration time Setting range of P01 09 0 00Hz P00 03 the Max frequency Setting range of P01 10 0 00 50 00s Setting range of P01 11 0 0 100 0 Setting range of P01 12 0 00 50 00s 0 00Hz P01 10 Waiting time before DC braking 0 00s P01 11 DC braking current 0 0 P01 12 DC braking time 0 00s P01 13 Dead time of FWD REV...

Page 23: ...determines the running state of the inverter when the set frequency is lower than the lower limit one 0 Run at the lower limit frequency 1 Stop 2 Hibernation The inverter will coast to stop when the set frequency is lower than the lower limit one if the set frequency is above the lower limit one again and it lasts for the time set by P01 20 the inverter will come back to the running state automati...

Page 24: ... current 0 P02 Group Motor 1 P02 01 Rated power of asynchronous motor 0 1 3000 0kW Depend on model P02 02 Rated frequency of asynchronous motor 0 01Hz P00 03 50 00Hz P02 03 Rated speed of asynchronous motor 1 36000rpm Depend on model P02 04 Rated voltage of asynchronous motor 0 1200V Depend on model P02 05 Rated current of asynchronous motor 0 8 6000 0A Depend on model P02 06 Stator resistor of as...

Page 25: ... won t be impacted by the rotation speed it is not necessary to adjust the protection value during low speed running 2 P02 27 Motor overload protection coefficient Times of motor overload M Iout In K In is the rated current of the motor Iout is the output current of the inverter and K is the motor protection coefficient So the bigger the value of K is the smaller the value of M is When M 116 the f...

Page 26: ...o parameters adjust the PI adjustment parameter of the current loop which affects the dynamic response speed and control accuracy directly Generally users do not need to change the default value Only apply to the vector control mode without PG 0 P00 00 0 Setting range 0 65535 1000 P03 10 Current loop integral coefficient I 1000 P03 11 Torque setting method This parameter is used to enable the torq...

Page 27: ...ds to three times of the motor current 0 P03 19 Upper limit setting of braking torque 0 P03 20 Electromotion torque upper limit keypad setting The function code is used to set the limit of the torque Setting range 0 0 300 0 motor rated current 180 0 P03 21 Braking torque upper limit keypad setting 180 0 P03 22 Weakening coefficient in constant power zone The usage of motor in weakening control Fun...

Page 28: ...elow picture is the motor rated voltage and fb is the motor rated frequency 0 P04 01 Torque boost Torque boost to the output voltage for the features of low frequency torque P04 01 is for the Max output voltage Vb P04 02 defines the percentage of closing frequency of manual torque to fb Torque boost should be selected according to the load The bigger the load is the bigger the torque is Too big to...

Page 29: ...or can not run stably or overcurrent may occur These phenomena can be canceled by adjusting this parameter The setting range of P04 10 0 100 The setting range of P04 11 0 100 The setting range of P04 12 0 00Hz P00 03 the Max frequency 10 P04 11 High frequency vibration control factor 10 P04 12 Vibration control threshold 30 00 Hz P04 26 Energy saving operation selection 0 No operation 1 Automatic ...

Page 30: ...top 7 Fault reset 8 Operation pause 9 External fault input 10 Increasing frequency setting UP 11 Decreasing frequency setting DOWN 12 Cancel the frequency change setting 13 Shift between A setting and B setting 14 Shift between combination setting and A setting 15 Shift between combination setting and B setting 16 Multi step speed terminal 1 17 Multi step speed terminal 2 18 Multi step speed termi...

Page 31: ...et the sample filter time of S1 S4 and HDI terminals If the interference is strong increase the parameter to avoid wrong operation 0 000 1 000s 0 010s P05 12 Virtual terminals setting 0x000 0x1FF 0 Disabled 1 Enabled BIT0 S1 virtual terminal BIT1 S2 virtual terminal BIT2 S3 virtual terminal BIT3 S4 virtual terminal BIT4 S5 virtual terminal BIT5 S6 virtual terminal BIT6 S7 virtual terminal BIT7 S8 ...

Page 32: ...is the enabling terminal on this mode and the running command is caused by SB1 or SB3 and both of them control the running direction NC SB2 generates the stop command COM SB2 SB1 FWD REV SIn SB3 Sln FWD REV Direction ON OFF ON ON Forward OFF Reverse ON ON OFF ON Forward OFF Reverse ON OFF Decelerate to stop Note for the 2 wire running mode when FWD REV terminal is valid the inverter stop because o...

Page 33: ...5 32 Lower limit of AI1 AI1 is set by the analog potentiometer AI2 is set by control terminal AI2 and AI3 is set by control terminal AI3 The function code defines the relationship between the analog input voltage and its corresponding set value If the analog input voltage beyond the set minimum or maximum input value the inverter will count at the minimum or maximum one When the analog input is th...

Page 34: ... 0 100 0 The setting range of P05 46 P05 44 10 00V The setting range of P05 48 0 000s 10 000s 100 0 P05 41 AI2 input filter time 0 100s P05 42 Lower limit of AI3 10 00V P05 43 Corresponding setting of the lower limit of AI3 100 0 P05 44 Middle value of AI3 0 00V P05 45 Corresponding middle setting of AI3 0 0 P05 46 Upper limit of AI3 10 00V P05 47 Corresponding setting of the upper limit of AI3 10...

Page 35: ...ote P06 08 and P06 08 are valid only when P06 00 1 0 000s P06 11 RO1 switching off delay time 0 000s P06 12 RO2 switching on delay time 0 000s P06 13 RO2 switching off delay time 0 000s P06 14 AO1 output selection 0 Running frequency 1 Setting frequency 2 Ramp reference frequency 3 Running rotation speed 4 Output current relative to the rated current of the inverter 5 Output current relative to th...

Page 36: ...ers cannot enter the parameter menu Only correct password can make the user check or modify the parameters Please remember all users passwords Retreat editing state of the function codes and the password protection will become valid in 1 minute If the password is available press PRG ESC to enter into the editing state of the function codes and then 0 0 0 0 0 will be displayed Unless input right pa...

Page 37: ... terminals control 2 Both valid for keypad and communication control 3 Valid for all control modes 0 P07 05 Displayed parameters 1 of running state 0x0000 0xFFFF BIT0 running frequency Hz on BIT1 set frequency Hz flickering BIT2 bus voltage Hz on BIT3 output voltage V on BIT4 output current A on BIT5 running rotation speed rpm on BIT6 output power on BIT7 output torque on BIT8 PID reference flicke...

Page 38: ... 10 1 0 P07 11 Rectifier bridge module temperature 20 0 120 0 C P07 12 Convertering module temperature 20 0 120 0 C P07 13 Software version 1 00 655 35 P07 14 Local accumulative running time 0 65535h P07 15 High bit of power consumption Display the power used by the inverter The power consumption of the inverter P07 15 1000 P07 16 Setting range of P07 15 0 65535 1000 Setting range of P07 16 0 0 99...

Page 39: ...ult ItE 20 Motor antotune fault tE 21 EEPROM operation fault EEP 22 PID response offline fault PIDE 23 Reserved 24 Running time arrival END 25 Electrical overload OL3 26 PCE 27 UPE 28 DNE 29 33 Reserved 34 Speed deviation fault dEu 35 Maladjustment STo 36 Underload fault LL P07 28 Previous fault type P07 29 Previous 2 fault type P07 30 Previous 3 fault type P07 31 Previous 4 fault type P07 32 Prev...

Page 40: ...s fault 0V P07 44 The output current at previous fault 0 0A P07 45 Bus voltage at previous fault 0 0V P07 46 The Max temperature at previous fault 0 0 C P07 47 Input terminals state at previous fault 0 P07 48 Output terminals state at previous fault 0 P07 49 Reference frequency at previous 2 faults 0 00Hz P07 50 Ramp reference frequency at previous 2 faults 0 00Hz P07 51 Output voltage at previous...

Page 41: ...3 to 0Hz Setting range 0 0 3600 0s Depend on model P08 08 Jogging running DEC time Depend on model P08 09 Jumping frequency 1 When the set frequency is in the range of jumping frequency the inverter will run at the edge of the jumping frequency The inverter can avoid the mechanical resonance point by setting the jumping frequency The inverter can set three jumping frequency But this function will ...

Page 42: ...output terminals will output the signal of fixed counting number arrival and the counter go on working when the counter achieves a setting number the multi function output terminals will output the signal of setting counting number arrival the counter will clear all numbers and stop to recount before the next pulse The setting counting value P08 26 should be no more than the setting counting value...

Page 43: ...tion detection value 5 0 P08 36 Frequency arrival detection value When the output frequency is among the below or above range of the set frequency the multi function digital output terminal will output the signal of frequency arrival see the diagram below for detailed information The setting range 0 00Hz P00 03 the Max frequency 0 00Hz P08 37 Energy Braking enable This parameter is used to control...

Page 44: ...e priority LED hundreds action selection during stopping 0 Setting is valid 1 Valid during running cleared after stopping 2 Valid during running cleared after receiving the stop command LED thousands keys and analog potentiometer integral function 0 The Integral function is valid 1 The Integral function is invalid 0x0000 P08 43 Integral ratio of the keypad potentiometer 0 01 10 00s 0 10s P08 44 UP...

Page 45: ...l as to change the rotation speed of the motor Its other advantages are Brake immediately after the stop command It does not need to wait the magnetic flux weaken The cooling is better The current of the stator other than the rotor increases during magnetic flux braking while the cooling of the stator is more effective than the rotor 0 P08 51 Input power factor of the inverter This function code i...

Page 46: ...he setting range 0 00 100 00 1 00 P09 05 Interval time Ti This parameter determines the speed of PID adjustor to carry out integral adjustment on the deviation of PID feedback and reference When the deviation of PID feedback and reference is 100 the integral adjustor works continuously after the time ignoring the proportional effect and differential effect to achieve the Max Frequency P00 03 or th...

Page 47: ...on integral adjustment when the frequency achieves the upper and low limit the integration shows the change between the reference and the feedback unless it reaches the internal integral limit When the trend between the reference and the feedback changes it needs more time to offset the impact of continuous working and the integration will change with the trend 1 Stop integral adjustment when the ...

Page 48: ... step speeds are in the range of fmax fmax and it can be Astraada DRV 22 series inverters can set 16 stages speed selected by the combination of multi step terminals 1 4 corresponding to the speed 0 to speed 15 When S1 S2 S3 S4 OFF the frequency input manner is selected via code P00 06 or P00 07 When all S1 S2 S3 S4 terminals aren t off it runs at multi step which takes precedence of keypad analog...

Page 49: ...stage 11 0 0s P10 26 Multi step speed 12 0 0 P10 27 The running time of stage 12 0 0s P10 28 Multi step speed 13 0 0 P10 29 The running time of stage 13 0 0s P10 30 Multi step speed 14 0 0 P10 31 The running time of stage 14 0 0s P10 32 Multi step speed 15 0 0 P10 33 The running time of stage 15 0 0s P10 34 Simple PLC 0 7 stage ACC DEC time selection Below is the detailed instruction Function code...

Page 50: ...up Protective parameters P11 00 Phase loss protection 0x00 0x11 LED ones 0 Input phase loss protection disable 1 Input phase loss protection enable LED tens 0 Output phase loss protection disable 1 Output phase loss protection enable 0x10 P11 01 Frequency dec reasing at sudden power loss 0 Enabled 1 Disabled 0 P11 02 Frequency decreasing ratio at sudden power loss Setting range 0 00Hz s P00 03 the...

Page 51: ... range of P11 05 0x00 0x12 Setting range of P11 06 50 0 200 0 Setting range of P11 07 0 00 50 00Hz s 0x01 P11 06 Automatic current limit level 160 0 P11 07 The decreasing ratio during current limit 10 00 Hz s P11 08 Overload pre alarm of the motor inverter The output current of the inverter or the motor is above P11 09 and the lasting time is beyond P11 10 overload pre alarm will be output Setting...

Page 52: ...r is used to set the speed deviation detection time Setting range of P11 15 0 0 10 0s 0 5s P11 16 Automatic frequency de creasing at voltage drop 0 Invalid 1 Valid ensure rated output torque when voltage drop 0 P13 Group Control parameters of SM P13 13 Braking current of short circuit After the inverter starts when P01 00 0 set P13 14 to non zero value and begin short circuit braking After the inv...

Page 53: ...itor If the answer delay is shorter than the system processing time then the answer delay time is the system processing time if the answer delay is longer than the system processing time then after the system deal with the data waits until achieving the answer delay time to send the data to the upper monitor 5 P14 04 Communication overtime fault time 0 0 invalid 0 1 60 0s When the function code is...

Page 54: ...r Range 0 0 5000 0A P17 08 Motor power Display current power of the motor Setting range 300 0 300 0 the rated current of the motor P17 09 Output torque Display the current output torque of the inverter Range 250 0 250 0 P17 10 The motor frequency evaluation Evaluate the motor rotor frequency on open loop vector Range 0 00 P00 03 P17 11 DC bus voltage Display current DC bus voltage of the inverter ...

Page 55: ...and the current stage of the multi step speed Display simple PLC and the current stage of the multi step speed Range 0 15 P17 28 ASR controller output The percentage of the rated torque of the relative motor display ASR controller output Range 300 0 300 0 the rated motor current P17 29 Reserved P17 30 Reserved P17 31 Reserved P17 32 Magnetic flux linkage Display the magnetic flux linkage of the mo...

Page 56: ...the characters are displayed totally Visual examination Conforming to the manual Main circuit For public use Ensure the screws are tightened scurrility Tighten up NA Ensure there is no distortion crackles damage or color changing caused by overheating and aging to the machine and insulator Visual examination NA Ensure there is no dust and dirtiness Visual examination NA Note if the color of the co...

Page 57: ...ual examination or rotate with hand Stable rotation Estimate there is no losses screw Tighten up NA Ensure there is no color changing caused by overheating Visual examination or estimate the usage time according to the maintenance information NA Ventilating duct Ensure whether there is stuff or foreign objection in the cooling fan air vent Visual examination NA 6 1 1 Cooling fan The inverter s coo...

Page 58: ...n the inverter are above 35000 Please contact with the local ASTOR offices or dial our service hotline 48 12 424 00 88 for detailed operation 6 1 3 Power cable Read and follow the instructions in chapter Safety Precautions Ignoring the instructions may cause physical injury or death or damage to the equipment 1 Stop the drive and disconnect it from the power line Wait for at least the time designa...

Page 59: ... 1 The voltage of the power supply is too low 2 The motor setting rated current is incorrect 3 The motor stall or load transients is too strong 1 Check the power of the supply line 2 Reset the rated current of the motor 3 Check the load and adjust the torque lift OL2 Inverter overload 1 The acceleration is too fast 2 Reset the rotating motor 3 The voltage of the power supply is too low 4 The load ...

Page 60: ...meters 2 Damage to EEPROM 1 Press STOP RST to reset 2 Change the main control panel PIDE PID feedback fault 1 PID feedback offline 2 PID feedback source disappear 1 Check the PID feedback signal 2 Check the PID feedback source bCE Braking unit fault 1 Braking circuit fault or damage to the braking pipes 2 The external braking resistor is not sufficient 1 Check the braking unit and change new braki...

Page 61: ...d ask for maintenance service DNE Parameter download error The keypad is not in good connection or offline The keypad cable is too long and there is strong interference Data storage error in keypad Check the environment and eliminate the interference source Change hardware and ask for maintenance service Backup data in the keypad again LL Electronic underload fault The inverter will report the und...

Page 62: ...the slave does not need to feedback the response message 7 2 Application of the inverter The Modbus protocol of the inverter is RTU mode and the physical layer is 2 wire RS485 7 2 1 2 wire RS485 The interface of 2 wire RS485 works on semiduplex and its data signal applies differential transmission which is called balance transmission too It uses twisted pairs one of which is defined as A and the o...

Page 63: ...e BIT1 BIT8 are the digital bits Start bit BIT1 BIT2 BIT3 BIT4 BIT5 BIT6 BIT7 BIT8 Check bit End bit 10 bit character frame BIT1 BIT7 are the digital bits Start bit BIT1 BIT2 BIT3 BIT4 BIT5 BIT6 BIT7 Check bit End bit In one character frame the digital bit takes effect The start bit check bit and end bit is used to send the digital bit right to the other device The digital bit even odd checkout an...

Page 64: ...eckout If the parity of the receiving data is different from the setting value there is an error in the communication CRC check The checkout uses RTU frame format The frame includes the frame error detection field which is based on the CRC calculation method The CRC field is two bytes including 16 figure binary values It is added into the frame after calculated by transmitting device The receiving...

Page 65: ... message is sent to the inverter with the address of 01H and ADDR occupies one byte CMD 03H means the message is received from the inverter to the master for the response of reading command and CMD occupies one byte Byte number means all byte number from the byte excluding the byte to CRC byte excluding the byte 04 means there are 4 byte of data from the byte number to CRC CHK low bit which are di...

Page 66: ...K high bit 14H END T1 T2 T3 T4 The RTU response command is START T1 T2 T3 T4 ADDR 01H CMD 08H High bit of sub function code 00H Low bit of sub function code 00H High bit of data content 12H Low bit of data content ABH CRC CHK low bit ADH CRC CHK high bit 14H END T1 T2 T3 T4 7 3 4 Command code 10H continuous writing Command code 10H means that if the master writes data to the inverter the data numb...

Page 67: ...n not be changed in any state The setting range unit and relative instructions should be paid attention to when modifying the function code parameters Besides EEPROM is stocked frequently which may shorten the usage time of EEPROM For users some functions are not necessary to be stocked on the communication mode The needs can be met on by changing the value in RAM Changing the high bit of the func...

Page 68: ...l input terminal command range 0x00 0x0F W 200CH Voltage setting value special for V F separation 0 1000 1000 corresponds to the 100 0 of the rated voltage of the motor W 200DH AO output setting 1 1000 1000 1000 corresponds to 100 0 W 200EH AO output setting 2 1000 1000 1000 corresponds to 100 0 W SW 1 of the inverter 2100H 0001H forward running R 0002H forward running 0003H stop 0004H fault 0005H...

Page 69: ...nsisted of 16 bit which is high 8 bits and low 8 bits High 8 bits mean the motor type series and low 8 bits mean the derived motor types of the series For example 0110H means Astraada DRV 22 vector inverters 7 3 6 Fieldbus ratio values The communication data is expressed by hex in actual application and there is no radix point in hex For example 50 12Hz can not be expressed by hex so 50 12 can be ...

Page 70: ...en used 08H The parameter can not be modified during running The modified parameter in the writing of the upper monitor can not be modified during running 09H Password protection When the upper monitor is writing or reading and the user password is set without password unlocking it will report that the system is locked The slave uses functional code fields and fault addresses to indicate it is a n...

Page 71: ... The command sent to the inverter If the response message is as below See from the returned data all fault types are 0023H decimal 35 with the meaning of maladjustment STo 7 3 8 2 Example of writing command 06H Make the inverter with the address of 03H to run forward See table 1 the address of communication control command is 2000H and forward running is 0001 See the table below The command sent b...

Page 72: ...00 11 ACC time 1 ACC time means the time needed if the inverter speeds up from 0Hz to the Max One P00 03 DEC time means the time needed if the inverter speeds down from the Max Output frequency to 0Hz P00 03 300 series inverters define four groups of ACC DEC time which can be selected by P05 The factory default ACC DEC time of the inverter is the first group Setting range of P00 11 and P00 12 0 0 ...

Page 73: ...Directive The EMC Directive defines the requirements for immunity and emissions of electrical equipment used within the European Union The EMC product standard EN 61800 3 2004 covers requirements stated for drives See section EMC regulations A 3 EMC regulations EMC product standard EN 61800 3 2004 contains the EMC requirements to the inverter First environment domestic environment includes establi...

Page 74: ...s are selected as specified in this manual 3 The drive is installed according to the instructions given in this manual A drive of category C3 is not intended to be used on a low voltage public network which supplies domestic premises Radio frequency interference is expected if the drive is used on such a network Appendix B Dimension Drawings Dimension drawings of the Astraada DRV 22 are shown belo...

Page 75: ...37 3 5 Rail mounting unit mm Model W1 H1 H3 H4 D1 D2 Installation hole d AS22DRV20C4 80 0 160 0 35 4 36 6 123 5 120 3 5 AS22DRV20C7 80 0 160 0 35 4 36 6 123 5 120 3 5 AS22DRV21C5 80 0 185 0 35 4 36 6 140 5 137 3 5 AS22DRV22C2 80 0 185 0 35 4 36 6 140 5 137 3 5 AS22DRV40C7 80 0 185 0 35 4 36 6 140 5 137 3 5 AS22DRV41C5 80 0 185 0 35 4 36 6 140 5 137 3 5 AS22DRV42C2 80 0 185 0 35 4 36 6 140 5 137 3 ...

Page 76: ...with the function of reducing high order harmonic and the rated sensitive current to 1 inverter should be above 30mA Input reactor This device is used to improve the power factor of the input side of the inverter and control the higher harmonic current Input filter Control the electromagnetic interference generated from the inverter please install close to the input terminal side of the inverter B...

Page 77: ...ects the DC reactor options and parts C 4 Breaker and electromagnetic contactor It is necessary to add fuse for the avoidance of overload It is appropriate to use a breaker MCCB which complies with the inverter power in the 3 phase AC power and input power and terminals The capacity of the inverter should be 1 5 2 times of the rated current Due to the inherent operating principle and construction ...

Page 78: ...U output filter C Voltage degree 2 AC 1PH 220V 15 240V 10 4 AC 3PH 380V 15 440V 10 D 3 digit development serial number For example 003 stands for the serial number of C3 filters in development C 6 2 C3 filter C3 filers are optional for Astraada DRV 22 series inverters The input interference filter can decrease the interference of the inverter to the surrounding equipments Output interference filte...

Page 79: ...t When the voltage increases to the limit damage may occur to the inverter It is necessary to apply braking unit resistor to avoid this accident happens Only qualified electricians are allowed to design install commission and operate on the inverter Follow the instructions in warning during working Physical injury or death or serious property may occur Only qualified electricians are allowed to wi...

Page 80: ...e shielded cables for braking resistor cables Install all resistors in a place where they will cool The materials near the brake resistor must be non flammable The surface temperature of the resistor is high Air flowing from the resistor is of hundreds of degrees Celsius Protect the resistor against contact Only external braking resistor is needed in Astraada DRV 22 Appendix D Further Information ...

Page 81: ...Notes ...

Page 82: ...112 Kraków Poland www astor com pl produkty astor com pl Version 1 5 All rights reserved No part of this manual covered by copyrights hereon may be reproduced or transmitted in any form by any means without prior permission of ASTOR Sp z o o ...
Reviews: