Assa Abloy Yale Real Living YRL210 Installation And Programming Instructions Download Page 3

3

An ASSA ABLOY Group brand

P/N AYRT-210-INST-FUL Rev E

Industry Canada:

Canadian ID: 6982A-YRHCPZW0 (Z-Wave); 6982A-YRHCPZB0 (Zigbee)

This Class B digital apparatus meets all requirements of the Canadian Interference Causing Equipment 
Regulations. Operation is subject to the following two conditions: (1) this device may not cause harmful 
interference, and (2) this device must accept any interference received, including interference that may 
cause undesired operation. 

Cet appareillage numérique de la classe B répond à toutes les exigences de l’interférence canadienne 
causant des règlements d’équipement. L’opération est sujette aux deux conditions suivantes: (1) ce 
dispositif peut ne pas causer l’interférence nocive, et (2) ce dispositif doit accepter n’importe quelle 
interférence reçue, y compris l’interférence qui peut causer l’opération peu désirée.

For the U4A-YRHCPZB0 and 6982A-YRHCPZB0, the following statement applies:

“This equipment complies with FCC/IC radiation exposure limits set forth for an uncontrolled 
environment. This equipment should be installed and operated with minimum distance 20cm between 
the radiator and your body. This transmitter must not be co-located or operating in conjunction with any 
other antenna or transmitter.”

Section 7.1.2 of RSS-GEN 

Under Industry Canada regulations, this radio transmitter may only operate 

using an antenna of a type and maximum (or lesser) gain approved for the transmitter by Industry 
Canada. To reduce potential radio interference to other users, the antenna type and its gain should be 
so chosen that the equivalent isotropically radiated power (e.i.r.p.) is not more than that necessary for 
successful communication.
En vertu des règlements d'Industrie Canada, cet émetteur radio ne peut fonctionner avec une antenne 
d'un type et un maximum (ou moins) approuvés pour gagner de l'émetteur par Industrie Canada. Pour 
réduire le risque d'interférence aux autres utilisateurs, le type d'antenne et son gain doivent être choisies 
de façon que la puissance isotrope rayonnée équivalente (PIRE) ne dépasse pas ce qui est nécessaire 
pour une communication réussie.

Section 7.1.3 of RSS-GEN 

This Device complies with Industry Canada License-exempt RSS standard(s). 

Operation is subject to the following two conditions: 1) this device may not cause interference, and 2) 
this device must accept any interference, including interference that may cause undesired operation of 
the device.
Cet appareil est conforme avec Industrie Canada RSS standard exemptes de licence(s). Son 
fonctionnement est soumis aux deux conditions suivantes: 1) ce dispositif ne peut causer des 
interférences, et 2) cet appareil doit accepter toute interférence, y compris les interférences qui peuvent 
causer un mauvais fonctionnement du dispositif.
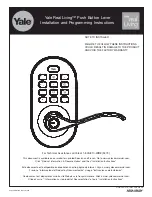
INTRODUCTION

The Yale Real Living™ Stand-alone Push Button Lever Lock combines a robust lockset with a   
contemporary electronic aesthetic.
Users benefit from an interactive Push Button keypad that makes day-to-day access effortless for 
simple updates to user information in the event of staffing changes or security breaches.            
Yale Real Living™ is engineered for quick and easy installation and fits in place of a standard lever 
lock door prep (ANSI/BHMA A156.115).
If this is an RF-enabled network lock, it needs to be located within 30 - 50 feet of another network 
controller or a repeating device. That distance is influenced by objects between the lock and the 
controller and may be expanded depending on proximity to other RF network devices. Also, if the 
lock is connected to a network controller, it is recommended that it is programmed through the 
centralized user interface (PC or hand-held device) to ensure communication between the lock and 
the controller unit. 

Summary of Contents for Yale Real Living YRL210

Page 1: ...m Click Product Information Documentation and then Installation Instructions Este documento est disponible en espa ol en nuestra p gina de internet Vaya a www yalecommercial com Presione Informaci n d...

Page 2: ...pment and receiver Connect the equipment into an outlet on a circuit different from that to which the receiver is connected Consult the dealer or an experienced radio TV technician for help IMPORTANT...

Page 3: ...une antenne d un type et un maximum ou moins approuv s pour gagner de l metteur par Industrie Canada Pour r duire le risque d interf rence aux autres utilisateurs le type d antenne et son gain doivent...

Page 4: ...tcheon Latch 4 Interior Escutcheon Mounting Screws Pack 1 2 Interior Mounting Plate Screws Pack 1 2 Latch 2 Strike Plate Mounting Screws Pack 2 Cylinder Installation Instructions Template Latch Strike...

Page 5: ...tanding exterior of the door NOTE Both latch face and strike plate have adhesive backed covers to prevent marring and should be removed upon installation IMPORTANT Latch bevel must match door bevel an...

Page 6: ...M4 x 25 4mm Flat Head Combination Screws Exterior Escutcheon with gasket Exterior of Door Do not remove clip from Exterior Escutcheon shank until correct handing has been determined and Exterior Lever...

Page 7: ...marked WHITE Tailpiece horizontal Posts are inserted in holes according to backset adjustment Refer to Fig A under Lock Preparation 4 Remove the interior mounting plate with gasket from the back door...

Page 8: ...terior escutcheon is vertically aligned Tighten securely with a 2 Phillips screwdriver Do not over tighten 6 Holding the exterior escutcheon flush to the door position the interior mounting plate by f...

Page 9: ...tion indicated by arrows on PCB as in Fig 13 10 Install and secure interior escutcheon to interior mounting plate using 4 M4 x 8mm pan head machine screws through the interior escutcheon into the moun...

Page 10: ...Correct curved position Incorrect Incorrect Determine Lever Position Both exterior and interior lever handles should always point toward the door hinges Important Note Follow the detailed instructions...

Page 11: ...exterior escutcheon shank 12 Install hex set screw Install the Exterior Lever Hex Set Screw RH RHR LH LHR Figure 16 CW A Place set screw in hole on side of shank toward latch Fig 16 turn set screw clo...

Page 12: ...s will retract the set screw back into the lever handle to secure it Do not overtighten 17 Rotate thumbturn counter clockwise to horizontal position Fig 21 Figure 21 Hex Lever Set Screw IMPORTANT Test...

Page 13: ...Fig 23 This will retract the set screw back into the lever handle to secure it in place Do not overtighten NOTE Thumbturn should still be in horizontal position IMPORTANT Before installing the batteri...

Page 14: ...cons Used in This Guide Click the indicated number Enter Master PIN code 4 8 digits in length Press the Star key on the keypad to Enter or Accept entry Enter User PIN Can be 4 8 digits in length Press...

Page 15: ...is setting becomes available through the Main Menu 7 and allows the lock to connect with a network controller One Touch Locking When the latch is retracted activating the keypad will extend the latch...

Page 16: ...es no codes are registered and the process must be re started PIN code structure Maximum number of user codes is 250 with Network Module without Network Module maximum is 25 user codes OPERATION Prote...

Page 17: ...ies are properly installed release the reset button All features including adjustable settings see below should now be returned to factory default Upon reset Master Code Registration is the only optio...

Page 18: ...k module User PIN Registration U For quiet areas select Disable 3 in Audio Mode Register Delete Advanced Lock Settings Audio Mode All Code Lockout Register Enable Enable Disable Delete Disable This fu...

Page 19: ...19 An ASSA ABLOY Group brand P N AYRT 210 INST FUL Rev E Open Door with PIN Code 1 Enter PIN code 2 Complete the code entry by pressing the key Unlock 3...

Page 20: ...f latch and or strike plate which may be preventing latch from properly entering the strike plate With the door open extend and retract the latch if it is smooth check the strike plate alignment Latch...

Page 21: ...ock Mode to lock the door automatically If low battery indicator is lit see below change batteries PIN codes will not register PIN codes must consist of 4 to 8 digits to register The same PIN code can...

Page 22: ...p 7 page 18 for enrollment of the Network Module 1 Remove cylinder A Repeat previous steps for removing the exterior lever handle B Remove cylinder Replace Install Cylinder 2 Install new cylinder A In...

Page 23: ...___ User ___ User ___ User ___ User ___ User ___ User ___ User ___ User ___ User ___ User ___ User ___ User ___ User ___ User ___ User ___ User ___ User ___ User ___ User ___ User ___ User ___ User _...

Page 24: ...roup company is prohibited YALE with its unique global reach and range of products is the world s favorite lock the preferred solution for securing your home family and personal belongings ASSA ABLOY...

Reviews: