background image

EN 8

Accessories

Your appliance is accompanied by a range of accessories, depending on the model. Only use 

original accessories; they are specially suited to your appliance. 

Not all accessories are suitable/available for every appliance (it may also differ by 

country). All the accessories that are being used must be able to withstand the highest 

temperature of the appliance. When purchasing, always provide the exact identification 

number of your appliance. Please see the sales brochures or check online for more 

details about optional accessories.

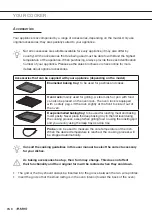
Accessories that can be supplied with your appliance (depending on the model)

Enamelled baking tray;

 to be used for pastries and cakes.

Oven rack;

 mainly used for grilling. A steam dish or pan with food 

can also be placed on the oven rack. The oven rack is equipped 
with a safety peg. Lift the rack slightly at the front to slide it out of 
the oven.

Deep enamelled baking tray;

 to be used for roasting meat and baking 

moist pastry. Never place the deep baking tray in the first level during 
the cooking process, except when grilling food or using the roasting spit 
and you are only using the deep tray as a drip tray.

Probe;

 can be used to measure the core temperature of the dish. 

When the desired temperature is reached, the cooking process will 
be stopped automatically.

Consult the cooking guidelines in this user manual to select the correct accessory 

for your dishes.

As baking accessories heat up, their form may change. This does not affect

their functionality and their original form will be restored when they cool down.

• 

The grid or the tray should always be inserted into the groove between the two wire profiles.

• 

Insert the grid so that the small railing is in the oven interior (toward the back of the oven).

YOUR COOKER

789046_en_naslovnica_drug_papir.indd   8

789046_en_naslovnica_drug_papir.indd   8

8. 11. 2021   14:59:03

8. 11. 2021   14:59:03

Summary of Contents for CC963614S

Page 1: ...Instructions for use COOKER CC96364W CC963614W CC963614S ...

Page 2: ...EN Manual EN 3 EN 34 Pictograms used Important information Tip ...

Page 3: ...ating the oven 16 Timer 16 Selecting additional functions 19 Meat probe when available 20 Operating the ceramic hob 22 Cleaning Please note 23 General 23 Cleaning the glass ceramic surface 23 Cleaning the oven 25 Aqua Clean function 25 Removing and cleaning the guide rails 26 Removing the oven door 27 Removing the oven window 28 Replacing the oven lamp 29 Solving problems General 30 Troubleshootin...

Page 4: ...ct cooking method Read this manual to learn how to get the most out of your cooker In addition to information about operating the oven you will also find background information that may be useful when using the appliance Please read the separate safety instructions carefully before using the appliance Read this manual before using the appliance and keep it in a safe place for future use YOUR COOKE...

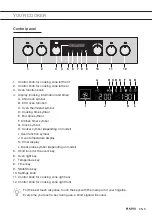
Page 5: ...r symbol depending on model I Oven function symbol J Oven temperature display K Timer display L Meat probe symbol depending on model 5 Child lock for the oven key 6 Oven light key 7 Temperature key 8 Timer key 9 Start Stop key 10 Settings knob 11 Control knob for cooking zone right rear 12 Control knob for cooking zone right front For the best touch response touch the keys with the main part of yo...

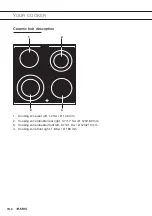
Page 6: ...iption 3 4 1 2 1 Cooking zone rear left 1 2 Kw Ø 145 mm 2 Cooking zone double rear right 0 7 1 7 Kw Ø 120 180 mm 3 Cooking zone double front left 0 7 2 1 Kw Ø 120 210 mm 4 Cooking zone front right 1 8 Kw Ø 180 mm YOUR COOKER ...

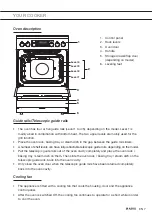
Page 7: ... the telescopic guide rails out of the oven cavity completely and place the oven rack baking tray steam dish on them Then slide the oven rack baking tray steam dish on the telescopic guide rails back into the oven cavity Only close the oven door when the telescopic guide rails have been returned completely back into the oven cavity Cooling fan The appliance is fitted with a cooling fan that cools ...

Page 8: ... The oven rack is equipped with a safety peg Lift the rack slightly at the front to slide it out of the oven Deep enamelled baking tray to be used for roasting meat and baking moist pastry Never place the deep baking tray in the first level during the cooking process except when grilling food or using the roasting spit and you are only using the deep tray as a drip tray Probe can be used to measur...

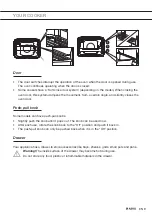
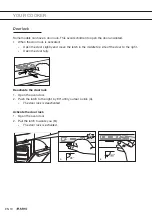
Page 9: ... door Push pull knob Some models can have push pull knobs Slightly push the knob until it pops out The knob can be used now After each use rotate the knob back to the Off position and push it back in The push pull knob can only be pushed back when it is in the Off position Drawer Your appliance has a drawer to store accessories like trays shelves grids small pots and pans Warning The inside surfac...

Page 10: ... and move the latch in the middle top site of the door to the right Open the door fully Deactivate the door lock 1 Open the oven door 2 Push the latch to the right by 90º until you feel a click A The door lock is deactivated Activate the door lock 1 Open the oven door 2 Pull the latch towards you B The door lock is activated 90 click A B YOUR COOKER ...

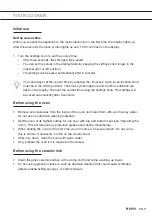
Page 11: ... current time using the settings knob The settings will be saved automatically after 5 seconds Before using the oven Remove all accessories from the inside of the oven and clean them with warm soapy water Do not use any abrasive cleaning materials Set the oven at its highest setting for one hour with top and bottom heat see Operating the oven This will remove any protective grease used during manu...

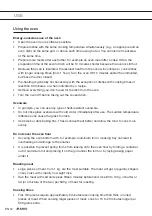
Page 12: ...ware In principle you can use any type of heat resistant ovenware Do not rinse glass ovenware with cold water immediately after use The sudden temperature difference can cause the glass to crack Use black or dark baking tins These conduct heat better and allow the food to cook more evenly Do not cover the oven floor Covering the oven bottom with for example aluminium foil or a baking tray can lead...

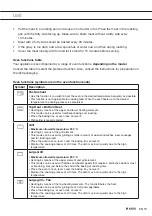
Page 13: ... lower heating elements This mode can be used for traditional baking and roasting Place the baking tray or oven rack on level 2 Preheating is recommended Grill Maximum allowed temperature 230 C Heating by means of the grill element This mode can be used for grilling a smaller amount of open sandwiches beer sausages and for toasting bread Place the oven rack on level 4 and the baking tray on level ...

Page 14: ...etables Place the baking tray or oven rack on level 2 Plate warming Use this function to reheat your dinnerware plates cups before serving food in it to keep the food warm longer Defrost With this function the air circulates by means of the fan Use this function to defrost frozen dishes Place the baking tray or oven rack on level 3 Aqua clean Only the bottom heater will radiate heat Use this funct...

Page 15: ...he right pressure is reached First set the cooking zone to maximum power then following the pressure cooker manufacturer s instructions use the relevant sensor to decrease the cooking power at the right time Make sure there is enough liquid in the pressure cooker or any other pot or pan Due to overheating using an empty pot on the cooking zone may result in damage to both the pot and the cooking z...

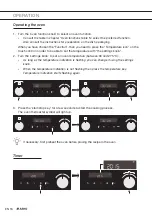
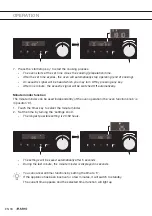
Page 16: ...to be able to set the temperature with the settings knob 2 Turn the settings knob to set an oven temperature between 30 and 275 ºC As long as the temperature indication is flashing you can change it using the settings knob When the temperature indication is not flashing then press the temperature key Temperature indication starts flashing again 0 0 3 Press the start stop key for a few seconds to s...

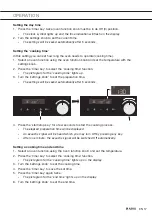
Page 17: ... knob to set the preparation time The settings will be saved automatically after 5 seconds 0 0 4 Press the start stop key for a few seconds to start the cooking process The elapsed preparation time will be displayed An acoustic signal will be heard which you may turn Off by pressing any key After one minute the acoustic signal will be switched Off automatically Setting a cooking time and end time ...

Page 18: ... The minute minder can be used independently of the oven operation the oven function knob is in position 0 1 Touch the timer key to select the minute minder 2 Set the time by turning the settings knob The longest possible setting is 23 59 hours 0 0 The settings will be saved automatically after 5 seconds During the last minute the minute minder is displayed in seconds You can cancel all timer func...

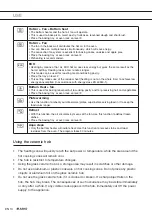
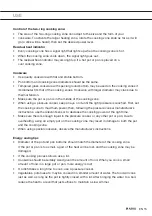
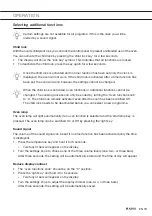
Page 19: ...d by turning the Oven function knob to 0 The child lock remains activated even after the oven has been switched Off The child lock needs to be deactivated before you can select a new programme Oven lamp The oven lamp will light automatically if an oven function is selected and the start stop key is pressed The oven lamp can be switched On or Off by pressing the light key Sound signal The volume of...

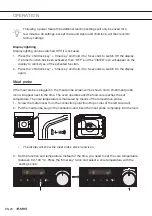
Page 20: ...conds to switch On the display again Meat probe If the meat probe is plugged in the meat probe screen will be shown and a small meat probe icon will appear next to the time The oven operates until the food core reaches the set temperature The core temperature is measured by means of the temperature probe 1 Screw the metal cover from the connection point front top corner of the left side wall 2 Put...

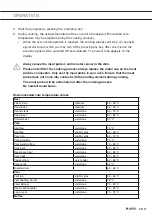
Page 21: ...obe does not come into contact with the heating element during cooking The meat probe will be extremely hot after the cooking process Be careful Avoid burns Recommended core temperature values Beef Fillet sirloin medium 55 58 ºC Roast beef medium 55 60 ºC Round steak well done 85 90 ºC Roast beef well done 80 85 ºC Stewed beef well done 90 ºC Pork Hoof leg well done 75 ºC Hoof leg slightly pink 65...

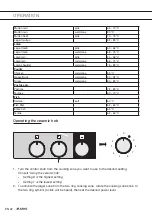
Page 22: ...ell done 80 85 ºC Pastries etc Pastries 72 85 ºC Terrines 60 70 ºC Fish Salmon soft 60 ºC Fish fillet 62 65 ºC Entire fish 65 ºC Terrine 62 65 ºC Operating the ceramic hob 5 4 3 6 7 8 2 9 1 0 1 Turn the control knob from the cooking zone you want to use to the desired setting Consult Using the ceramic hob Setting 9 is the highest setting Setting 1 is the lowest setting 2 To activate the larger zon...

Page 23: ...rface Do not use abrasive or solvent based cleaning agents If you do not follow these instructions the casing may become damaged Painted and plastic surfaces Clean the knobs with a soft cloth and liquid cleaning agent suitable for cleaning smooth painted surfaces You can also use cleaning agents specifically designed for this type of surfaces In this case follow the instructions of the manufacture...

Page 24: ...r Be careful when handling the scraper to prevent injury Only use the scraper when dirt cannot be removed with a wet cloth or special cleaners for glass ceramic surfaces Hold the scraper at the correct angle 45 to 60 Gently press the scraper against the glass and slide it over the signage to remove the dirt Make sure the plastic handle of the scraper in some models does not come into contact with ...

Page 25: ... seal stays clean This prevents accumulation of dirt and allows you to close the door properly Aqua Clean function With the Aqua Clean function and a damp cloth you can easily remove grease and dirt from the oven walls Using the Aqua Clean function Only use the cleaning programme if the oven is cold If the oven is hot it is more difficult to remove dirt and grease using this programme 1 Remove all...

Page 26: ...se conventional cleaning products to clean the guide rails Grasp the guide rails at the bottom and tilt them towards the middle of the oven A Remove the guide rails from the holes in the back wall B B A Do not clean the extendible guides in the dishwasher ...

Page 27: ...he hinge beds At the angle of 15 relative to the closed door position slightly lift the door and pull it out from both hinge beds on the appliance A B C To replace the door repeat these actions in reverse If the door does not open or close properly make sure the hinges are positioned correctly in their slots Always ensure that the catches fit properly in their slots Never allow the hinge fitting t...

Page 28: ...rker 1 on the bracket and pull this away from the glass slightly to marker 2 on the bracket 2 Grasp the glass at the bottom and gently lift this upwards to remove it from the support 3 The inner third glass depending on the model can be removed by lifting this carefully and removing it Also remove the rubber seals around the glass To replace the glass pane observe the reverse order The markings se...

Page 29: ...oving the lamp The lamp in this household appliance is only suitable for illumination of this appliance The lamp is not suitable for household room illumination The lamp is consumable material and is not covered by the guarantee 1 Unscrew the glass cover anticlockwise and replace the oven lamp Fit a new lamp with the same specifications 2 Screw the glass cover back on tightly CLEANING ...

Page 30: ... it has been used a few times Ventilate the kitchen A cooking zone suddenly stops working and you hear a signal The preset time has ended Switch Off the signal by pushing a random key The hob is not working There is no power supply due to a defective cable or a faulty connection Check the fuses or the electric switch if there is no plug A fuse blows as soon as the hob is switched on The appliance ...

Page 31: ...k the position of the baking plate Condensation appears inside the oven This is normal Wipe the oven clean after use Have the following information to hand when you call The model number and serial number stated on the inside of the oven door Guarantee details A clear description of the problem Choose a clean dry place if you have to store the oven temporarily as dust and moisture can damage the a...

Page 32: ...ts are guaranteed by ASKO to meet the safety requirements To avoid dangerous situations resulting from any damage to the connecting cable this should only be replaced by the manufacturer the manufacturer s service organisation or suitably qualified persons Electrical connection 230 V 50 Hz 400 V 50 Hz 400 V models only Wall socket and plug must be accessible at all times Make sure that the cable d...

Page 33: ...h the adjusting feet If you want to install the cooker on a platform make sure that it is securely fastened Mounting the door lock Mount the door lock with two screws on the front middle at the top of the oven cavity Mounting the storage drawer handle accessory Mount the handle with two screws on the front top of the drawer Prevention from tipping over Dimensions in the parenthesis represent built...

Page 34: ... This indicates that household appliances must be disposed of separately This means that the appliance may not be processed via the regular waste flow at the end of its useful life You should take it to a special municipal waste depot or a sales outlet that offers to do this for you Collecting household equipment separately prevents harm to the environment and public health The materials used in m...

Page 35: ...EN 35 ...

Page 36: ...ce identification card is located on the inside of the appliance When contacting the service department have the complete type number to hand You will find the addresses and phone numbers of the service organisation on the guarantee card ...

Reviews: