background image

Engl

ish

31

new folders in the “My Documents” folder

, in the 

“Storage Disk” folder

 or on the storage card. 

It is highly 

recommended to create layers in the same folder as 
the job file using these layers. Observing this rule will 
simplify the download procedure.

Type

: Choose the type and/or format of the layer you 

want to create:

SHP layer: Depending on your choice the layer will 
hold 2D/3D points, 2D/3D lines, or 2D/3D polygons.

MIF layer (can hold any type of feature).

CSV layer (point feature type only).

Location

: Choose the storage medium where you want 

to store the layer. You can choose either “Main 
memory”

, Storage Disk folder

 (resident memory) or 

“Storage Card” (if there is an SD card inserted in the 
receiver).

3. Tap the 

Save

 button to proceed. If you are defining the 

second or next layers, go directly to step 5. If you are 
defining the first layer in the open job, the program will 
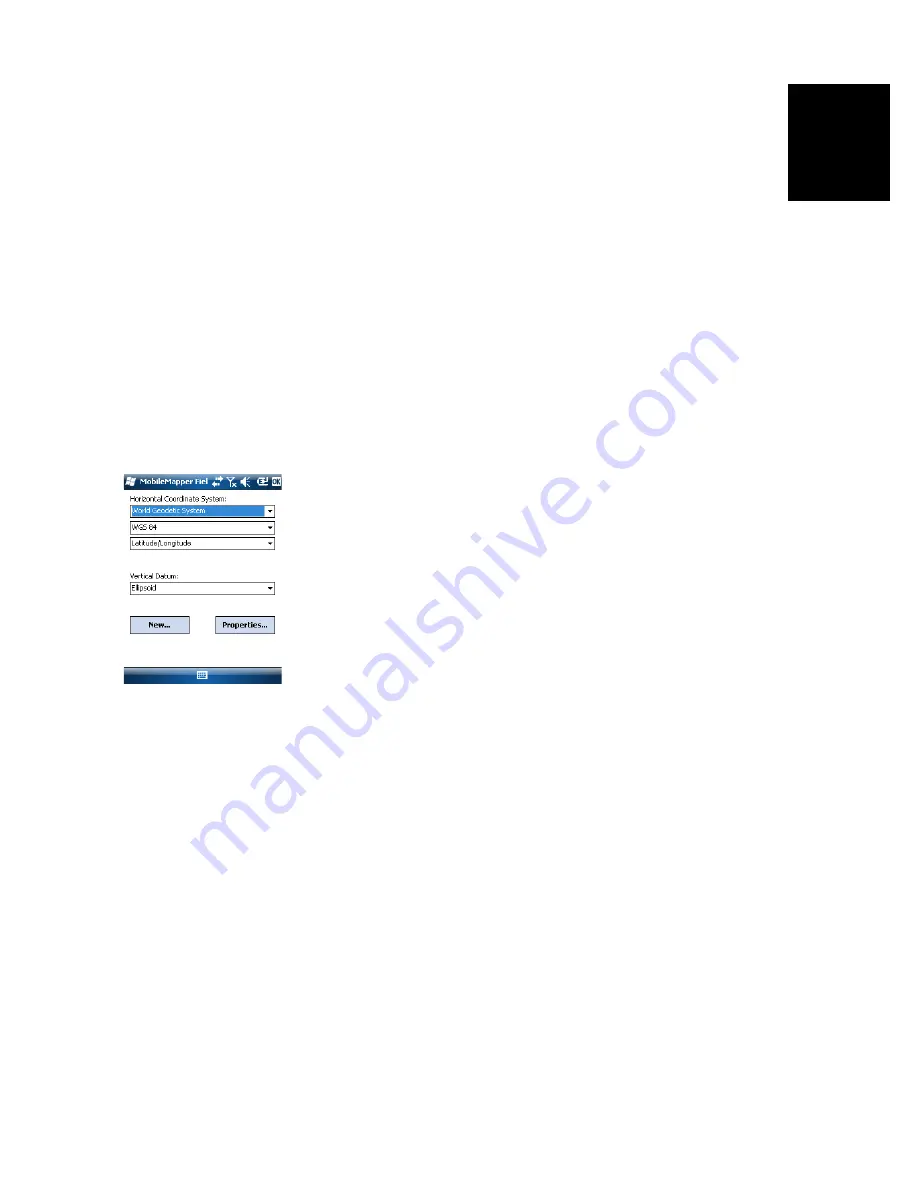
first ask you to define a 

horizontal 

coordinate system for 

the job: 

• First field: Choose the country you are working in. You 

may also choose a worldwide system such as UTM or 
Worldwide Geodetic System.

• Second field: The number of options available in this 

field depends on the selected country. Select the 
datum that is suitable for your job.

See also 

Coordinate Systems on page 49

.

• Third field: The number of options available in this 

field depends on the selected country. Choose a 
projection that is suitable for your job. Select Latitude/
Longitude for no projection.

Fourth field: Choose a vertical datum in which to 
express the Z coordinate.

“Ellipsoid” (no geoid used) and “EGM84” (global 
earth geoid model) are the two default options. Other 
geoids may be prompted in this field after you have 
downloaded them to the receiver from the 
MobileMapper Software CD. 

4. Tap 

OK

Summary of Contents for MobileMapper 100

Page 1: ...MobileMapper 100 Getting Started Guide DRAFT 1 July 28 2010...

Page 2: ......

Page 3: ...ial Features 12 Power Modes 12 LED Indicator 13 Internal Battery 13 GPRS Connection Using the Internal Modem 14 CDMA Connection Using an External Mobile Phone 16 Using the Camera 19 Making a Video 20...

Page 4: ...de 63 NMEA Output 64 GNSS Status 64 Reset 65 Troubleshooting 66 About 66 Turn Off GNSS 67 Installing Geoids 68 Platform Specifications 69 GNSS Characteristics 69 RMS Horizontal Accuracy Figures 69 Pro...

Page 5: ...and the Ashtech s powerful BLADE technology BLADE allows the MobileMapper 100 to operate in extreme GNSS environments while maintaining high levels of accuracy most GIS professionals are seeking Ashte...

Page 6: ...back of the docking station and leave it there for less than 4 hours until it s fully charged Follow the instructions below Prepare the AC adapter Remove the protective cover 1 by pushing the button t...

Page 7: ...been charged do the following Turn over the receiver and rotate the finger screw counter clockwise a quarter turn and pull the trap door open Insert the battery as shown The label must be outwards an...

Page 8: ...idle time From the Start screen tap successively on Start Settings System and Backlight Choose the idle time before the backlight is turned off 10 seconds 30 seconds or 1 to 5 minutes For maximum powe...

Page 9: ...make sure no user intervention from the screen or keypad can affect the work in progress From the Start screen tap on Start At the bottom of the screen tap Lock As a result the touch screen and keypad...

Page 10: ...r hold the same button pressed ntil the screen wakes up This will instantly restore the use context in which the receiver was before entering the Suspend mode Turning the Receiver Off After you have f...

Page 11: ...ed holder 5 Built in GNSS Antenna The receiver incorporates a built in antenna 6 The receiver should be held properly to optimize satellite reception Microphone A microphone is used by the voice recor...

Page 12: ...ttery compartment 13 Receiver Side View Left Power Button With the receiver off pressing the Power button 14 briefly will turn on the receiver After the receiver has completed the boot sequence anothe...

Page 13: ...e antenna input connector is protected by a rubber flap Warning Always keep the flap close when no external antenna is used Receiver Bottom View Power Data Connector This connector 18 is used to conne...

Page 14: ...ging once the receiver battery is fully charged or the receiver is removed from the docking station As an interface with a computer for office work using a serial data line and Microsoft ActiveSync To...

Page 15: ...ntil temperature is back to normal If persisting remove battery and resume charging later If this occurs several times with the same battery consider changing the battery Dispose of the battery accord...

Page 16: ...an idle time that you can set through Start Settings Power Advanced tab See also Power Management on page 4 or in case of a very low battery after dismissing successively the two low battery alerts P...

Page 17: ...y 5 seconds Suspend Charging Steady green On off or Suspend Charge complete Table 3 Receiver on Powered Docking Station Abnormal Statuses LED Indication Power Mode Internal Battery Status Comment Blin...

Page 18: ...the battery Place the low battery at the back of the docking station at the office so that it can be quickly recharged At this stage if you persist in using the receiver with its low battery it won t...

Page 19: ...Settings Connections Wireless Manager This opens the Wireless Manager window Tap anywhere on the blue Phone bar This turns on the Phone function The color of the Phone bar turns dark blue with a phon...

Page 20: ...nection Tap Start Settings Connections and Connections Tap on the hyperlink Manage existing connections Tap and hold the name of the connection profile you have just created e g My Connection and sele...

Page 21: ...Manager This opens the Wireless Manager window Tap anywhere on the Bluetooth bar This turns on the receiver s Bluetooth The color of the Bluetooth bar turns dark blue with a Bluetooth icon showing up...

Page 22: ...ed unit Tap OK to close this window Tap Done at the bottom of the screen to close the window and return to the Start screen Setting Up the Internet Connection Tap Start Settings Connections Connection...

Page 23: ...indow The picture you have taken is now visible in the My Pictures folder Renaming a Picture With the My Pictures folder open tap on the desired picture This opens a new window showing the picture Tap...

Page 24: ...on Changing Picture Settings Tap Start and Pictures Videos This opens the My Pictures folder Tap Camera to turn on the camera Wait a couple of seconds until the center of the window displays the viewf...

Page 25: ...plained below With a preset time limit 15 or 30 seconds the video camera will stop filming automatically and close the video file after this time has elapsed A down counter under the viewfinder will k...

Page 26: ...em used in the receiver is the standard Microsoft Windows Mobile version 6 5 software For more information on how to use the different applications you can visit the Microsoft web site http www micros...

Page 27: ...eMapper FIeld Ashtech recommends you first uninstall the previous version of MobileMapper Field from the receiver using Start Settings System Remove Programs Installation Procedure Place the receiver...

Page 28: ...MobileMapper Field option can be seen on the Start screen Entering the Activation Code You will not be able to use MobileMapper Field until you enter an activation code This code can be seen on the ad...

Page 29: ...scale is provided based on the currently selected unit 4 Current position of the receiver no coordinates displayed if the receiver has not determined its position yet 5 Log button Use this button to l...

Page 30: ...ause Use this option to pause the current feature logging Stop Use this option to stop the current feature logging Layers Use this option to add modify or remove layers Find Use this option to find a...

Page 31: ...on is fixed The top of the map screen will always give the North direction Course Up Map orientation will change as you walk The map will rotate in order to have your course always orientated upward o...

Page 32: ...der of the storage card or the Storage Disk folder in the main memory If you want to use a special folder to store your job files first create it using File Explorer You can only create new folders in...

Page 33: ...in the receiver A new window then opens listing all these jobs To list all the DXF jobs stored in the receiver select the DXF extension from the Type combo box After you have found the job you wish t...

Page 34: ...apper Field session you tap Menu Layers and then you tap on the Add button From the screen displaying the Create a new layer button do the following 1 Tap the Create a new layer button 2 Enter the fol...

Page 35: ...or next layers go directly to step 5 If you are defining the first layer in the open job the program will first ask you to define a horizontal coordinate system for the job First field Choose the coun...

Page 36: ...in the layer Adding Layers into a DXF Job The procedure is quite similar to attaching a layer to a Map job Among the similarities are first the prior necessity to define a coordinate system for the j...

Page 37: ...tes you can create in a layer Each attribute is defined by a name 22 characters max and a type There are eight different attribute types of attributes as summarized below NOTE For best quality voice r...

Page 38: ...ter a name for the attribute using the virtual keyboard Select a type for this attribute If applicable set the additional one or two parameters Tap on the Add button This takes you back to the Attribu...

Page 39: ...new layer you ve just selected Tap OK to return to the map screen The new layer is now available for feature logging NOTE 1 Adding an existing layer to a new job as the first layer in this job will c...

Page 40: ...maps each holding a different geographical area All logged features will always appear over the background map Tap Menu Options and then on the Map tab Tap on the Add button Tap in the Type field and...

Page 41: ...d drag the stylus on the image if necessary Tap on the point location and then enter its ID and coordinates If you are currently standing at that location and the receiver delivers a valid GPS positio...

Page 42: ...F layers and for those contained in a DXF job the geometry i e point line or polygon of the feature This field is preset for CSV layers points exclusively and for SHP layers On the Settings tab you ca...

Page 43: ...an be done through the appropriate use of the Pause Resume Stop functions Double logging is useful to reduce both the time spent logging features and the distance walked in the field MobileMapper Fiel...

Page 44: ...feature To log the point with an offset tap on the Offset tab and enter the following parameters for no offset just check that the horizontal distance is 0 on this tab and proceed to the next step Bea...

Page 45: ...the beginning of the line or polygon you want to log Tap Log or press underneath A menu appears listing all the layers in the job Tap on the desired layer name Lines or Areas in our example Tap on th...

Page 46: ...rawn on the screen as you walk If you have selected the manual vertex mode the receiver will assume you are standing on the first vertex and so it will log this vertex according to the chosen averagin...

Page 47: ...ture number 1 2 3 etc The picture number is ascribed in chronological order with no reference to any other file View Allows you to view the picture assigned to the attribute Select Allows you to displ...

Page 48: ...ention used is Sound wav where is the record number 1 2 3 etc The record number is ascribed in chronological order with no reference to any other file For a date attribute the current date is automati...

Page 49: ...with the logging of the first feature More about Feature Logging The number of point features that can be logged in a session is only limited by the memory capacity of the storage medium used Up to 1...

Page 50: ...screen Revisiting Features Going Back to a Feature Tap Menu Go To The receiver allows you to go back to a feature according to one of the following two methods 1 Enter target coordinates Choose this o...

Page 51: ...Find Feature Function MobileMapper Field allows you to search for a particular feature you logged in a map MobileMapper Field will ask you to indicate the layer it belongs to and optionally the known...

Page 52: ...ction is active Do the following depending on the OS used in your computer Vista In the auto run window that opens choose the option to explore the mobile device Windows XP or older In the ActiveSync...

Page 53: ...ed horizontal position Other geoid models may be downloaded to the receiver from the MobileMapper Software CD Once downloaded they are made available as possible choices in the Vertical Datum field Th...

Page 54: ...shows the non editable settings for the coordinate system used in the map Tap on the Properties button to read the details of the datum and projection used in the coordinate system Voice Setting For...

Page 55: ...all the subsequent power cycles of the receiver until you decide to change it Logging Raw Data Here are a few key points that will help you understand how the raw data logging function operates in yo...

Page 56: ...f you are also using the e compass while collecting raw data remember the backlight setting must be left unchanged Always collect raw data for at least 10 minutes including for those projects where GI...

Page 57: ...Mapper Office Software Using the data transfer procedure see Upload Download Functions on page 48 copy the following field data files from the receiver to a folder of your choice on the computer map f...

Page 58: ...ed in area 3 4 or 6 this area shows job properties coordinate system and units used layer attributes and appearance or raw data file properties observation time span etc When selecting a feature on th...

Page 59: ...eference station click successively on Add Reference Raw Data then From Web A new window then opens in which you have to indicate how you wish to search for the reference station you will use for post...

Page 60: ...lays the post processed more accurate position of each GIS feature Additionally MobileMapper Office adds a vector layer into the project Each feature in the layer can be edited individually Vector att...

Page 61: ...ick OK to confirm your filter settings All the vectors for which the HRMS VRMS and PDOP are less than those specified here will pass the quality control whereas all the others if any will fail Note th...

Page 62: ...export layers Open your job Make visible the layers you want to export turn on the corresponding check boxes As background maps will not be exported they can stay visible in the job Click on and then...

Page 63: ...the job Note that background maps are seen as layers in the job Status Bar The status bar is located at the bottom of the main window Whatever the feature selected on the map screen the status bar di...

Page 64: ...icking on the last point This will freeze the distance measurement Click on to quit the distance measurement tool Area measurement Same as distance measurement The area measurement is effective only a...

Page 65: ...e layer in area 3 on the screen and press the Del key or click on Remove Layer Recommendations on folders Ashtech recommends you store all the files pertaining to a project in the same folder By doing...

Page 66: ...ng purposes About Views versions of installed software and firmware Turn off GNSS Allows you to turn off the GNSS section of the receiver when GNSS reception is temporarily unnecessary for the tasks y...

Page 67: ...urn to the GNSS Toolbox window Differential Mode The table below summarizes the different settings required for each type of communication used to acquire real time differential corrections 1 Radio pa...

Page 68: ...ailable NMEA messages are GGA GLL GSA GSV RMC RRE VTG and ZDA GNSS Status Open the GNSS Toolbox and tap on GNSS Status ISP data required APN user password Connect to Network Modem connection used Cell...

Page 69: ...ites tab displays a polar diagram showing the locations in the sky of the tracked satellites Different colors are used to display the numbers of the visible satellites Yellow characters GPS satellites...

Page 70: ...n Connect the docking station to your computer using the USB cable provided Using Microsoft ActiveSync open one of these folders Storage Disk if Internal Memory was selected for data recording Storage...

Page 71: ...isplayed asking you to confirm or cancel your power off request Tap Yes to confirm This will instantly turn off the GNSS section of the receiver and take you back to the Start screen Note that from th...

Page 72: ...eoids using your web browser to connect to the following URL http resources ashtech com GEOIDS After a new geoid has been downloaded to your computer MobileMapper Office will automatically prompt you...

Page 73: ...30 cm typical Real time RTK 30 cm down to 1 cm Post processing 30 cm down to 1 cm Note Handheld accuracy performance achieved in good conditions with PDOP 4 and more than 5 satellites in view Accuracy...

Page 74: ...Environmental IPX7 20 to 50 C withstands 1 meter drop User Interface Keyboard Alphanumeric virtual keyboard 4 way navigation scroll button OK Menu Escape Zoom In Out keys context sensitive keys Illum...

Page 75: ...Battery charging time 3 hours in standalone or with turned off receiver External power 9 28 V DC Multimedia Sensors 3 Megapixel camera E Compass G Sensor Speaker Microphone Standard Accessories Integr...

Page 76: ...er button 7 Enter target coordinates 46 ESC key 26 Export function 57 External antenna 9 F Features 26 47 Fill 33 Filter settings quality control 57 Find feature function 47 Framework 2 0 53 Freezing...

Page 77: ...Resolution 20 S Saving MobileMapper Field settings 27 SBAS 25 26 Scale 25 26 34 Scroll button 7 SD Card 9 Search up to x km 55 Search up to x stations 55 Serial Number 24 Show hide features 35 Show Hi...

Page 78: ...65 9838 4229 n Fax 65 6777 9881 In China 86 10 5802 5174 n Fax 86 10 5802 5135 Email mobilemappingapac ashtech com www ashtech com Ashtech follows a policy of continuous product improvement specifica...

Reviews: