Ashley 1440E Owner'S Installation And Operation Manual Download Page 12

-12-

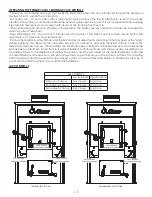
Chimney Installation

CHIMNEY

Your wood furnace may be hooked up with a factory built or masonry chimney, matching the diameter of the 

exhaust. If you are using a factory built chimney, it must comply with UL 103 or CSA-B365 standard; therefore 

it  must  be  a  Type  HT  (2100°F).  It  is  extremely  important  that  it  be  installed  according  to  the  manufacturer’s 

specifications.

If you are using a masonry chimney, it is important that it be built in compliance with the specifications of the 

National Building Code. It must be lined with fire clay bricks, metal or clay tiles sealed together with fire cement. 

(Round flues are the most efficient).

The interior diameter of the chimney flue must be identical to the furnace smoke exhaust. A flue which is too 

small may cause draft problems, while a large flue favors rapid cooling of the gas, and hence the build-up of 

creosote and the risk of chimney fires. Note that it is the chimney and not the furnace which creates the draft 

effect; your furnace’s performance is directly dependent on an adequate draft from your chimney.

Do not connect this unit to a chimney flue serving another appliance.

The following recommendations may be useful for the installation of your chimney:

•  It must rise above the roof at least 3’ (0.9m) from the uppermost point of contact.

•  The exterior portion should be double or triple wall pipe to ensure proper draft.

•  The chimney must exceed any part of the building or other obstruction within a 10’ (3.04m) distance by a 

height of 2’ (0.6m).

•  Installation of an interior chimney is always preferable to an exterior chimney. The interior chimney will be 

hotter than an exterior chimney that is being cooled by the ambient air outside the house. Therefore the gas 

which circulates will cool slower, thus reducing the build-up of creosote and the risk of chimney fires.

•  The draft caused by the tendency for hot air to rise will be increased with an interior chimney.

•  Using a fire screen at the extremity of the chimney requires regular inspection in order to insure that it is not 

obstructed thus blocking the draft, and it should be cleaned when used regularly.

IMPORTANCE OF PROPER DRAFT

Draft is the force which moves air from the appliance up through the chimney. The amount of draft in your 

chimney depends on the length of the chimney, local geography, nearby obstructions and other factors. Too 

much draft may cause excessive temperatures in the appliance. Inadequate draft may cause back puffing into 

the room and ‘plugging’ of the chimney. Inadequate draft will cause the appliance to leak smoke into the room 

through appliance and chimney connector joints.

An uncontrollable burn or excessive temperature indicates excessive draft. Do not operate with the flue draft 

exceeding .06 water column/14.93 Pascals. The draft can be checked with a draft gauge or manometer.

Take into account the chimney’s location to insure it is not too close to neighbors or in a valley which may cause 

unhealthy or nuisance conditions.

Summary of Contents for 1440E

Page 1: ...37380 852836 3901F Installation is to be preformed by a qualified installer SAVE THESE INSTRUCTIONS This unit is certified UL 391 R2014 U S ENVIRONMENTAL PROTECTION AGENCY Certified to comply with the...

Page 2: ...by furnace main disconnect Respect all local and national codes when installing this unit This unit is not to be connected to a chimney flue serving another appliance This unit is designed to burn sol...

Page 3: ...not be altered It is against federal regulations to alter this setting or otherwise operate this wood heater in a manner inconsistent with operating instructions in this manual The operation of this...

Page 4: ...e pipe and chimney must be kept in good condition These instructions also apply to a draft inducer if used To prevent flame or smoke spillage the slide baffle must be pulled out and the fuel loading d...

Page 5: ...lowing is a list of tools and materials needed to install your furnace 7 16 socket wrench 5 16 socket Best if using a power drill and a socket bit Pair of pliers or channel locks Power drill with an 1...

Page 6: ...re proper assembly installation and operation of your new furnace If installing in an area with a fan it should not be allowed to create negative pressure in the room where the furnace is installed LO...

Page 7: ...M L N K MAINTENANCE CLEARANCE FLOOR PROTECTOR REQUIREMENTS FLOOR PROTECTOR The furnace must be placed on solid concrete solid masonry or when installed on a combustible floor on a floor protector The...

Page 8: ...s furnace the hot air plenum is to have a minimum height of 24 610mm if the top of the first vertical section is not flush with the top of the first horizontal section of ductwork If the top of the pl...

Page 9: ...9 CENTRAL INSTALLATION Air Filter Replacement...

Page 10: ...hermodisc 3 Remove blowers from cartons Remove junction box cover Attach clip nuts as in figure shown Install blower s and gasket s with 1 4 20 x 3 4 bolts as shown 4 Wire right side blower first See...

Page 11: ...ian It is recommended to connect the furnace to its own 15 amp 120 Volt circuit from the house power supply 105 C NOTE Wire leads from the distribution blower are usually BOTH BLACK Makes no differenc...

Page 12: ...mney must exceed any part of the building or other obstruction within a 10 3 04m distance by a height of 2 0 6m Installation of an interior chimney is always preferable to an exterior chimney The inte...

Page 13: ...a professional Make sure there are no cracks loose mortar or other signs of deterioration and blockage Have the chimney cleaned before the furnace is installed and operated When connecting the furnace...

Page 14: ...ctor and a minimum 24 gauge ventilated wall thimble which has two air channels of 1 25 4 mm each construct a wall pass through There shall be a minimum 6 152 4 mm separation area containing fiberglass...

Page 15: ...foot with the upper end of the section toward the chimney Any installation with a horizontal run of furnace pipe must conform to NFPA 211 You may contact NFPA National Fire Protection Association and...

Page 16: ...ame manufacturer and install the ceiling support package or wall pass through and T section package firestops where needed insulation shield roof flashing chimney cap etc Maintain proper clearance to...

Page 17: ...for the maximum amount of combustion air during the initial start up to insure the fastest and cleanest start up These settings should remain open until the stove has heated up and an adequate fire ha...

Page 18: ...over or covered area from rain or snow also accelerates drying time A good indicator if wood is ready to burn is to check the piece ends If there are cracks radiating in all directions from the center...

Page 19: ...4 first fires Never start your furnace outside You will not be able to see if you are over heating LIGHTING YOUR WOOD FURNACE 1 Make sure that your furnace has been installed as per the instructions o...

Page 20: ...ill indicate the temperature of your gas exhaust fumes within the smoke exhaust system The ideal temperature for these gases is somewhere between 275 F and 500 F Below these temperatures the build up...

Page 21: ...rn rate slows the flow of usable heat out of the home through the chimney and it also consumes less wood SMOKE AND CO MONITORS Burning wood naturally produces smoke and carbon monoxide CO emissions CO...

Page 22: ...2 diameter rope gasket PAINT Only clean your furnace with a dry soft cloth that will not harm the paint finish If the paint becomes scratched or damaged it is possible to give your wood furnace a bra...

Page 23: ...68217 Feed Door Assy 1 13 610499 Tertiary Damper Assy 1 14 27901 Tertiary Damper Shield 1 15 89574 Handle Spring 2 16 891098 Handle Assembly 1 17 610496 Assembly Ash Door 1 Replacement Parts 1 2 29 3...

Page 24: ...1 6 80594 Blower Assembly 2 7 89319 Blower Gasket 2 8 68231 3 Fan Cntrl Cord Assy 1 9 22140 Control Mounting Bracket 1 10 80714 F140 Thermodisc 1 11 80231 Cover Junction Box 1 Inordertomaintainwarran...

Page 25: ...mpany ________________________________________ Telephone No ______________________________________ Stove Inspected Chimney Swept Items Replaced ____________________________________ Service 05 Date ___...

Page 26: ...as a result of their breach of this written warranty or any implied warranty 2 Should the heater be replaced by United States Stove Company free of charge all further warranty obligations are thereby...

Page 27: ...Notes...

Page 28: ...owing information as shown in this list 1 The part number___________________________________________________________________________________ 2 The part description_____________________________________...

Reviews: