background image

P/N PM000223A • Rev. 1 • ISS 9 August 2017

127

Installation Manual
NU-Series Hardware

Room Modules

2 of 2

P/N PM000121A • Rev. 1 • ISS 20 MAR 2017

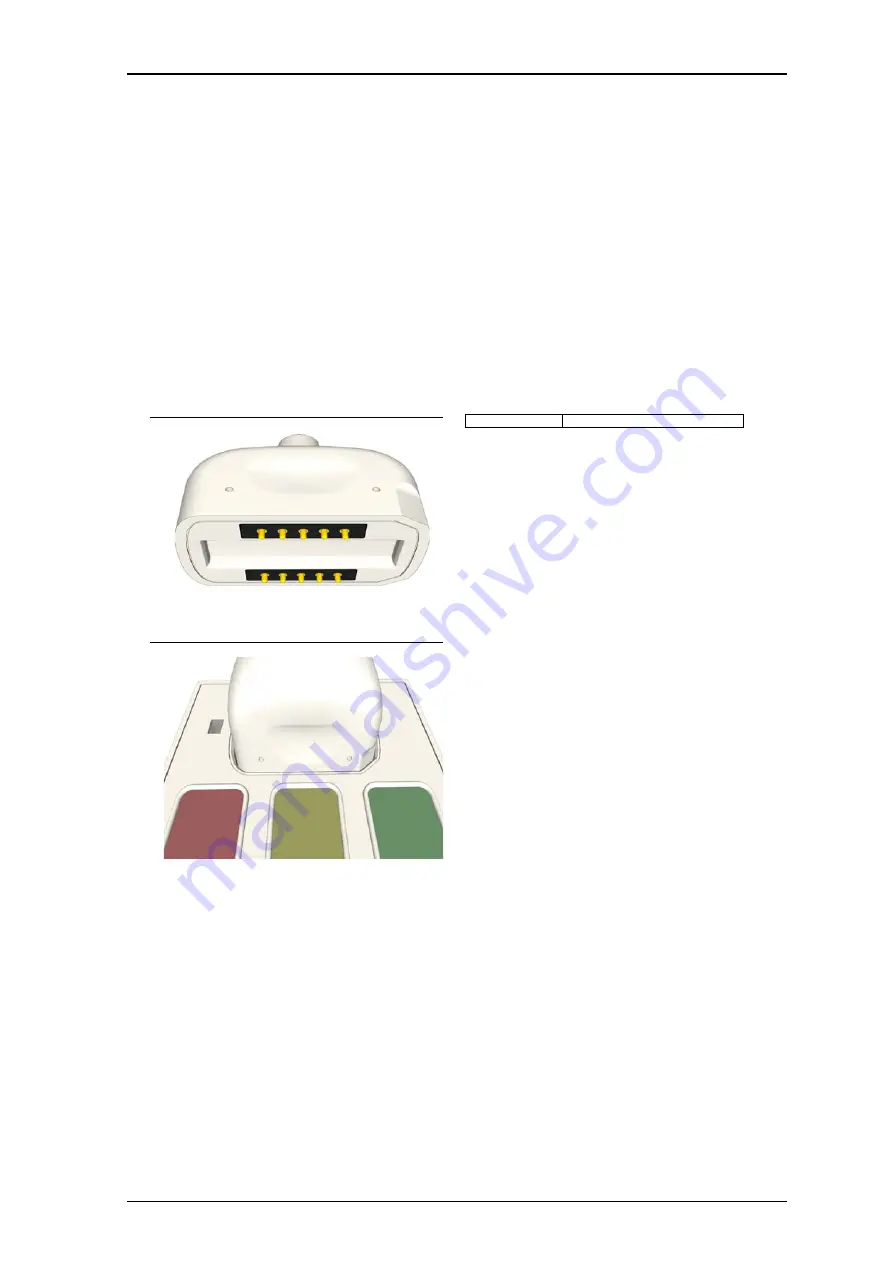
Ascom SafeConnect Plug

The Handset plug provides the wiring connection to the 

Bedside Module. The plug is able to fit into the receptacle 

only one way to ensure proper connection.

Two of the corners on the plug have a flat portion to prevent

improper installation. The flat portions of the plug must be

aligned with the flat portions on the receptacle. See graphic 

below.

Note: The plug has a built in magnet that provides a Safe 

Release function. If the handset plug is pulled past magnetic 

force limits, the plug will release to prevent damage. 

Ascom SafeConnect Plug

Ascom SafeConnect Plug Orientation

Installation

All handsets shall be connected to a Bed Side Module in 
rooms and get clipped to a patient’s bed for use. 

1. Insert the handset plug at the end of the cord into the Bed 

Side Module receptacle. 

2. Ensure the wiring plug is properly oriented and seated.

3. Test handset for proper operation:

•  Call
•  Light Control (If in use)
•  Sun Blind Control (If in use)
•  TV Remote Control (If in use)
•  TV Audio (If in use)

Note: The Infrared codes to communicate with different TV 

manufactures shall be configured in the Configuration 

Tool. The bedside module will then send the data at 

connection of the bedside handset.

Specifications

Wire/terminations

SafeConnect Plug

Summary of Contents for NU Series

Page 1: ...P N PM000223A Rev 1 Installation Manual NU Series Hardware...

Page 2: ...gainst all claims litigation and suits filed for protected health information violations European Union directives The European directive Waste Electrical and Electronic Equipment WEEE aims to minimiz...

Page 3: ...separation between the equipment and receiver Connect the equipment into an outlet on a circuit different from that to which the receiver is connected Consult the dealer or an experienced radio or tel...

Page 4: ...be UL Listed to UL IEC EN 60601 Auxiliary hardware must have a latching normally open dry contact relay and must also provide a cable that has a standard 1 4 inch 0 64 cm plug Intended Use The primary...

Page 5: ...en Source Software is licensed under the terms of the end user license that accompanies such Open Source Software Ascom in no way limits or supersedes the terms and conditions of any applicable end us...

Page 6: ...bles 10 2 4 Terminating Cables 10 2 4 1 Terminating Cat 5 5e 6 7 Connectors 10 2 4 2 Terminating Block Connectors 12 2 4 3 Terminating Passive Room Bus Connectors 13 2 4 4 Disconnecting a Wire from a...

Page 7: ...ies Dome Light 57 6 3 NUPBC Passive Bus Concentrator 62 7 Room Modules 66 7 3 NIAT Television Interface Module 68 7 3 1 Terminating a TV to NIAT Connection 69 7 3 2 Terminating a NIAT to NUBM3X Connec...

Page 8: ...P N PM000223A Rev 1 ISS 9 August 2017 iii Installation Manual NU Series Hardware Contents 7 21 NUHS Series Handsets 126 7 22 NUMDC Medical Device Cable 128...

Page 9: ...generated in the system such as calls staff presence medical alarms technical alarms etc The Ascom Telligence System operates on a Ethernet LAN 10 100 BaseT network using a Cat 5 5e 6 7 structured wir...

Page 10: ...Touch Screen Display Hallway Devices Dome Lights Dome lights NUDL series reside on the hallway bus and are installed between the Gateway II and the room modules Dome lights pass the room devices state...

Page 11: ...mentary messaging display in Ascom Telligence Systems It contains a PoE interface and connects directly to the Ethernet network The corridor display has a large character indicator and a signaling buz...

Page 12: ...system setup using a dome light to communicate with active modules and a NUPBC to control passive modules Figure 3 Hallway bus with Gateway II in combination with NUPBC and dome light Legend 1 Gateway...

Page 13: ...ces on the hallway bus The Gateway II then requests identification and other information about any room modules connected to the room buses When all devices connected to the buses have been identified...

Page 14: ...es that can be connected to the room bus can vary based the on total power consumption of the connected modules and the length of the bus cable However the software limits this to a total of sixteen m...

Page 15: ...Passive Bus Concentrator 5 Passive room bus Note The Telligence system is an electrically supervised system except for the passive devices connected to the passive room buses Each NUPBC includes eight...

Page 16: ...from higher voltage systems through the use of separate conduits or divided cable trays Sufficient free cable length shall be available during the installation of the dome lights lights Passive Bus C...

Page 17: ...ble and wire terminations at each cable end for easy identification when connecting to system devices We recommended that you use two different colors of Cat 5 5e 6 7 cable one for hallway networks an...

Page 18: ...s Refer to the relevant module description in the following sections for details of the electrical connections Be sure to pay attention to the colors that differentiate the hallway and room bus cables...

Page 19: ...to the connector If using an EZ RJ45 connector push through until the wire ends emerge from the pins For strength of connection also push as much of the cable jacket as possible into the connector 6 W...

Page 20: ...er connections Each connector has a screwless spring cage connection technique and each terminal has two connection points The Ascom Telligence System uses 4 6 and 8 pole block connectors Figure 8 4 p...

Page 21: ...e block connector for the light relay used with passive bedside module 2 4 3 Terminating Passive Room Bus Connectors The passive bus consists of eight wires that carry V Ground Reset Set C line and th...

Page 22: ...k connector 1 Carefully place the point of a small screw driver point approximately 2 5mm wide on the relevant orange colored release key of the connection terminals 2 Firmly push in the key to open t...

Page 23: ...V and GND 3 Hallway bus from Gateway II to hallway devices see Daisy Chaining Hallway Devices on page 16 4 Passive Bus Concentrator NUPBC 5 Dome Light NUDL2S or NUDL4S The hallway bus uses unshielded...

Page 24: ...llway bus is to daisy chain the devices All devices are equipped with two RJ 45 connectors for easy chaining However the devices connect serially so removing one device will break the chain The prefer...

Page 25: ...An active room bus is the communication system that transfers power data and speech between a dome light which controls the bus and NU series room module devices that are connected to the bus An activ...

Page 26: ...e Daisy Chaining Hallway Devices on page 16 4 Dome light NUDL4S or NUDL2S 5 Two active room bus connectors 2 6 1 Active Bus Connections The active room bus consists of four unshielded twisted wire pai...

Page 27: ...le the teleCARE M modules use 24VDC power Use care when replacing IAM modules with NUPBC modules during the migration to the Telligence system Warning All modules connected to the NUPBC shall be of th...

Page 28: ...NUPBC module 4 Check the connectors If you are using RJ 45 then terminate them with spring connectors 5 Check the V pin to ensure that you have oriented the connector in the proper direction in the N...

Page 29: ...24VDC power supply is needed when connecting legacy passive teleCARE M room modules to the NUPBC Notes Installations requiring compliance to ANSI UL 1069 shall only use PoE switches that are E23929 l...

Page 30: ...ating specifications Table 7 UPS Power Requirements Ascom recommends selecting a rack mountable UPS having at least four 120 240VAC outlets The UPS shall be compliant with the following For system ins...

Page 31: ...ts shall be EN 60950 1 or EN 62368 certified and CE marked The input Mains power requirement is 230V 50 60HZ The power supply unit must be plugged into a UPS power outlet The power distribution is bes...

Page 32: ...se with legacy teleCARE devices It includes a fixed Mains cable a fixed 24VDC output cable and a mounting bracket Figure 20 24V 4 2A power supply unit The power output wires of the 24V 4 2A power supp...

Page 33: ...ing of the wires Note The NU series devices cannot be used with 24VDC power as this will damage the devices The output of the power supply unit can be divided over multiple buses This method is recomm...

Page 34: ...ptable voltage at any point on the active bus shall be no less than 4 3VDC 3 4 Passive Room Bus Power Supply A passive room bus is powered by the NUPBC The NUPBC provides the passive modules on the pa...

Page 35: ...9 August 2017 27 Installation Manual NU Series Hardware Control Equipment 4 Control Equipment This Chapter elaborates on the control equipment This section describes the installation instructions for...

Page 36: ...P N PM000223A Rev 1 ISS 9 August 2017 28 Installation Manual NU Series Hardware Control Equipment 4 1 Gateway II NGGTWY2...

Page 37: ...P N PM000223A Rev 1 ISS 9 August 2017 29 Installation Manual NU Series Hardware Control Equipment...

Page 38: ...ry IP devices and the installation of these devices This includes the following products NGTDSP and NGWDSP Touch Screen Display details on page 31 Supplementary IP Devices details on page 34 System Ma...

Page 39: ...and placed on a desktop Desktop touch screen display NGTDSP H Wall mounted touch screen display with handset NGWDSP H Note For details on using the display screen refer to the Telligence Operation Ma...

Page 40: ...rrite core for Class B compliance To connect a touch screen display 1 Connect a Cat 5 5e cable to the back of the touchscreen display 2 Clamp the round ferrite core provided with the NGWDSP H on the C...

Page 41: ...esandannunciators RJ 45 PoE jack RJ 22 Installing a supervising dome light with buzzer for supervision When additional supervision is needed install a supervising dome light model HC CL4 SUPV near eac...

Page 42: ...erface GUI comes with the NISM2 Use a web browser to manage the system setup Use any Internet browser that can interpret Java script 1 2 CSS 2 We recommend that you use Microsoft Internet Explorer 7 0...

Page 43: ...ows the electrical connections on the back of the NISM2 Figure 25 NISM2 electrical connections Legend 1 COM Ports 2 Ethernet LAN for facility 3 External Power 5 3 2 Ethernet LAN Cable for Facility Net...

Page 44: ...er supply connect the mains power supply to the 100VAC to 240VAC 50 60Hz socket at the rear of the NISM2 module Figure 27 NISM2 electrical connections Legend 1 100 240VAC 50 60Hz Power Supply Importan...

Page 45: ...he following figure Figure 28 NISM2 with external 12 24VDC power input Legend 1 12 24VDC External Power Input 5 3 5 Setting the type of Power Supply in the NISM Advanced Settings After connecting the...

Page 46: ...r LED 5 3 6 Connecting a Paging System Use either of the RS232 COM ports COM1 and COM2 to connect ESPA or TAP paging systems Support for a TAP or an ESPA paging system requires a license Figure 31 Con...

Page 47: ...PM000223A Rev 1 ISS 9 August 2017 39 Installation Manual NU Series Hardware IP Devices Figure 32 Paging system selection Choose the appropriate paging protocol TAP or ESPA to access its system settin...

Page 48: ...SI UL 1069 standard for Hospital Signaling and Nurse Call equipment and is not considered to be part of a listed system configuration The corridor display has a large character height 50mm 2 0in white...

Page 49: ...following graphic identifies the display features and components of the corridor display Figure 34 Corridor display features and components Legend 1 Mounting clips for mounting directly to a wall 2 To...

Page 50: ...ay on ceiling tile rails or directly to ceiling tiles Figure 35 Corridor display dimensions 5 4 3 Corridor Display Power Requirements Power the corridor display using Power over Ethernet PoE through a...

Page 51: ...A standard T 568B Ethernet cable connects the display to the LAN network Figure 36 T 568B Ethernet cable Figure 37 Corridor display PoE connection 5 4 5 Connecting the LAN Cable Before mounting a disp...

Page 52: ...lt on page 53 5 4 6 1 Mounting the Corridor Display from the Ceiling The corridor display comes with a nylon line suspension kit Use the kit to mount the corridor display from the ceiling Important Ha...

Page 53: ...evice 3 Mount the two eyelet screws Use anchors to secure the screws if necessary Legend 1 Ceiling anchor 2 eye bolt 3 235mm 9 25in 4 On the corridor display fixtures slightly unscrew the two hex scre...

Page 54: ...a single or double display When placing the wall mounting bracket on the wall consider the minimum height at which the display should be mounted The minimum installation height depends on things like...

Page 55: ...lation Manual NU Series Hardware IP Devices Figure 39 Wall bracket mounting dimensions and components Legend 1 Remove grub screw M4x4 2 Display fastener 10mm size spanner 3 Serrated washer 4 Plain was...

Page 56: ...dware IP Devices To mount the bracket on the wall 1 Drill four holes according to the dimensions of the mounting bracket 2 Fix the mounting bracket on the wall by using four well fitted screws not inc...

Page 57: ...h the wall mounting bracket To mount single display to the wall mounting bracket 1 Ensure that the LAN cable is connected to the corridor display See 5 4 5 Connecting the LAN Cable on page 43 2 Remove...

Page 58: ...displays back to back onto the wall mounting bracket using the cross mount plate to create a double sided display Use the mounting accessories for a double display that are included with the wall mou...

Page 59: ...uble display to the wall mounting bracket 1 Ensure that the LAN cable is connected to the corridor display See 5 4 5 Connecting the LAN Cable on page 43 2 Remove the two hex screws at the top of the d...

Page 60: ...splays to the Ethernet outlet 5 4 6 3 Mounting the Corridor Display Directly on a Wall The corridor display can be mounted directly to a flat wall surface using two screws not included When mounting t...

Page 61: ...he corridor display See 5 4 5 Connecting the LAN Cable on page 43 7 Place the display against the wall so that the screw heads can pass through the keyhole slots on the display s mounting clips and th...

Page 62: ...stallation Manual NU Series Hardware IP Devices Location of the Reset Button Hole Figure 43 Reset button hole on the corridor display Legend 1 Reset button hole press for four seconds to reset to fact...

Page 63: ...on a physical or virtual PC or server that meets the required operating system and functional specifications To connect the Telligence Bridge computer to the Ascom Telligence system Connect a Cat 5 5...

Page 64: ...for complete electrical connection and assembly details before starting the installation The hallway devices have an IP40 ingress protection The areas in which the devices are to be installed must be...

Page 65: ...installation ensure all the necessary cables are available and are properly terminated RJ 45 connectors should be terminated in accordance with the T568B or EIA 568B connection standard The dome ligh...

Page 66: ...e the cables entering the dome light s housing and then choose which knockouts to remove 2 Removed from the top or sides of the backplate See the figure above items 2 and 3 3 Using a cutter or pliers...

Page 67: ...I O cable 1 Terminate the auxiliary I O cable with a 4 pole connector or a 6 pole connector as required Connectors not included Note The NUDL2 series dome lights do not have RELAY or COM To connect a...

Page 68: ...dome light to the backplate 1 Ensure that all cable connections are properly secured to the jacks and terminals on the back of the dome light 2 Place the dome light onto the two top fasteners of the b...

Page 69: ...P N PM000199A Rev 2 ISS 25MAY2017 5 of 5 Specifications Wire terminations Cat 5 5e 6 7 U UTP Note Cat 6 7 cable will work electrically but may be too stiff for some back boxes Compatible back boxes E...

Page 70: ...pacer Mounting the Backplate Spacer 1 Mount the backplate spacer to the backbox and route the wiring through the opening in the back Backplate Spacer Mounting Circuit Board 36VDC Legend 1 Jumper set t...

Page 71: ...e White 4 S Set Blue 5 C C line Green White 6 L_GR LED Green Green 7 L_YL LED Yellow Brown White 8 GND Ground Brown DIP Switch Addressing The PBC will come from the package with the DIP Switch setting...

Page 72: ...over which will illuminate blue when operating correctly The LED will flash if there is a steady issue with the device Status LED Removal The following provides the proper steps for removal of the Pas...

Page 73: ...ISS 01MAY2017 4 of 4 Specifications Wire terminations Cat 5 5e Recommended 6 7 Optional cable with RJ 45 connectors NOTE Cat 6 7 cable will work electrically but may be too stiff for some back boxes...

Page 74: ...talling any room bus module be sure to do the following Review to each module s electrical connection and assembly details in this chapter before installing the device Verify that areas used for modul...

Page 75: ...ails on page 105 NUBM3P Passive Bedside Module details on page 108 NUDM3P Passive Customizable Button Module details on page 116 NIPC W3P Passive Pull Cord Module details on page 119 NIPC2 WAP Passive...

Page 76: ...ision interface module is a supplementary passive device that does not require a power supply Figure 44 Television interface module front and back view The Television Interface module must be mounted...

Page 77: ...d 1 3 5mm jack to TV 2 4 pole terminal block to NIAT 7 3 2 Terminating a NIAT to NUBM3X Connection The NIAT connects to the NUBM3X via a Cat 5 5e 6 7 cable connection Terminate the 4 pole block connec...

Page 78: ...n audio cable with a 4 pole connector to the 4 pin terminal J1 on the Television Interface module and then attach the other end to the headphone jack socket on the television 4 Mount one end of a Cat5...

Page 79: ...se globally and with inserts for use in the United Kingdom The kits include inserts for one two or three button configurations Figure 49 EU Button Insert Kit Contents P N NUCBK HE Figure 50 UK Button...

Page 80: ...nose pliers grasp the edge of the existing button label and pull it out of the button label channel 4 Slide your new custom button insert into the button insert channel 5 Place the module back on the...

Page 81: ...es are available and are properly terminated RJ 45 connectors should be terminated in accordance with the T568B or EIA 568B connection standard The module can mount to a backbox or to a wall by using...

Page 82: ...otect the switching relays on the NUBM3 module An external power source and external relay are needed for the light switching function The diode power supply and external relay are all provided by the...

Page 83: ...figure Removal When separating the module from an adapter or spacer use a screwdriver with a blade that is approximately 6mm wide To remove the module from a backbox or spacer 1 Insert the 6mm flat b...

Page 84: ...llowing graphic External Call Contact with Call LED Output The external call connection allows an external normally open or normally closed third party contact to activate a call The 4 pole connector...

Page 85: ...5e 6 7 cable The cable attaches to 4 pole terminals on the extension module and the Television Interface module See Bedside Extension Module Connections figure item 2 Extension Modules 4 Pole for TV...

Page 86: ...e backbox and then attach the cable to the 6 pin terminal The interconnection cable is included with the module 5 Attach the 4 pole connector cable for the Television Interface module NIAT to the 4 pi...

Page 87: ...m corner of the frame as this may damage the frame or module 3 Remove the module from the adapter Specifications Wire terminations 6 wire Interconnection cable 4 pin television interface module cable...

Page 88: ...ne of sight to the caller The light mounts to a backbox using a backplate included that supports the device In areas where no backboxes are available backplates spacer can be used to mount the device...

Page 89: ...f the backplate See the figure above items 2 and 3 3 Using a cutter or pliers carefully remove the excess plastic from the knockouts To mount backplate spacer on a wall 1 Place the backplate spacer ag...

Page 90: ...ng an auxiliary I O to the light attach the 6 pole connector from the auxiliary device to the 6 pin terminal otherwise skip this step Ensure the connector is seated properly on the terminal pins See f...

Page 91: ...Insert a 6mm flat blade screwdriver into the notch at the bottom of the light and then apply light upward pressure 3 Gently twist the screwdriver to disengage the light from the backplate Do not use e...

Page 92: ...nted in a patient room Pull Switch NUCPS HK Cardiac Front Pull Switch NUEPS HK Emergency Front Installation Note Before beginning the installation ensure all the necessary cables are available and are...

Page 93: ...ckbox Tighten the screws 5 Insert the screw hole covers into the pull switch Removal To remove module from the backbox With a small blade screwdriver 2mm carefully remove the screw hole covers 6 Remov...

Page 94: ...the heads of the screws can pass though the key hole slots of the adapter plate When using a spacer ensure the spacer is properly mounted to the wall and that the adapter screws are available 2 Place...

Page 95: ...previous module and OUT to the next module To attach the module on the adapter 1 Place the module against the frame ensuring that the module is facing up 2 Place he module s upper snap fasteners again...

Page 96: ...n Do not insert the screwdriver into the bottom corner of the frame as this may damage the frame or module 3 Remove the module from the adapter Specifications Wire terminations Cat 5 5e 6 7 U UTP with...

Page 97: ...ensure all the necessary cables are available and are properly terminated RJ 45 connectors should be terminated in accordance with the T568B or EIA 568B connection standard The module comes with a bac...

Page 98: ...top or sides of the backplate spacer See the figure above items 2 and 3 3 Using a cutter or pliers carefully remove the excess plastic from the knockouts To mount the backplate spacer on a wall 1 Plac...

Page 99: ...IOM H module connections item 1 Note If your installation does not use the DIP switches set the DIP switches to the 0 position and use the Software Configuration Tool 2 Attach the 4 pole connectors fr...

Page 100: ...locking screw from the bottom of the NUIOM H See item 1 in the figure below 2 Insert a 6mm flat blade screwdriver into the notch at the bottom of the NUIOM H and then apply light upward pressure See i...

Page 101: ...are available and are properly terminated RJ 45 connectors should be terminated in accordance with the T568B or EIA 568B connection standard The module can mount to a backbox or to a wall by using a...

Page 102: ...rews or screws with anchors 4 Remove the knock outs in the spacer for the cable wires 5 Place the spacer over the holes insert the screws and then tighten 6 Pull the cables though the knock out holes...

Page 103: ...ensure all the necessary cables are available and are properly terminated RJ 45 connectors should be terminated in accordance with the T568B or EIA 568B connection standard To avoid physical damage to...

Page 104: ...wall plugs The diameter of the screw must not exceed 3 8mm Mounting the Backplate on the Wall Pull Cord Backplate Mount the pull cord backplate over the backbox using the holes in the corners of the b...

Page 105: ...tions and DIP Switch Settings The NUPC Pull Cord module is an active module that connects to the room bus Use the DIP switches on the circuit board to set the device s bus address To mount the pull co...

Page 106: ...with excessive force The second ball lower ball weights the pull cord and allows the cord to be grabbed easily The upper half of the pull cord comes already attached to the pull cord module The lower...

Page 107: ...hat connects to the room bus via two RJ 45 connectors NURD Room Display Rear NURD HE EU Market NURD HK UK Market Installation Note Before beginning the installation ensure all the necessary cables are...

Page 108: ...ate and drill holes into the wall at each marked corner 7 Insert a screw anchor into each hole if necessary 8 Place the backplate over the backbox and align it with the drilled holes 9 Insert the four...

Page 109: ...l procedure may result in damage to the room display 1 Insert a 6mm flat blade screwdriver into one of the indentations at the top or side of the NURD module 2 Gently twist the screwdriver to disengag...

Page 110: ...from the backbox and the heads of the screws can pass though the key hole slots of the adapter plate When using a spacer ensure it is properly mounted to the wall and that the adapter screws are avail...

Page 111: ...3 Insert the RJ 45 room bus connector into the first jack and then insert the next connector to the next module into the other jack as shown in the following graphic IN from the previous module and OU...

Page 112: ...ses from the adapter Caution Do not insert the screwdriver into the bottom corner of the frame as this may damage the frame or module 3 Remove the module from the adapter 4 Disconnect the RJ 45 connec...

Page 113: ...d Control Module must be mounted on a 1 5 in DIN rail which must be permanently mounted to a wall It must not be within reach or intentional access of a resident or it can be mounted within a separate...

Page 114: ...ole block connector with matching wires from the eight wire room bus cable that goes to the next module You must terminate the unused wires on a separate 4 pole block connector or similar connector wi...

Page 115: ...source is turned off for the sun blind motor and all wires are disconnected from the screw terminals 1 Insert a number 2 flat blade screwdriver into the clip at the top of the device 2 Apply light upw...

Page 116: ...andsets Installation Note Before beginning the installation ensure all the necessary cables are available and are properly terminated The module can mount to a backbox or to a wall by using a surface...

Page 117: ...8 pole connector for controlling room lights 8 pole Block Passive Bus Connection Pinouts To connect a passive bedside module 1 Slide the cables with their connectors through a module frame 2 If this...

Page 118: ...inst the adapter so that the module s bottom fasteners snap closed on the adapter See previous figure Removal When separating the module from an adapter or spacer use a screwdriver with a blade that i...

Page 119: ...secondary bus connector attaches to a second bus on the PBC It controls the module s first second and fourth light sections Installation The passive light mounts to a backbox using a backplate include...

Page 120: ...ll be needed to accommodate the cables entering the light s housing and then choose which knockouts to remove from the spacer 2 Remove the knockouts from the top or sides of the spacer See the figure...

Page 121: ...secondary connector ensure the primary connector is also attached Note The diodes shown in the figure below are built into the light s circuit board NUCL4P H Bus Connections Terminating an End of Lin...

Page 122: ...t the jumper on the two pins marked BLUE If the fourth section is to illuminate white set the jumper on the pins marked White See figure NUCL4P H connectors and jumper item 3 NUCL4P H Room Bus Connect...

Page 123: ...emove the locking screw from the bottom of the light 2 Insert a 6mm flat blade screwdriver into the notch at the bottom of the light and then apply light upward pressure 3 Gently twist the screwdriver...

Page 124: ...from the backbox and the heads of the screws can pass though the key hole slots of the adapter plate When using a spacer ensure the spacer is properly mounted to the wall and that the adapter screws...

Page 125: ...ith their connectors through a module frame 2 If this is the last device on the passive room bus move the EOL jumper to the pins labeled EOL otherwise leave the jumper in its default position OFF See...

Page 126: ...ade screwdriver into the slot at the bottom of the module between the faceplate and the adapter 2 Gently push the 2 flat blade screwdriver until the module releases from the adapter Caution Do not ins...

Page 127: ...s a passive device that connects to a passive room bus using a 4 pole terminal The following figure shows the location of the 4 pole room bus connector for the NIPC W3P pull cord NIPC W3P Passive Room...

Page 128: ...oL When the pull cord is the last module on the room bus it must be terminated with 10k EoL resistors not included Terminate the light as shown in the figures below Terminating the NIPC W3P EoL on a P...

Page 129: ...the breakaway ball so that the edges are touching and then press them until they click together See Figure above items 2 and 3 4 Extend the cord to its full length and then allow it to hang freely fro...

Page 130: ...kplate The module is not compatible with a standard module backplate or with surface mounting spacers The module is attached to the backplate by two latches and two screws through the cover plate The...

Page 131: ...second block connector in the backbox This connector does not mount on any device 6 Mount the module onto the backplate or spacer Terminating an End of Line EoL When the pull cord is the last module o...

Page 132: ...the lower edge of the module onto the two lower snap fasteners of the backplate Mounting Module to Backplate 3 Push the top edge of the module onto the two upper snap fasteners until the module click...

Page 133: ...breakaway ball so that the edges are touching and then press them until they click together See Figure above items 2 and 3 4 Extend the cord to it s full length and then allow it to hang freely from t...

Page 134: ...andset 7 button NUHS7B HK Handset 7 button UK Version NUHS14B H Handset with TV remote control NUHS14B HK Handset with TV remote control UK Version The NUHS Series handsets provide patients with a con...

Page 135: ...set plug is pulled past magnetic force limits the plug will release to prevent damage Ascom SafeConnect Plug Ascom SafeConnect Plug Orientation Installation All handsets shall be connected to a Bed Si...

Page 136: ...em The EOL resistor can be connected to a 3 pin relay or a 2 pin relay When connected to a 3 pin relay the Ascom system will detect line breaks and cord out of the cable from the medical device side W...

Page 137: ...ug The Medical Device Cable provides the wiring connection to the NUMI2 HE Module The plug is able to fit into the socket only one way to ensure proper connection Ascom SafeConnect Plug Orientation No...

Reviews: