background image

ARTURIA – PROPHET V - MANUAL 

59 


Filter Module 

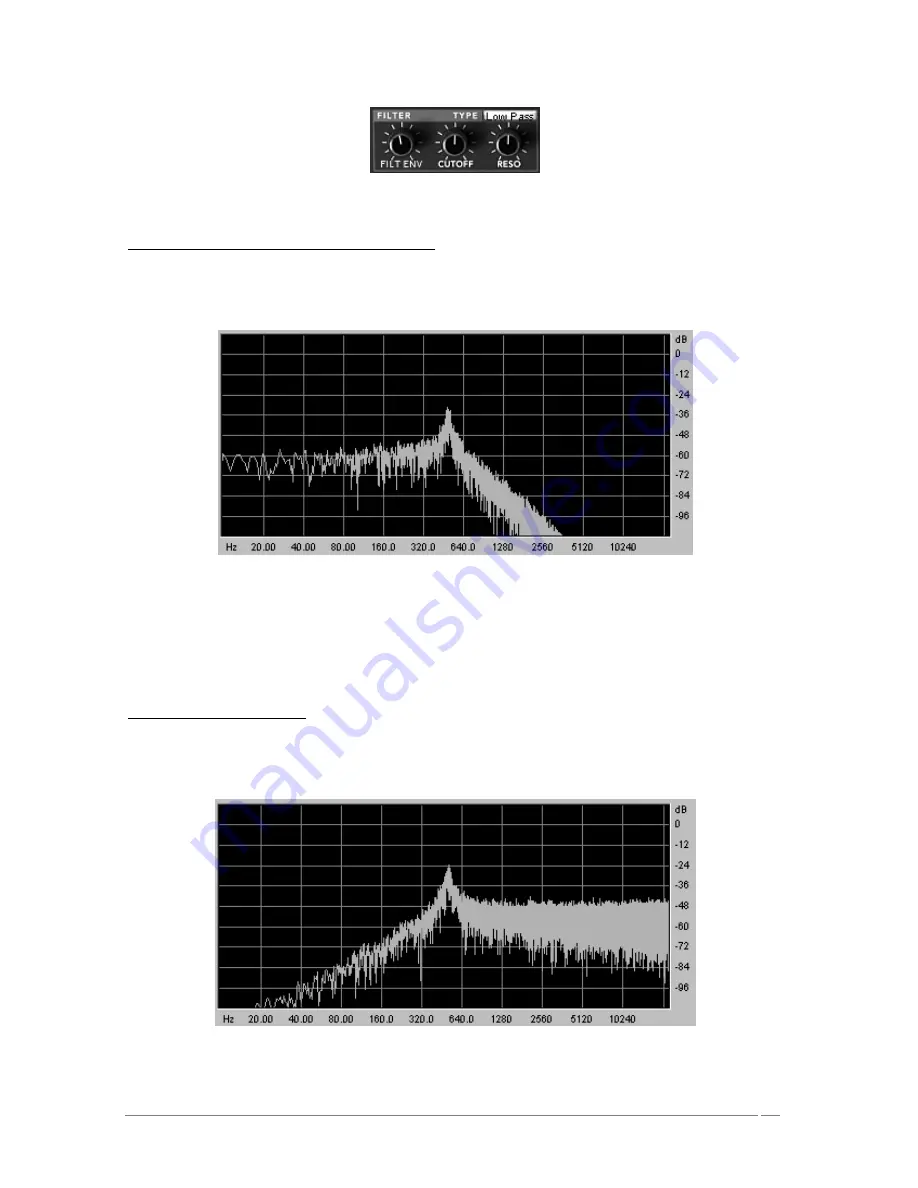
Low Pass Filter 24dB /octave slope (LP Filter) 

The  low pass filter 24 dB native to the Prophet VS.  It eliminates the frequencies found above 
the cut-off frequency.  


Low Pass Resonant Filter 

The other four modes of filtration did not exist on the original Prophet VS but they are present 
on  a  number  of  other  digital  and  analog  synthesizers.    They  all  use  a  slope  of  12  dB/octave.  
These modes were added to increase the sonic possibilities of the PROPHET V. 


High Pass Filter (HP Filter) 

The high-pass filter acts symmetrically to that of the low pass filter.  It eliminates frequencies 
below the cut-off frequency. 


High Pass Resonant Filter 

Summary of Contents for Prophet V

Page 1: ...ARTURIA PROPHET V MANUAL 1 U US SE ER R S S M MA AN NU UA AL L P PR RO OP PH HE ET T V V ...

Page 2: ... in this manual is subject to change without notice and does not represent a commitment on the part of Arturia The software described in this manual is provided under the terms of a license agreement or non disclosure agreement The software license agreement specifies the terms and conditions for its lawful use No part of this manual may be produced or transmitted in any form or by any purpose oth...

Page 3: ...our USB key and your card The USB key will be required any time you run PROPHET V so your key is the real value of your product See chapter two for more information about how the key works We recommend that you register your product By registering you identify yourself as the legitimate owner and will be sure to receive the latest news and updates for your product After registration you will recei...

Page 4: ...2 Quickly create evolving pad sounds with the Prophet VS 25 3 4 The Hybrid Interface 32 3 5 The Effects Section 34 3 5 1 Chorus 35 3 5 2 The Delay 36 3 6 Real time Controllers and assigning them to MIDI 37 4 Principal Elements of the Interface 38 4 1 Tool Bar 38 4 2 Using Presets 38 4 2 1 Choice of a bank sub bank preset 39 4 2 2 Creation of a bank sub bank preset 41 4 2 3 Saving a user preset 41 ...

Page 5: ...s 82 6 2 1 The keyboard 82 6 2 2 The envelope generator 82 6 2 3 The low frequency oscillator 83 6 3 Complements to Wavetable Synthesis 85 6 4 Modules of Prophet V 85 7 A Few elements of Sound Design 86 7 1 Brass Preset with the Prophet 5 86 7 2 Pad sound with the Frequency Modulation using the Prophet 5 87 7 3 Basic Preset with the Prophet VS Sweet Pad 91 7 4 Preset using the modulation matrix an...

Page 6: ...mode 111 8 3 Audio Unit Max OSX only 112 8 3 1 Installation 112 8 3 2 Use in Logic Audio 113 8 3 3 Use in Digital Performer 114 8 4 Pro Tools 114 8 4 1 Installation 114 8 4 2 Utilization of the plug in 114 8 5 DXi Windows only 115 8 5 1 Installation 115 8 5 2 Opening the instrument Sonar 2 0 116 ...

Page 7: ...a resonant low pass VCF voltage controlled filter The filter modified the voice timbre under control of its four stage envelope generator The filter could also be driven to resonance and could serve as a sound source Following each filter was a VCA voltage controlled amplifier controlled by a four stage envelope generator which shaped the voice amplitude Supplementing the basic voices was polyphon...

Page 8: ...n timbres and running that through the usual VCF VCA chain It was an extension of the instruments like the PPG and Fairlight that could scan in one dimension along a table of wave shapes or between two different wave shapes Another peculiarity that contributed to the success of this instrument was its modulation matrix This allowed it to largely surpass the limitations of classic modulation the en...

Page 9: ...the Prophet V oscillator made with TAE 1 2 2 A better reproduction of analog oscillator waveforms The waveforms produced by the oscillators in analog synthesizers are marked by the presence of a capacitor in the circuits The discharge of the capacitor results in a light bend in the original waveform notably for saw tooth triangular and square waveforms TAE allows the reproduction of this capacitor...

Page 10: ...ARTURIA PROPHET V MANUAL 10 Temporal representation of a saw tooth waveform of the original Prophet 5 ...

Page 11: ...ve unprecedented accuracy in the emulation of the original s analog 4 pole low pass filter By modeling the operation of the individual hardware components of the filter circuit the warm nuances synonymous with the original s analog sounds are recreated This graph is a frequency domain plot as just a single example of direct circuit modeling in action it shows the generation of harmonics at multipl...

Page 12: ...ARTURIA PROPHET V MANUAL 12 Comparison of Harmonics generated by the filter circuits of the Prophet V and Prophet 5 when in self oscillation ...

Page 13: ...t V is complete You can also download the latest version at this address http syncrosoft com downloads Once you have installed the driver an application called License Control Center allows you to manage the installed licenses on your key On Windows this application and its documentation are available via the menu Start Programs Syncrosoft On Macintosh this application is installed in the Applicat...

Page 14: ...n The DXi plug in The RTAS plug in Choose your protocol For more information on those protocols please see to chapter 8 of this manual For the installation of the VST and RTAS protocols you should select the installation folder of these plug ins to allow the host application to use them If you don t know how to do this go to the Protocol Chapter Ch 8 ...

Page 15: ...cut to your desktop The installation program will then ask to install the Syncrosoft drivers These drivers are necessary for the USB protection key for the PROPHET V to function properly the latest version of Syncrosoft must be installed If you are sure that your system possesses the most recent Syncrosoft drivers you can click on the Cancel button Otherwise click OK Syncrosoft Installation Dialog...

Page 16: ... Installation Mac OSX Insert the CD ROM into the drive Explore the contents of the CD ROM and double click on the icon called Prophet V mpkg The installation program requiring administrative rights may have the system ask you to enter the login of an administrative user of the system In this case enter your login and administrative password and click on OK to continue the installation After the so...

Page 17: ...The standalone application will be installed in the applications folder and the different plug ins will be installed in folders reserved to each type of plug in 2 4 Registration Once your software has been installed we recommend to you to register online as a licensed Prophet V user This registry isn t obligatory but it is highly advised It gives you the access to reserved resources for new preset...

Page 18: ...ollers visible on the screen will be given in the following chapters Chapter 7 A Few Elements of Sound Design is particularly useful for those who have not yet worked with a subtractive synthesizer and who wish to acquire a basic knowledge Complete View of the Prophet V 3 1 Using Presets 3 1 1 Selecting Presets Like on the original the Prophet 5 and the Prophet VS the presets allow you to save all...

Page 19: ...se the SUB BANK Pads then select Full_Pad among the PRESETS This sound is a very simple pad played with the Prophet 5 emulation Select the preset The Prophet V is delivered with 400 presets that allow you to become acquainted with the sounds of the synthesizer A bank named User Temp offers a selection of presets giving the possibility to use a template to begin programming a sound The sound 1_Osc ...

Page 20: ... select new bank among the choices New bank and sub bank locations are immediately created along with the new preset The names new bank new sub bank and new presets appear in their perspective places Click on each of the names to rename them as you wish in the three sections Save a preset To save a User preset click on the Save icon in the tools bar the new settings will be saved in the preset cur...

Page 21: ...zers at the same time 3 3 Brief Tour of the Prophet 5 The Prophet 5 interface consists of 54 synthesis parameters as well as preset selection buttons that allow you to quickly find 44 presets that were found on the original machine With the knobs and switches associated to these parameters you will be able to create an infinite number of sounds These parameters are distributed as follows 2 oscilla...

Page 22: ...of the amplifier Finally the following synopsis resumes our example sound creation The sound path of a preset 1_Osc Begin by lowering the cut frequency of the low pass filter This will slowly lower the sound For this set the Cutoff knob For an exact setting right click with the mouse in PC or shift click in Mac Note that the cut off frequency is modulated by an ADSR envelope attack decay sustain a...

Page 23: ...In the same way change the decay time value This too will diminish rather rapidly as you hold the note on the keyboard The decay time parameter of the filter envelope Now let s test a short modification in the second ADSR envelope editing the amplification Increase the attack time of this envelope so that the sound volume increases progressively Increase the Attack time of the Amplifier Envelope ...

Page 24: ...ters of the Prophet VS are as follows 4 oscillators that are chosen in a bank of 96 wave form samples A mixer to mix the signals coming from the 4 oscillators A multi mode resonant filter with 24 dB octave slope Two LFOs allowing 5 wave forms 1 VCA amplifier Three 5 point envelopes for modulating the mixer the filter and the amplifier A loop function is available on each of the envelopes Modulatio...

Page 25: ...nt wave form for each of the 4 oscillators To do this click on the selection screen found on each of the oscillators then scroll the mouse up or down to choose a wave form You can also scroll down more precisely by right clicking with the mouse or shift click on Mac Choosing a different wave form Once the wave forms are chosen progressively move the joystick between four points A B C and D You can...

Page 26: ...the mixer and its envelope Click on the Envelopes option Click on the MIXER option Before editing the four times of the mixing envelope of the oscillators begin by placing the 5 positions that the joystick will move to at the moment of automation points 0 1 2 3 and 4 Place the joystick at point A corresponding to the A oscillator This constitutes the starting point for the automation called positi...

Page 27: ...e 0 value place the joystick to the 1 position Next move the joystick to the position 2 Move it to point C corresponding to the C oscillator Point C should be at the 100 value and the other points A B and D should be at the 0 value Move the joystick to the position 2 Now place the joystick at its third position position 3 Move it to point D corresponding to the D oscillator You should have a value...

Page 28: ...ction explains the settings corresponding to the four parameters of the mixing envelope of the 4 oscillators Click on the OFF ON panel found above the knob envelopes to put it in the ON position This activates the envelope on the mixer Click on the OFF ON panel Turn the 1 knob to control the time between the 0 point and the 1 point Choose a value around 3000 ms for example for more precision use t...

Page 29: ...the 2 knob Turn the 3 knob of the envelope to control the time between the 2 point and the 3 point Choose a value around 2000ms for example Turn the 3 knob Turn the 4 knob to control the time between the 3 point and the 4 point Choose a value around 800 ms This path of the joystick will not be taking into account until after the note release Turn the 4 knob ...

Page 30: ...umber of repetitions Click on the zone Loop Choose the type of loop and the zone repeat Complete editing of the preset by setting the cutoff filter the amplitude envelope and a modulating the cut frequency of the filter by an LFO Turn the cut frequency knob of the filter CUTOFF Choose a value that gives the amount of brightness in the sound that you would like Turn the cut frequency knob Proceed t...

Page 31: ...the 1 point to the right corresponding to the attack time Move this same point towards the top to obtain the attack level volume Move the 1 point to the right corresponding to the attack time Stretch the release time of the note by moving the point 4 to the right Use for example a value of 1500 ms Stretch the release time of the note by moving the point 4 ...

Page 32: ...ble by right clicking or shift click on Mac Click and holding on the amount panel The envelopes for the filter and the amplitude are automatically connected to the modules that are available to them Thus it is not necessary to change to the modulation matrix to activate them However the modulation matrix will be indispensable for all other types of connections as well as for the settings for the a...

Page 33: ... to select and connect to the oscillators route the audio signal to the Pro5 or ProVS filters route the sound of the Prophet 5 in one of the two filters etc Click in the LCD viewer to select the C oscillator and choose the option Osc VS C Select the C oscillator and choose the option Osc VS C Lightly detune it in relation to the C oscillator already in place by slightly increasing the FINE knob Th...

Page 34: ...ption MODULATION accessible on the right of the Prophet VS interface Click on the bullet situated at the intersection of the source LFO1 horizontal line and the destination Cutoff vertical line Set the modulation rate with the panel found to the right of the horizontal line LFO1 Click and hold the value shown then scroll your mouse up or down to either increase or decrease the value For more preci...

Page 35: ...d livelier Three types of stereo chorus are available from the simplest to the densest Activate the ON OFF button of the Chorus in the effects section found in the right hand section of the tool bar Activate the ON OFF button of the Chorus Set the Dry Wet knob of the chorus in order to balance the raw sound and the return of the effect Set the Dry Wet knob of the chorus Turn the Rate knob of the C...

Page 36: ... sound It holds independent settings for the speed and number of the repetitions from left to right It is therefore possible to create a large number of rhythmic combinations between the repetitions The speed of the delay can also be synchronized to MIDI tempo Take for example the preset Full_Pad and you will see how to use the sound effects Activate the Delay button on the tool bar The effect is ...

Page 37: ... external MIDI controller For example Click on the Cutoff switch of the filter while holding the Ctrl key or the equivalent on the Mac The dialogue box for assigning MIDI appears Click on Learn then move the controller MIDI of your choice the modulation wheel for example The switch of the Prophet V will move at the same time Next you can save the movements of your MIDI controller on your MIDI sequ...

Page 38: ...s Example to load a specific synthesizer interface click on the buttons PROPHET 5 PROPHET VS or Hybrid Tool Bar 4 2 Using Presets Presets allow you to save specific sounds on the Prophet V A preset contains all the settings information of the different controllers necessary to reproduce a sound In the software the presets are classed in the banks and sub banks The original banks or factory presets...

Page 39: ... your sequencer Choice of a preset in the same sub bank To choose a preset in the same main bank but a different sub bank click on the button and a drop down menu appears with a list of the sub banks contained in the same main bank Each sub bank listed in the menu allows you to open a sub menu containing its presets A click on a preset allows you to directly choose a preset in the new sub bank Cho...

Page 40: ...vailable in all of the banks This gives you access directly to all of the presets of a given type for example all of the basses no matter which bank they are in This function is particularly useful to quickly see all of the presets of the same type Choice of preset regardless of bank When a preset has been modified an asterisk appears next to its name in the tool bar ...

Page 41: ...ame 4 2 3 Saving a user preset To save your setting modifications in the current preset click on the Save button in the tool bar of the Prophet V Save button in the tool bar If you want to save your settings under another preset name click on the Save As button in the tool bar A drop down menu appears and lets you choose an existing preset in this case the contents of the existing preset will be r...

Page 42: ...at you are exporting 4 3 Use of controllers 4 3 1 Knobs Generally sequencers allow several knob control modes The default mode of control for knobs with the mouse is the circular mode click on the knob and turn around it in order to change the value of the controller The circular mode gives high precision in the manipulation of controls The further the mouse goes from the knob the higher the preci...

Page 43: ...e Switches 4 3 3 Pitch Bend and Modulation wheel The Pitch bend controls the frequency pitch of the synthesizer oscillators Simply click on the wheel while playing a note on the master keyboard or in a sequencer then move the mouse vertically to modify the pitch The wheel comes back to its initial position at the release of the note Pitch Bend Wheel The modulation wheel sets the modulation rate of...

Page 44: ...or example To change the selection being used several types of manipulations exist following the context of the screen Drop menu offering a number of choices Types of filters waveforms of LFO 1 and 2 number of polyphonic voices click on the screen The menu appears allowing you to select the parameter wished Screen for choosing filter types Drop menu offering a large range of choices choice of wave...

Page 45: ...nything else make sure that the MIDI device that you wish to use is correctly connected to the computer and that the sequencer or the Prophet V application is correctly configured to receive MIDI events coming from the device Every instance of the Prophet V receives MIDI events transmitted on a given channel This reception channel is defined in a global manner for the synthesizer either in your se...

Page 46: ...tivate the animations when switching between playing modes You can also activate or deactivate the pop up indications when scrolling over or selecting a parameter Show control popup when Mouse Clicks on Control Mouse Rests on Control To open this window click on the plaque of the PROPHET V found just above the virtual keyboard To close this window simply re click on the same plaque ...

Page 47: ...Prophet 5 interface takes on all of the parameters and characteristics of the original synthesizer The interface is so much like the original that only playing functions in monophonic mode LEGATO and the sustain of a note HOLD were added You will even find a preset bank which offers the 40 factory presets of the original machine these cannot be deleted Prophet 5 The PROPHET 5 consists of 2 oscilla...

Page 48: ...ency of oscillator B or the output of the filter envelope The oscillators can be tuned and edited separately They supply up to 2 wave forms on oscillator A and 3 on oscillator B These wave forms can be used simultaneously Whether tuned separately or when using several mixed wave forms the two oscillators allow you to quickly obtain large variety of sounds Two Oscillators 5 1 1 1 Oscillator A FREQ ...

Page 49: ...e keyboard Notice by turning on the LO FREQ button the oscillator B will ask less CPU power of your computer A weaker oscillation frequency will allow you to use it as an LFO for modulating oscillator A or the filter in the POLY MOD section Here are the representations of the different wave forms used by the oscillators of the Prophet 5 Saw tooth Square Triangle ...

Page 50: ...e original Prophet 5 You ll find all the sonic characteristics that made the original the must have of analogue synthesis Filter settings CUTOFF setting for the filter cut frequency tuned from 10 Hz to 25 KHz RESO setting for the filter resonance KBD manual setting for the keyboard following ENV AMT manual setting for the amount of modulation by the filter envelope Notice To set the conventional k...

Page 51: ...RL Click on MAC This can be useful when you wish to set the level of the cut off frequency Low pass resonant filter 5 1 4 Amplifier The amplifier is the last step in sound creation It allows you to set the general volume of the Prophet 5 Amplifier This module is very simple This consists of VOLUME general volume control of the synthesizer 5 1 5 Envelopes The two ADSR envelopes allow you to develop...

Page 52: ...ound parameter in a cyclical manner to generate effects such as a vibrato effect when the LFO modulates the oscillator frequency or wahwah effect when it modulates the cut off frequency RATE setting parameter for LFO frequency SHAPE connection buttons for the audio output of the three wave forms Saw tooth Triangle Square LFO 5 1 7 WHEEL MOD This section offers the necessary connections to select t...

Page 53: ...allic sounds similar to bell sounds or very particular special effects notably by modulating the cut off frequency of oscillator B Notice If you use oscillator B as a modulation source you can apply a modulation in which the speed will be proportional to the note played on the keyboard This gives you some interesting effects when oscillator B will be used in the lower frequencies LO FREQ Source Am...

Page 54: ...on for the release HOLD connection button for holding a note LEGATO connection button for the Legato mode uniquely available in monophonic mode B RANGE Set the range of the pitch bend wheel GLIDE setting for the glide time Glide Modes the various modes for the glide OFF ON LEGATO Playing Mode section CAREFUL Only the volume envelope will be taken into account by the HOLD function This permits you ...

Page 55: ...ors MOD Wheel controlling modulation Wheels Attention None of the modulation made by the LFO will be audible if the Mod Wheel is positioned at 0 at the bottom Also notice that the position of the wheel is stored in a preset 5 2 PROPHET VS The Prophet VS brings you a unique sound that has the strength to stand on its own but at the same time is complementary to that of the Prophet 5 The Prophet VS ...

Page 56: ... oscillator allows you to control the frequency the tuning and the basic timbres of the Prophet VS The difference between the VS and the Prophet 5 is that the oscillators of the VS use sample wave forms from diverse sources acoustic instruments voice and assorted sound effects These wave forms give you access to a sound palette much greater than that of most analog synthesizers To choose a wave fo...

Page 57: ... 5 2 2 MIXER The mixer lets you mix the four oscillators in order to enrich and develop the sound This mix is done with a joystick moving between four points A B C and D representing the maximum volume of each of the oscillators Joystick the joystick mixes the four oscillators in real time The Mixer ...

Page 58: ...ars in one of the four fields found to the right of the page ENVELOPE MIXER You can equally click on the number and slide the mouse up or down ENVELOPE The envelope automates the movements of the joystick designating a time to each of the four movements points 0 to 4 and during the length of a note LOOP The LOOP function applies a loop between to points of the envelope OFF 0 3 1 3 2 3 or 0 3 1 3 2...

Page 59: ...her four modes of filtration did not exist on the original Prophet VS but they are present on a number of other digital and analog synthesizers They all use a slope of 12 dB octave These modes were added to increase the sonic possibilities of the PROPHET V High Pass Filter HP Filter The high pass filter acts symmetrically to that of the low pass filter It eliminates frequencies below the cut off f...

Page 60: ... will make the sound more pinched Band Pass Filter Notch The Notch is opposite to that of the pass band filter It eliminates the frequencies inside a band of frequencies The resonance allows you to accentuate the sag of a band of frequencies The Filter notch Attention Setting the resonance of the notch filter to a large amount causes the effect of the notch filtering to be cancelled 5 2 5 ENVELOPE...

Page 61: ...dulates the cut off frequency by allocating a Level and Time to each of the 5 points of the active envelopes during the hold points 0 to 3 and the note release point 4 LOOP The Loop function allows you to define a segment found between two points of the envelope which is meant to be repeated OFF 0 3 1 3 2 3 or 0 3 1 3 2 3 REPEAT The Repeat function repeats the loop a certain number of times OFF de...

Page 62: ...d side of the PROPHET VS interface Once you have opened the Envelope tab choose the Amplifier option AMPLIFIER this envelope modulates the cut off frequency by allocating the Level and the Time to each of the 5 active points of the envelope during the interval between points 0 and 3 and the release of the note point 4 LOOP the loop function allows you to define a loop between two of the envelope p...

Page 63: ... modulation sources LFO Envelopes to the synthesis parameters Cutoff Frequency PW of the Prophet VS The Modulation page is accessible by clicking on the tab found in the screen on the right hand side of the Prophet VS It allows you to set The SOURCES vertically are LFO1 LFO2 PRESSURE VELOCITY KEYBOARD FILT ENVELOPE AMPL ENVELOPE MODULATION WHEEL JOYSTICK X JOYSTICK Y The DESTINATIONS horizontally ...

Page 64: ...FO2 AMOUNT VS VOLUME AMPL ENVELOPPE PANORAMIC Modulation connections are made by clicking on the white points placed at the intersections between a source and a destination An orange insert appears in their place when the connection is made Matrix Modulation Click on the white points to add a modulation connection ...

Page 65: ... to the densest in the Ensemble style that is often present on analog machines RATE setting knob for the chorus frequency DEPTH setting for the modulation of depth DRY WET balance between the sound with and without effect TYPE selection buttons for the three types of chorus The chorus 5 2 10 2 The Delay The Delay module has Two knobs Time Left and Time Right to set the duration of the repetition o...

Page 66: ...MODES tab The GLIDE mode progressively changes the oscillator frequencies each time a new note is activated VOLUME setting for the general volume of the Prophet VS TUNE setting for the general tuning of the synthesizer UNISON starts unison mode V DETUNE setting to detune the polyphonic voices HOLD button to start the hold mode LEGATO allows one to play in a legato style can be activated only in th...

Page 67: ... the wheel is kept in the memory of the preset 5 3 PROPHET Hybrid This interface uses both synthesizers at the same time in order to create diverse and unheard sounds It can be opened by clicking on the Hybrid button found on the tool bar You will find all the parameters included on both of the synthesizers and described in the paragraphs below In this chapter we will concentrate primarily on the ...

Page 68: ...ersections between a source and a destination A orange insert appears at these points when the channels are connected 5 3 1 1 Types of oscillators To select the oscillators click on the panel corresponding to one of the four sources A B C and D to make the menu offering oscillator choices appear The different Sources available SOURCE A OSC A VS or OSC A P5 SOURCE B OSC B VS or OSC B P5 SOURCE C OS...

Page 69: ...tion of the filter Pro VS to the filter Pro 5 5 3 1 3 Connection of noise of the Prophet 5 to the filters The noise module of the Prophet 5 can be routed to the Prophet VS filter the Prophet 5 filter or to the two serial connections Noise Module connection to the Pro VS filter 5 3 1 4 Audio Output connection to the Prophet 5 and VS filters These connections can be used without an active oscillator...

Page 70: ...lation present on the Prophet VS Here is a complete list of sources and modulation destinations present in this matrix The SOURCES vertically are LFO1 Pro VS LFO2 Pro VS PRESSURE Pro VS VELOCITY Pro VS KEYBOARD Pro VS FILT ENVELOPE Pro VS AMPL ENVELOPE Pro VS MODULATION WHEEL Pro VS JOYSTICK X Pro VS JOYSTICK Y Pro VS LFO PROPHET 5 FILT ENV PROPHET 5 AMPL ENV PROPHET 5 The DESTINATIONS horizontall...

Page 71: ...rom the Hybrid to Prophet 5 alone for example the settings of the audio connection matrix will change radically You will no longer hear the Prophet VS because its audio connection will be automatically cut However it will be reactivated when you pass from the Prophet 5 alone to the 5 VS When it returns you will find the parameters of the Prophet VS that you left still intact in the Hybrid Interfac...

Page 72: ...musicians alike This is due to the simplicity with which complex sounds can be created over the more unwieldy forms of synthesis techniques such as additive or granular to name but two As a basic overview to subtractive synthesis one may consider any sound created either in nature or on your synthesizer of choice as consisting of a number of sine waves or harmonics grouped together In subtractive ...

Page 73: ...eral oscillators simultaneously due to difference in frequencies between the oscillators The waveform which determines the harmonic richness of the audio signal On the Prophet V 6 waveforms are available The saw tooth presents the richest audio signal of the 3 waveforms it contains all of the harmonics at decreasing volume levels in high frequencies Its sound is ideal for brass sounds percussive b...

Page 74: ...at of the saw tooth wood sounds clarinet if the square signal is a little filtered etc The triangle can be considered like a very filtered and soft square signal It is very low in harmonics odd only and will be very useful for creating sub basses flute sounds etc Triangle ...

Page 75: ...m change Waveforms of the PROPHET 5 An example of a PROPHET VS waveform The synchronization of an oscillator with another creates more complex waveforms If for example you synchronize oscillator2 with oscillator1 oscillator2 will restart a new period every time the first oscillator completes its period even if oscillator2 has not fully completed its current cycle this signifies that it is not tune...

Page 76: ...ing for enharmonic sonorities like bell sounds or special effects for example The Noise Module The noise signal spectrum has all frequencies at an equal volume level often referred to as white noise For this reason the noise module is used to create different noises like the imitation of wind or special effects White noise is the richest of noises Pink noise is also regularly present on synthesize...

Page 77: ... and B and of the noise generator The mixer doesn t have a modulation input so the settings are done manually The Mixer of the Prophet 5 The Mixer of the Prophet VS as in the Prophet 5 this mixer sets the volume of the four oscillators of the Prophet VS The mix is done with a joystick which moves between four points within a diamond shape Each point A B C or D corresponds to the maximum volume of ...

Page 78: ...low frequencies of a sound The removal of undesirable frequencies at the cut off frequency is not done suddenly but progressively depending on the filtering slope This filtering slope is expressed in decibels per octave or dB Oct The filters used in classic analog synthesizers have 24 dB Oct or 12 dB Oct slopes The Prophet V offers several types of slope The removal of undesirable frequencies at t...

Page 79: ...rophet VS proposes other types of complementary filtering High Pass Filter HP Filter The high pass filter acts symmetrically to that of the low pass filter It eliminates frequencies below the cut off frequency High Pass Resonant Filter Band Pass Filter BP Filter The band pass filter is the combination of a low pass filter and a high pass filter it eliminates the frequencies found on either side of...
Page 80: ...f frequency the resonance you will also find it called emphasis or Q for Quality of filtering The resonance amplifies frequencies close to the cut off frequency The other frequencies remaining are either unchanged below the cut off frequency or reduced above the cut off frequency On the Prophet V you can increase the rate of resonance through the emphasis knob When you increase the resonance the f...

Page 81: ...by tuning the cut off frequency of the filter with the frequency of the oscillators The filter settings of the Prophet 5 6 1 4 The amplifier or VCA The amplifier Voltage Controlled Amplifier receives the audio signal coming from the filter or directly from the oscillator if it is not being filtered to be adjusted before the volume is sent to the speakers The Prophet 5 VCA In conclusion here is a d...

Page 82: ...ey is pressed and stop it when released Secondly for the notes to tune correctly to the notes of the keyboard you must apply a keyboard following modulation replacing the 1volt octave control present on most analogic synthesizers If you do not use a MIDI keyboard you can also play on the virtual keyboard of the Prophet V but your sequencer will not record those actions it is for auditioning preset...

Page 83: ...ter envelope only the LEVEL and the RATE Point 0 only has the LEVEL parameter ADSR envelope of the Prophet 5 The Prophet VS envelope 6 2 3 The low frequency oscillator The LFO Low Frequency Oscillator or LFO on the Prophet V possesses more or less the same characteristics of the classic oscillator but it only produces frequencies lower than 20 Hz In other words you won t hear the pitch of its soun...

Page 84: ...cy of an oscillator would produce a vibrato effect With an LFO sinusoid wave modulating the cut off frequency of a lightly resonant low pass filter you will obtain a wah wah effect Le LFO in vibrato The LFO module of the Prophet 5 The original Prophet 5 could also use the second oscillator for low frequencies LOFREQ position to modulate the frequency of oscillator A or the cutoff frequency of the ...

Page 85: ...onic noise atonal sounds basic wave forms sources and allow you to enrich the sonic pallet offered in the Prophet 5 while remaining complementary 6 4 Modules of Prophet V The essential elements of the Prophet V consist of 6 oscillators two for the Prophet 5 and four for the Prophet VS 1 noise module 1 mixer mixing the 4 oscillators and the noise module to the filters of the Prophet 5 and VS 2 filt...

Page 86: ...u will begin with a basic preset In this example the secrets of the modulation matrix and mixing the oscillators will be revealed The third section allows you to create a rich and evolving sound from the association between the two synthesizers 7 1 Brass Preset with the Prophet 5 To begin we will learn how to program a basic polyphonic sound It is composed of four primary elements two oscillators ...

Page 87: ...w the filter increase the attack time to about 40ms Lower the Decay value to about 200ms and the sustain to around 0 25 The duration becomes shorter Settings of the filter envelope Save the sound under the name brass1 You can reuse it later To do that click on the Save as button then choose the option new bank at the bottom of the menu Give a name to the bank for example brass then to the preset b...

Page 88: ...the filter sections and lower the volume of oscillator B completely by turning the level knob fully anti clockwise Oscillator B will be used in low frequency mode to modulate the cutoff frequency of the filter and we do not want it to produce a sound through the audio mixer Lower the volume of oscillator B on the mixer On oscillator A choose the square wave form Choose the same form for oscillator...

Page 89: ...he Poly Mod You ll notice that the oscillation frequency varies following the note played This is due to the fact the frequency of oscillator B follows the keyboard The lower the note played the slower the oscillation and inversely the sharper the note the faster the oscillation If you do not wish to have this variation deactivate the keyboard following by clicking on the button KBD Deactivate the...

Page 90: ...he button Chorus then Effect Edit Choose the EFFECTS button to edit the chorus Set the Dry Wet knob of the chorus in order to balance the Dry sound and the return effect Set the Dry Wet knob of the chorus Next turn the Rate knob of the chorus to set the speed of the oscillations Finally set the Depth of the chorus You have the choice between three types of chorus Chorus 1 2 and 3 These three varia...

Page 91: ...face by clicking on the PRO VS button found in the utility bar Open the Prophet VS interface Choose the Preset ProVS Templates 4_Osc_Saw as a starting point This Preset constitutes 4 oscillators using the No 33 wave form saw tooth 1 low pass filter 1 amplifier The envelope associated to the filter The envelope associated to the amplifier The mix joystick of the oscillator volume To start we re goi...

Page 92: ...d perception of the richness of wave table synthesis Move the joystick between points A B C and D Lower the value of the filter s cutoff frequency Place it in the central position at around 45 Lower the value of the filter s cutoff frequency to 45 Most of the values and envelope points of the Prophet VS range from 0 to 99 A few of the values are doubled with the values indicated in Hertz frequency...

Page 93: ... the filter envelope click on the EDIT button found just underneath it The editing interface appears on the LDC screen at the right hand side of the screen you also have access to this interface by clicking directly on the menu ENVELOPE FILTER in the same screen Click on the EDIT button Click on the menu ENVELOPE FILTER Editing the filter envelope Increase the LEVEL of point 0 to a value around 22...

Page 94: ...he cutoff frequency will softly evolve creating a brighter sound after three seconds The phase between points 0 and 1 corresponds to the ATTACK of the ADSR envelope Adjust the settings associated to point 1 Set point 2 by increasing the LEVEL to a value around 70 and the RATE to about 300ms This phase corresponds to the DECAY period of the ADSR envelope Set point 2 ...

Page 95: ...t point 3 Finally adjust the settings to point 4 place the LEVEL to 0 and the RATE to about 3000ms The cutoff frequency is going to fall progressively to about 0 at the not release The phase between points 3 and 4 is called the RELEASE on the ADSR envelope Set point 4 Now let s work with the amplitude envelope Click on the menu ENVELOPE AMPLIFIER Point 0 must be set at the maximum initial level Va...

Page 96: ... the values associated to points 2 and 3 level 99 and rate 1000 ms This corresponds to a maximum Sustain level for the duration of the note Define the values associated to points 2 and 3 Finally adjust the setting of point 4 the LEVEL remains at the 0 value Set the RATE to about 1300ms The sound volume is going to fall progressively at the note release ...

Page 97: ... to select the polyphonic voice 1 Set the PAN knob on 0 This voice will be placed to the extreme left The settings of the voice 1 Choose the second voice and set it to 99 This will be placed to the extreme right The settings of the voice 2 Set the other three voices at your convenience by repeating the same steps By doing this your sound will have a lot of stereo space without using as many effect...

Page 98: ... frequency will cease really softly at the release of the note For the amplitude envelope choose a RATE around 2500ms This will be the release period Mixing the four oscillators happens in two steps Choose the position of the 5 points constituting the path the joystick will follow from 0 the beginning of the note to 4 final point of the movement and release of the note Setting of the four movement...

Page 99: ... only shows the duration setting of each phase of the mix Each of the four knobs found under the joystick is used to set the rate at which the joystick will go from one point to another in the mix From 0 to 1 Knob 1 From 1 to 2 Knob 2 From 2 to 3 Knob 3 From 3 to 4 Knob 4 Setting the Knobs For the first choose 1000ms For the second 500ms For the third 800ms For the fourth 1000ms Setting the Knobs ...

Page 100: ...ou to create a cyclical variation of the mix between the oscillators a bit like an LFO would do it 0 3 1 3 2 3 Or 0 3 1 3 2 3 In this example select the mode 0 3 in the LOOP tab found in the LCD screen Repeat the loop by clicking in the REPEAT tab and choosing the C option infinite loop The loop settings 7 4 3 Modulation Matrix In this section we will see how to use the modulation matrix It is wit...

Page 101: ...horizontal line Click in the panel and scroll the mouse up for the minimum value 0 Set the modulation rate in the AMOUNT panel Connect the modulation wheel source MOD WHEEL to the modulation rate of the LFO1 destination LFO1 AMNT This allows you to make the LFO activity appear progressively by increasing the modulation wheel Set the rate of this modulation at 50 The modulation wheel settings The k...

Page 102: ...ar to that of a chorus For this turn the V DETUNE knob to 80 Settings of Unison Mode At this point you can also give stereo space to this preset by placing each of the polyphonic voices to the right and than to the left in an alternating pattern Click on the VOICE panel found to the right of the name AMPLIFIER to select the polyphonic voice 1 Set the PAN knob on 0 This voice will be placed to the ...

Page 103: ...ters of the both Prophets either in a series or in parallel In doing so you will discover the large difference in sound between the two For this example you will connect the audio paths of the two filters in a series To do this click on the switch found at the interception of the mixer source output of the two oscillators SOURCE MIXER and of the VS filter FILTER VS The switch will release and beco...

Page 104: ...ers simultaneously 7 5 2 Editing sound on the Prophet VS The sound of the Prophet 5 remains unchanged on this preset so we will go on directly to editing the Prophet VS Begin by changing the type of filter Choose the BAND PASS to better complement the low pass filter of the Prophet 5 Lightly decrease the cutoff frequency of the filter to about 35 in order to have a less aggressive sound Completely...

Page 105: ...30 and a RATE a bit longer 479 The cutoff frequency falls again towards the intermediate point before coming to the SUSTAIN phase Finally set point 4 with a level slightly higher than before 63 and a RATE a bit longer 600 The cutoff frequency will increase slowly at the release of the note Settings of the Filter envelope Now we ll set the amplifier envelope Point 0 must be set on the maximum initi...

Page 106: ... button found in the utility bar to activate it and open the EFFECTS by clicking on the button found in the LCD screen The Delay gives a type of stereo echo which adds space to your sound It has independent settings for the speed and the number of repetitions on the right and left side It is thus possible to create a large range of rhythmic combinations between the repetitions The speed of the Del...

Page 107: ...d present very different levels of difficulty We hope that they permit you to discover a portion of the possibilities that the Prophet V offer Don t hesitate to experiment on your own it is in this way that you will make the most progression and that you will create the most original of sounds ...

Page 108: ...uria Prophet V and choose Prophet V On a Macintosh open the folder Applications Arturia Prophet V and double click on the application icon Prophet V You can also double click on a previously saved document in order to open the corresponding configuration of the Prophet V application This will be described in Section 1 6 of this document 8 1 2 Preference Configuration In order to access the prefere...

Page 109: ...ose the fader control mode of the instrument With linear control the mouse is moved vertically to assure the fader rotation with circular control the mouse must trace an arc around the fader in order to modify the knob position on screen 8 1 3 Instrument configuration utility bar Each instrument carries a utility bar allowing routing of MIDI input channel range and transpose parameters as well as ...

Page 110: ...ation menu window CPU or by choosing Command L Attention this reading only shows CPU usage per instance of the Prophet V therefore it is only part of the overall usage of the system 8 1 5 Saving the configuration Saving allows you to not only keep the state of an instrument but also the tonal parameters as well as the MIDI configuration and audio routing To save a configuration simply select the d...

Page 111: ...ophet V plug ins is the same as opening all other VST plug ins Please consult the instruction manual of your host sequencer for more specific information Under Cubase SX open the menu VST Instruments and choose Prophet V in the rack Prophet 5 opening in Cubase SX3 Connection to a MIDI track So that Prophet V can play information coming from a MIDI track you have to choose a MIDI track and select P...

Page 112: ...e Prophet V will load the P1 preset and the modifications The drop down menu which the VST sequencer allows you to save a new voice is of course usable with Prophet V However it is highly advised to use the Prophet V internal menu the presets saved in this way are usable in any other mode standalone or other sequencer they can be exported and exchanged more easily and they will remain compatible w...

Page 113: ...n 7 there has been an Audio Unit plug in manager in Logic To launch it click on the menu Preferences Start Logic AU Manager Launching of the Audio Unit manager of Logic This Manager allows us to see the list of the available plug ins to test their compatibility with Logic and to activate or de activate them If it happens that one of the Arturia plug ins poses a problem in Logic start by checking t...

Page 114: ...n the folder reserved for the Pro Tools plug ins in Library Application Support Digidesign Plug Ins On Windows at the time of the installation procedure select the RTAS plug in among the proposed choices of plug ins Then when the system asks indicate the folder in which the other RTAS plug ins are located Usually its access path is C Program Files Common Files Digidesign DAE Plug Ins 8 4 2 Utiliza...

Page 115: ...is able to be used with Prophet V like with all other plug ins Nevertheless it is highly recommended to use the internal Prophet V menu with the presets saved like this they are usable no matter which mode standalone or other sequencer and they can be exported exchanged more easily and will stay compatible with the future versions of Prophet V Automation under Pro Tools The automation function wit...

Page 116: ...ar The Synth Rack window will then appear In order to make the graphic interface of Prophet V appear double click on its name in the Synth Rack window Connection to a MIDI track In order that Prophet V can play the information coming from a MIDI track choose a MIDI track and select Prophet V as shown below Connecting to a MIDI track in Prophet V MIDI events can now play through to the Prophet V vi...

Page 117: ...you were working on the preset P1 at which time you modified the parameters without saving them in the plug itself the next time you opened the piece Prophet V would load the preset P1 plus the modifications Automation Automation with Sonar functions simply by the reception and saving of MIDI Control Change messages See your Sonar documentation for more details on the plug in automation ...

Reviews: