


<EN>
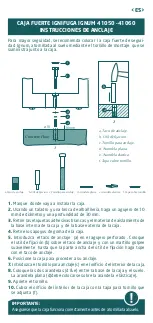
FIREPROOF SAFE –IGNUM 41050 -41060
MOUNTING INSTRUCTIONS
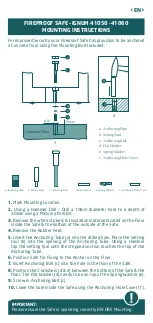
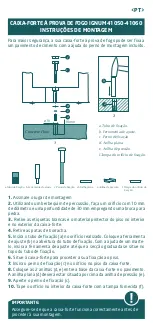
a. Anchoring Pipe
b. Setting Tool
c. Anchoring Bolt
d. Flat Washer
e. Spring Washer
f. Anchoring Hole Cover
c
f
b
d
e
a
a
30mm
ø10
2
1
a.Anchoring Pipe
b.Setting Tool
c.Anchoring Bolt
d.Flat Washer
e.Spring Washer
f. Anchoring Hole Cover
Concrete Floor
1. Mark Mounting Location.
2. Using a Hammer Drill – Drill a 10mm diameter hole to a depth of
30mm using a Masonry Drill Bit.
3. Remove the white stickers & Insulation material located on the Floor
inside the Safe & the bottom of the outside of the Safe.
4. Remove the Rubber Feet.
5. Insert the Anchoring Tube (a) into the drilled hole, Place the setting
tool (b) into the opening of the Anchoring Tube. Using a Hammer
tap the setting tool until the stepped section touches the top of the
Anchoring Tube.
6. Position Safe for Fixing to the Anchor on the Floor.
7. Insert Anchoring Bolt (c) into the hole in the floor of the Safe.
8. Position the 2 Washers (d & e) between the bottom of the Safe & the
floor. The Flat Washer (d) needs to be on top of the Spring Washer (e).
9. Screw in Anchoring Bolt (c).
10. Cover the hole inside the Safe using the Anchoring Hole Cover (f ).
IMPORTANT:
Please ensure the Safe is operating correctly BEFORE Mounting.
For improved Security your Fireproof Safe has provision to be anchored
a Concrete floor using the Mounting Bolt Included.
Summary of Contents for IGNUM 41050
Page 26: ...GR B 1 READY 1234 4 LR6 AM3 AA 1 5V A B IGNUM 1 2 3 4 5 1 6 5 3 2 IGNUM 5...
Page 27: ...GR READY C D B 2 4 8 1234 OPEN B 3 1234 D B 4 4 C...
Page 28: ...GR D 1 1234 OPEN 4 8 INTO D 2 1234 OPEN 4 8 INTO D 8 0 8 0...
Page 29: ...GR ERROR 60 0 BELL ON E 14 OPEN 0 PASS1 0 LO BATTE B 4 LR6 AM3 AA 1 5V F G...
Page 30: ...GR 24 23 2003 10 ABSS 12 6 ABSS IMPORTANTE...
Page 31: ...GR 1 2 10mm 30mm 3 4 5 6 7 8 2 9 10 30mm 10 2 1...
Page 32: ...www arregui es...


