Arregui IGNUM 41050 Instruction Manual And Guarantee Download Page 3

<EN>

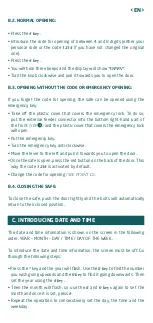
B.2. NORMAL OPENING:

• Press the 

# key

.

• Introduce the code for opening of between 4 and 8 digits (either your 

personal code or the code 

1234

 if you have not changed the original 

one). 

• Press the 

# key

.

• You will hear three beeps and the display will show 

”OPEN”

.

• Turn the knob clockwise and pull it towards you to open the door.

B.3. OPENING WITHOUT THE CODE OR EMERGENCY OPENING:

If you forget the code for opening, the safe can be opened using the 
emergency key.
•  Take  off  the  plastic  cover  that  covers  the  emergency  lock.  To  do  so, 

put the external feeder connector into the bottom right-hand part of 
the front 

(SEE    )

 and the plastic cover that covers the emergency lock 

will open.

• Put the emergency key. 
• Turn the emergency key anti-clockwise.
• Move the lever to the left and pull it towards you to open the door.
• Once the safe is open, press the red button on the back of the door. This 

way the code 

1234

 is activated by default.

• Change the code for opening

 (SEE POINT D)

.

B.4. CLOSING THE SAFE:

To close the safe, push the door tightly and the bolts will automatically 
return to their closed position. 

4

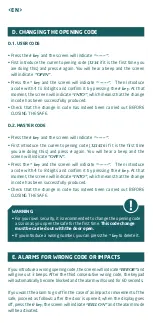
The date and time information is shown on the screen in the following 
order: YEAR – MONTH – DAY / TIME / DAY OF THE WEEK.

To introduce the date and time information, the screen must be off. Go 
through the following steps:

• Press the 

*

 key and the year will flash. Use the 

8 key

 to find the number 

you wish going upwards and the 

0 key

 to find it going downwards. Then 

set the year using the 

# key

• Then the month will flash, so use the 

8

 and 

0 keys

 again to set the 

month and once it is set, press 

#

.

• Repeat the operation to consecutively set the day, the time and the 

weekday.

C. INTRODUCING DATE AND TIME

Summary of Contents for IGNUM 41050

Page 1: ...safe ES Manual de instrucciones y garant as de la caja fuerte IGNUM 41050 41060 PT Manual de instru es e garantia da caixa forte IGNUM 41050 41060 IT Manuale di istruzioni e garanzia della cassaforte...

Page 2: ...in the back compartment Open the compartment to install the batteries at the back of the door and place 4 LR6 1 5V alkaline batteries AM3 AA taking into conside ration their polarity When the batterie...

Page 3: ...the lever to the left and pull it towards you to open the door Once the safe is open press the red button on the back of the door This way the code 1234 is activated by default Change the code for op...

Page 4: ...ode with 4 to 8 digits and confirm it by pressing the key At that moment the screen will indicate INTO which means that the change in code has been successfully produced Check that the change in code...

Page 5: ...the screen indicates LO BATTE the batteries have to be changed for the safe to function properly If the safe is closed it can be opened in two ways by using the external feeder or the emergency key se...

Page 6: ...pacts and falls are excluded from the guarantee The repair or substitution of any part due to a fault implies a 6 month exten sion to the guarantee of the part repaired or substituted ABSS will accept...

Page 7: ...bber Feet 5 Insert the Anchoring Tube a into the drilled hole Place the setting tool b into the opening of the Anchoring Tube Using a Hammer tap the setting tool until the stepped section touches the...

Page 8: ...ujando la maneta hacia usted Retire el alimentador externo una vez abierta la puerta Puede utilizar esas mismas pilas para colocarlas en el compartimento trasero Abra el compartimento para instalar la...

Page 9: ...IGO O APERTURA DE EMERGENCIA En caso de olvido del c digo de apertura se puede abrir la caja mediante la llave de emergencia Retire la cubierta de pl stico que tapa la cerradura de emergencia Para ell...

Page 10: ...ulse de nuevo Escuchar un pitido y la pantalla indicar OPEN Pulse la tecla y la pantalla indicar Introduzca entonces un c digo de 4 a 8 d gitos y conf rmelo pulsando la tecla En ese mo mento la pantal...

Page 11: ...a puerta de la caja fuerte introduciendo el c digo de apertura Cuando desaparece OPEN de la pantalla pero sta contin a de color azul pulse la tecla 0 Aparecer en pantalla PASS1 y a continuaci n la fec...

Page 12: ...icas golpes y ca das La reparaci n o sustituci n por aver a de cualquier pieza implica una pr rroga de 6 meses de la garant a de la pieza reparada o sustituida ABSS responder de las faltas de conformi...

Page 13: ...anclaje 7 Introduzca el tornillo para anclaje c en el orificio del interior de la caja 8 Coloque las dos arandelas d e entre la base de la caja y el suelo La arandela plana d debe colocarse sobre la...

Page 14: ...anete na sua direc o Retire o alimentador externo depois de abrir a porta Pode colocar as mesmas pilhas no compartimento traseiro Abra o compartimento para pilhas situado atr s da porta e introduza 4...

Page 15: ...BERTURA DE EMERG NCIA Em caso de esquecimento do c digo de abertura poss vel abrir a caixa forte com a chave de emerg ncia Retire a tampa de pl stico que cobre a fechadura de emerg ncia Para o fazer i...

Page 16: ...irme a sua selec o premindo a tecla No ecr aparecer a indica o INTO que significa que a modifica o do c digo de abertura se realizou correctamente ANTES DE FECHAR A CAIXA comprove que o c digo de aber...

Page 17: ...PASS1 e a seguir a indica o da data e da hora da ltima abertura da caixa al m do c digo utilizado para a sua abertura Continue a premir a tecla 0 para consultar os dados relativos s ltimas opera es de...

Page 18: ...tr ficas golpes e quedas A repara o ou a substitui o de qualquer pe a em caso de avaria implica uma prorroga de 6 meses da garantia aplic vel pe a reparada ou substitu da ABSS responder pelas faltas d...

Page 19: ...a fixa o ao piso 7 Insira o perno de fixa o c no orif cio no piso da caixa forte 8 Coloque as 2 anilhas d e entre a base da caixa forte e o pavimento A anilha plana d dever estar situada por cima da a...

Page 20: ...ando la manopola verso di s Una volta aperta la porta staccare l alimentatore esterno Le stesse pile possono essere usate per il comparto posteriore Per inserire le pile aprire il comparto che si trov...

Page 21: ...RA DI EMERGENZA In caso di dimenticanza del codice di apertura possibile aprire la cas saforte con la chiave di emergenza Rimuovere il rivestimento in plastica dalla serratura di emergenza In troducen...

Page 22: ...subito il codice attuale di apertura 1234 se la prima volta e digitare nuovamente Si udir un suono e lo schermo visualizzer la scritta OPEN Digitando sulla tastiera lo schermo indicher Inserire quindi...

Page 23: ...Aprire la porta della cassaforte inserendo il codice di apertura Una volta scomparso OPEN dallo schermo quest ultimo resta di colore azzurro quindi digitare 0 Sullo schermo apparir PASS1 e di seguito...

Page 24: ...atastrofiche colpi e cadute La riparazione o sostituzione per avaria di un pezzo implica una proroga di 6 mesi della garanzia del pezzo riparato o sostituito ABSS risponder di mancanze di conformit de...

Page 25: ...ancoraggio sul pavimento 7 Inserire vite di ancoraggio c nel foro sul pavimento della cassaforte 8 Posizionare le 2 rondelle d e tra la parte inferiore della cassaforte e il pavimento La rondella pian...

Page 26: ...GR B 1 READY 1234 4 LR6 AM3 AA 1 5V A B IGNUM 1 2 3 4 5 1 6 5 3 2 IGNUM 5...

Page 27: ...GR READY C D B 2 4 8 1234 OPEN B 3 1234 D B 4 4 C...

Page 28: ...GR D 1 1234 OPEN 4 8 INTO D 2 1234 OPEN 4 8 INTO D 8 0 8 0...

Page 29: ...GR ERROR 60 0 BELL ON E 14 OPEN 0 PASS1 0 LO BATTE B 4 LR6 AM3 AA 1 5V F G...

Page 30: ...GR 24 23 2003 10 ABSS 12 6 ABSS IMPORTANTE...

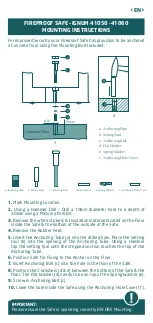
Page 31: ...GR 1 2 10mm 30mm 3 4 5 6 7 8 2 9 10 30mm 10 2 1...

Page 32: ...www arregui es...

Reviews: