


<EN>
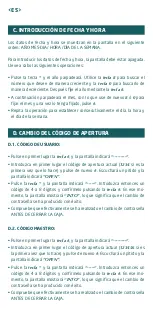
D.1. USER CODE
• Press the
# key
and the screen will indicate
“-------”
.
• First introduce the current opening code (
1234
if it is the first time you
are doing this) and press
#
again. You will hear a beep and the screen
will indicate
”OPEN”
.
• Press the
* key
and the screen will indicate
“-------”
. Then introduce
a code with 4 to 8 digits and confirm it by pressing the
# key
. At that
moment, the screen will indicate
“INTO”
, which means that the change
in code has been successfully produced.
• Check that the change in code has indeed been carried out BEFORE
CLOSING THE SAFE.
D.2. MASTER CODE
• Press the
# key
and the screen will indicate
“-------”
.
• First introduce the current opening code (
123456
if it is the first time
you are doing this) and press
#
again. You will hear a beep and the
screen will indicate
”OPEN”
.
• Press the
* key
and the screen will indicate
“-------”
. Then introduce
a code with 4 to 8 digits and confirm it by pressing the
# key
. At that
moment, the screen will indicate
“INTO”
, which means that the change
in code has been successfully produced.
• Check that the change in code has indeed been carried out BEFORE
CLOSING THE SAFE.
If you introduce a wrong opening code, the screen will indicate
“ERROR”
and
will give out 3 beeps. After the third consecutive wrong code, the keypad
will automatically become blocked and the alarm will sound for 60 seconds.
If you want the alarm to go off in the case of an impact or movement of the
safe, proceed as follows: after the door is opened, when the display goes
off, press the
0 key
; the screen will indicate
“BELL ON”
and the alarm mode
will be activated.
D. CHANGING THE OPENING CODE
E. ALARMS FOR WRONG CODE OR IMPACTS
WARNING:
• For your own security, it is recommended to change the opening code
as soon as you open the safe for the first time. This code change
must be carried out with the door open.
• If you introduce a wrong number, you can press the
* key
to delete it.
Summary of Contents for IGNUM 41050
Page 26: ...GR B 1 READY 1234 4 LR6 AM3 AA 1 5V A B IGNUM 1 2 3 4 5 1 6 5 3 2 IGNUM 5...
Page 27: ...GR READY C D B 2 4 8 1234 OPEN B 3 1234 D B 4 4 C...
Page 28: ...GR D 1 1234 OPEN 4 8 INTO D 2 1234 OPEN 4 8 INTO D 8 0 8 0...
Page 29: ...GR ERROR 60 0 BELL ON E 14 OPEN 0 PASS1 0 LO BATTE B 4 LR6 AM3 AA 1 5V F G...
Page 30: ...GR 24 23 2003 10 ABSS 12 6 ABSS IMPORTANTE...
Page 31: ...GR 1 2 10mm 30mm 3 4 5 6 7 8 2 9 10 30mm 10 2 1...
Page 32: ...www arregui es...


