Armstrong Air 4SHP16LS Series Installation Instructions Manual Download Page 10

506860-03

Issue  1946

Page 10 of 27

A - 

Open both manifold valves and start the vacuum pump.

B - 

NOTE - During the early stages of evacuation, it is desirable to close the manifold gauge valve at least once. A rapid rise in pressure

indicates a relatively large leak. If this occurs, 

repeat the leak testing procedure.

NOTE - The term absolute pressure means the total actual pressure above absolute zero within a given volume or system. Absolute

pressure in a vacuum is equal to atmospheric pressure minus vacuum pressure.

C - 

When  the  absolute  pressure  reaches  23,000  microns (29.01 inches of

mercury), perform the following:

Close manifold gauge valves.
Close valve on vacuum pump.
Turn off vacuum pump.
Disconnect manifold gauge center port hose from vacuum pump.
Attach  manifold  center  port  hose  to  a  nitrogen  cylinder  with  pressure

regulator set to 150 psig (1034 kPa) and purge the hose.
Open manifold gauge valves to break the vacuum in the line set and indoor

unit.
Close manifold gauge valves.

D - 

Shut off the nitrogen cylinder and remove the manifold gauge hose from the cylinder. Open the manifold gauge valves to release the

nitrogen from the line set and indoor unit.

E - 

Reconnect the manifold gauge to the vacuum pump, turn the pump on, and continue to evacuate the line set and indoor unit until the

absolute pressure does not rise above 500 microns (29.9 inches of mercury) within a 20-minute period after shutting off the vacuum pump

and closing the manifold gauge valves.

F - 

When the absolute pressure requirement above has been met, disconnect the manifold hose from the vacuum pump and connect it to a

cylinder of HFC-410A positioned to deliver liquid refrigerant. Open the manifold gauge valve 1 to 2 psig in order to release the vacuum in the

line set and indoor unit.

G - 

Perform the following:

Close manifold gauge valves.
Shut off HFC-410A cylinder.
Reinstall service valve cores by removing manifold hose from service valve. Quickly install cores with core

tool while maintaining a positive system pressure.
Replace stem caps and finger tighten them, then tighten an additional one-sixth (1/6) of a turn as illustrated.
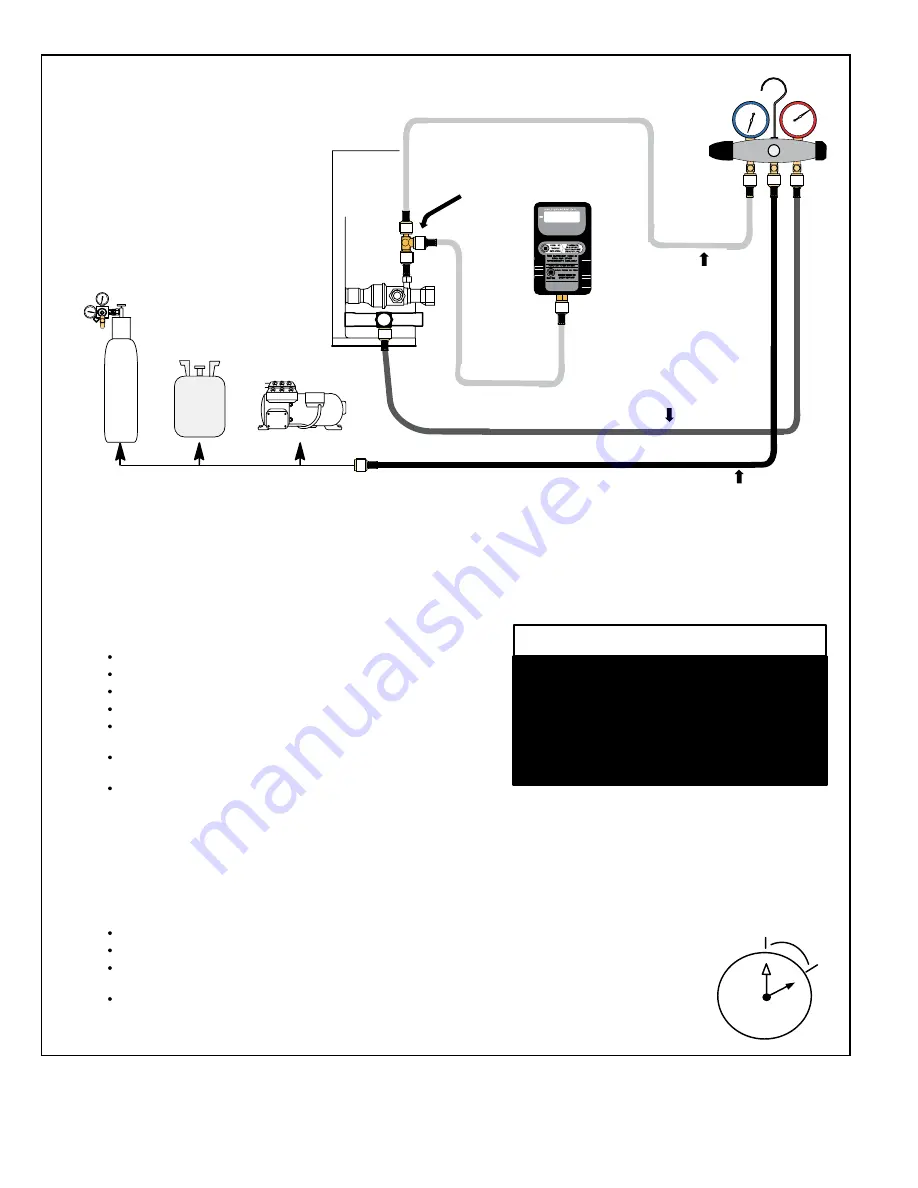
OUTDOOR

UNIT

TO VAPOR

SERVICE VALVE

TO LIQUID LINE

SERVICE VALVE

MICRON

GAUGE

VACUUM PUMP

1/4 SAE TEE WITH SWIVEL

COUPLER

500

MANIFOLD

GAUGE SET

HFC-410A

RECOMMEND

MINIMUM 3/8” HOSE

A - 

Connect low side of manifold gauge set with

1/4 SAE in-line tee to 

vapor 

line service valve

B - 

Connect high side of manifold gauge set to

liquid 

line service valve

C - 

Connect available micron gauge connector

on the 1/4 SAE in-line tee.

D - 

Connect the  vacuum pump (with vacuum

gauge)  to  the  center  port  of  the  manifold

gauge set. The center port line will be used

later for both the HFC-410A and nitrogen

containers.

HIGH

LOW

1

2

3

4

5

6

7

8

9

10

11 12

1/6 TURN

NITROGEN

3

CONNECT GAUGE SET

A

B

C

D

4

EVACUATE THE SYSTEM

NOTE - Remove cores from service valves (if not already done).

Possible equipment damage.
Avoid deep vacuum operation. Do not use

compressors  to  evacuate  a  system.

Extremely low vacuum can cause internal

arcing  and  compressor  failure.  Damage

caused  by  deep  vacuum  operation  will

void warranty.

WARNING !

EVACUATION

H - 

Open suction service valve first before liquid valve to release the unit charge into the system. Replace valve

caps and tighten (8 ft. lb.). Caps are the primary seal.

Evacuate the line set and indoor unit until a slight vacuum is indicated on the micron gauge (approximately 23,000 microns or 

29.01 inches of mercury).

NOTE - Position 

canister to deliver 

liquid refrigerant.

Summary of Contents for 4SHP16LS Series

Page 1: ...local codes in any way The installation must comply with all provincial state and local codes as well as the National Electrical Code U S or Canadian Electrical Code Canada Compliance should be determ...

Page 2: ...ing parts 4 Handle refrigerant with caution refer to proper MSDS from refrigerant supplier 5 Use care when lifting avoid contact with sharp edges Installation NOTE In some cases noise in the living ar...

Page 3: ...cted by a wall or other barrier Table 2 Clearances 30 around Control Box 24 6 NOTE See Table 2 for specific minimum clearance guidelines Figure 2 DO LOCATE THE UNIT With proper clearances on sides and...

Page 4: ...24 3 8 3 4 36 3 8 7 8 48 3 8 7 8 60 3 8 1 1 8 For installations exceeding 50 refer to long line set guidelines Be extra careful with sharp bends Tubing can kink very easily and if this occurs the enti...

Page 5: ...UNIT VAPOR LINE SERVICE VALVE VAPOR LIQUID 1 A B C D A Cylinder with clean R 410A positioned to deliver liquid refrigerant to the vapor service valve B Refrigerant gauge set low side to the liquid lin...

Page 6: ...hown Sensing bulb insulation is required if mounted external to the coil casing sensing bulb installation for bulb positioning STUB END TEFLON RING LIQUID LINE ASSEMBLY WITH BRASS NUT DISTRIBUTOR ASSE...

Page 7: ...ound Do not crimp end of the line Remove service cap and core from both the vapor and liquid line service ports 1 2 LIQUID LINE SERVICE VALVE SERVICE PORT CORE SERVICE PORT CAP SERVICE PORT CORE SERVI...

Page 8: ...ES POINT FLAME AWAY FROM SERVICE VALVE PREPARATION FOR NEXT STEP 7 WRAP SERVICE VALVES To help protect service valve seals during brazing wrap water saturated cloths around service valve bodies and co...

Page 9: ...of the manifold gauge set in order to pressurize the line set and the indoor unit E After a few minutes open one of the service valve ports and verify that the refrigerant added to the system earlier...

Page 10: ...id refrigerant Open the manifold gauge valve 1 to 2 psig in order to release the vacuum in the line set and indoor unit G Perform the following Close manifold gauge valves Shut off HFC 410A cylinder R...

Page 11: ...nch with a hex head extension to back the stem out counterclockwise as far as it will go Use a 3 16 hex head extension for liquid line service valves and a 5 16 extension for suction line service valv...

Page 12: ...ring 2 Ground unit at unit disconnect switch or to an earth ground To facilitate conduit a hole is in the bottom of the control box Connect conduit to the control box using a proper conduit fitting Un...

Page 13: ...OR AIR HANDLER RSBus RSBus OPTIONAL DISCHARGE AIR SENSOR COMFORT SYNCTM THERMOSTAT COMFORT SYNCTM ENABLED HEAT PUMP RSBus OPTIONAL OUTDOOR AIR SENSOR OPTIONAL DISCHARGE AIR SENSOR COMFORT SYNCTM ENAB...

Page 14: ...or varying lengths of line set refer to Table 4 for refrigerant charge adjustment A blank space is provided on the unit rating plate to list the actual field charge Table 4 Refrigerant Charge Adjustme...

Page 15: ...ocked out until power to the board is interrupted then re established or until the error is cleaned NOTE The control board ignores input from the low pressure switch terminals as follows During the TE...

Page 16: ...m the Comfort Sync thermostat must be used The complete configuration of the outdoor unit is performed using the Comfort Sync thermostat For complete details on how to integrate this unit into a Comfo...

Page 17: ...nication problem Hardware problem on the control Cycle power on control Replace if problem prevents service and is persistent Cleared 300 seconds after fault recovered E131 Corrupted control parameter...

Page 18: ...r unit blower motor dirty filters or clogged refrigerant filter Confirm that the evaporator coil is clean The alarm clears after a power rest E412 The outdoor unit pressure is above the required limit...

Page 19: ...ed by allowing the unit to run for 90 seconds before checking discharge sensor resistance If the discharge sensor resistance is not within range after 90 seconds the board will count one fault After 5...

Page 20: ...Hz Idle Mode Decimal point blinks at 1 Hz 0 5 second on 0 5 second off Display OFF Soft Disabled Top and bottom horizontal line and decimal point blink at 1 Hz Soft Disabled Top and bottom horizontal...

Page 21: ...650 pause A104 pause Outdoor Coil Temperature OCT Any time OCT is sensed in operating range value is displayed if unit is in diagnostic mode Following string is repeated if 2nd stage heat is active wi...

Page 22: ...minutes if coil temperature remains below terminate temperature or by pushing button down for less than 2 seconds Enter A test mode Display will string active error codes E ambient A coil c and disch...

Page 23: ...g procedure must be repeated Table 9 Configuring Unit Capacity Display Code Procedure Solid Pt Release push button Allows user to select type and number of stages on outdoor unit IMPORTANT Field repla...

Page 24: ...ent fins may affect unit operation SHARP OBJECT HAZARD Condenser coils have sharp edges Wear adequate body protection on body extremities e g gloves FAILURE TO FOLLOW THIS WARNING COULD RESULT IN BODI...

Page 25: ...t may engage auxiliary heat during the defrost cycle to satisfy a heating demand however the unit will run to normal operation at the conclusion of the defrost cycle In case of extended power outage I...

Page 26: ...506860 03 Issue 1946 Page 26 of 27 4SHP16LS124 36 48 Wiring Diagrams...

Page 27: ...506860 03 Issue 1946 Page 27 of 27 4SHP16LS160...

Reviews: