19
VESA Mounting for ARP-5542AX-E01 only
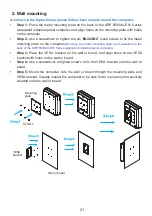
As shown in the figure below, please follow these steps to mount the display.
•
Step 1:
Place two VESA mounts on the back of the ARP-5542AX-E01 Series
waterproof industrial panel computer, and align holes on VESA mounts with the holes
on the display.
•
Step 2:
Use a screwdriver to tighten the eight “M8” sized screws to fix the VESA
mounts on the industrial panel computer.
•
Step 3:
Place one wall bracket on the wall or board, and align holes on the bracket
with holes on the wall or board.
•
Step 4:
Use a screwdriver to tighten screws and fix the wall bracket on the wall or
board.
•
Step 5:
Mount the ARP-5542AX-E01 industrial panel computer onto the wall or board
through the VESA mount and wall bracket.
VESA
Mounts
Step1
Step2
Step3
Step4
Step5
Screws
Summary of Contents for ARP-5500AX-E01 Series
Page 5: ...5 Product specifications ...
Page 6: ...6 ...
Page 9: ...9 ARP 5515AP E01 ...
Page 10: ...10 ARP 5517AP E01 ...
Page 11: ...11 ARP 5519AP E01 ...
Page 12: ...12 ARP 5521AP E01 ...
Page 13: ...13 ARP 5542AP E01 Power indicator ...
Page 33: ...33 5 Click Next to continue 6 Click Finish to complete the setup ...
Page 37: ...37 7 Click Finish to complete the setup ...
Page 39: ...39 3 Click Install to proceed with the installation 4 Click Finish to complete the setup ...
Page 41: ...41 3 Click Finish to complete the setup ...
Page 44: ...44 6 About Tab 4 Edge Compensation Tab 3 Display Tab 5 Hardware Tab ...


