


17
Mounting the computer
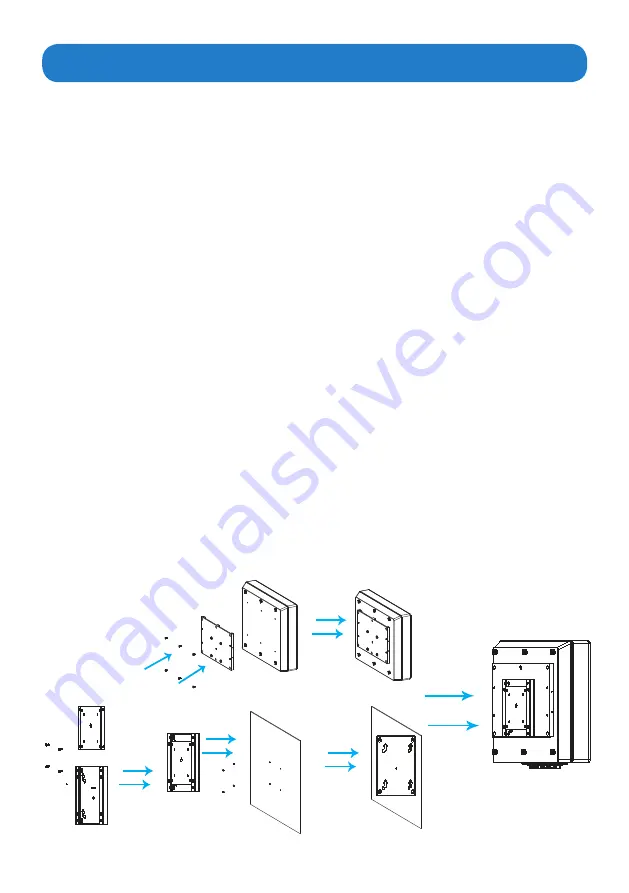
1. VESA Mounting
“VESA FDMI Standard” stands for Video Electronics Standards Association Flat Display
Mounting Interface Standard. The ARP-5500AX-E01 Series waterproof industrial panel
computer needs to be mounted on a VESA-compliant arm or bracket. And holes are pre-
drilled on the back of it.
As shown in the figure below, please follow these steps to mount the computer.
•
Step 1:
Place the metal mounting plate on the back of the ARP-5500AX-E01 Series
waterproof industrial panel computer, and align holes on the mounting plate with holes
on the computer.
•
Step 2:
Use a screwdriver to tighten the six “
#8-32UNC
” sized screws to fix the metal
mounting plate on the computer
(Generally, the metal mounting plate is pre-installed on the
back of the ARP-5500AX-E01 Series waterproof industrial panel computer.).
•
Step 3:
Place the metal board on the VESA bracket, and tightly bolt four screws to the
VESA bracket and metal board.
•
Step 4:
Place the VESA bracket with the metal board on the wall or board, and align
holes on the VESA bracket with holes on the wall or board.
•
Step 5:
Use a screwdriver to tighten screws and fix the VESA bracket on the wall or
board.
•
Step 6:
Mount the display onto the wall or board through the metal mounting plate and
VESA bracket. Ensure that the computer is securely situated onto the wall or board.
This section outlines how to mount the ARP-5500AX-E01 Series waterproof industrial panel
computer. There are five methods available: VESA Mounting, Wall Mounting, Benchtop
Stand Mounting, Pedestal Mounting and Ceiling Mounting. Users may choose any of the
five mounting methods to suit their needs.
Mounting
plate
Step1
Step2
Step3
Step4
Step5
Step6
Metal
board
VESA
Bracket
Wall or board
Screws
Summary of Contents for ARP-5500AX-E01 Series
Page 5: ...5 Product specifications ...
Page 6: ...6 ...
Page 9: ...9 ARP 5515AP E01 ...
Page 10: ...10 ARP 5517AP E01 ...
Page 11: ...11 ARP 5519AP E01 ...
Page 12: ...12 ARP 5521AP E01 ...
Page 13: ...13 ARP 5542AP E01 Power indicator ...
Page 33: ...33 5 Click Next to continue 6 Click Finish to complete the setup ...
Page 37: ...37 7 Click Finish to complete the setup ...
Page 39: ...39 3 Click Install to proceed with the installation 4 Click Finish to complete the setup ...
Page 41: ...41 3 Click Finish to complete the setup ...
Page 44: ...44 6 About Tab 4 Edge Compensation Tab 3 Display Tab 5 Hardware Tab ...


