background image

14

15

E

n

g

li

sh

TO PROGRAM A SPECIAL SEQUENCE

Press 

PROG 

on  the  remote  control  to  open  the ‘Programme’  menu. 

Note that playback must be stopped first.

DVD

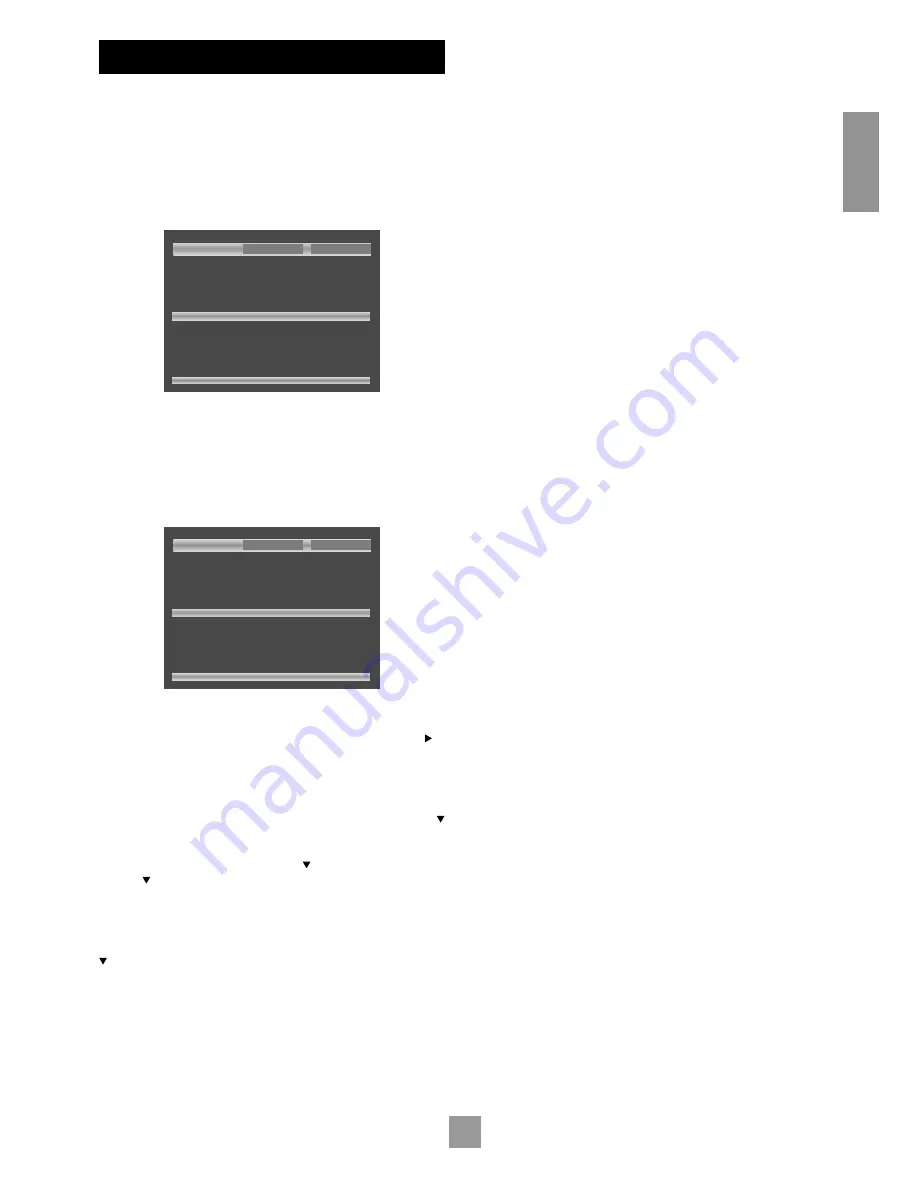
The  bottom  of  the  screen  shows  the  number  of  titles  present  on 
the  disc,  together  with  the  number  of  chapters  in  the  title  selected 
currently (or the first title if no title has yet been specified). Below this is 
an information line, giving relevant information for the cursor position.

2  Title(s) on this disc.

27 Chapter(s) in this title.

Enter title number.

Play

Clear All

1: –  –
2: –  –
3: –  –
4: –  –
5: –  –

6: –  –
7: –  –
8: –  –
9: –  –
10: –  –

11: –  –
12: –  –
13: –  –
14: –  –
15: –  –

16: –  –
17: –  –
18: –  –
19: –  –
20: –  –

You can enter a sequence of up to 20 title/chapter combinations for 
programmed playback. If you enter data that is invalid for the current 
disc, the field is erased automatically.
A number of aids have been built in to the programme menu to make 
it easier to use. These are best illustrated by an example. Let’s assume 
that you want to play chapters 5, 7, 9, 4, 8, 3, and 1 (in that order) of 
title 1, then all of title 2. 

2  Title(s) on this disc.

27 Chapter(s) in this title.

Enter title number.

Play

Clear All

1: 1  5
2: 1  7
3: 1  9
4: 1  4
5: 1  8

6: 1  3
7: 1  1
8: 2  All
9: –  –
10: –  –

11: –  –
12: –  –
13: –  –
14: –  –
15: –  –

16: –  –
17: –  –
18: –  –
19: –  –
20: –  –

First,  highlight  the  title  position  for  the  first  programmed  item  (as 
shown in the screen above). Then press the number 

1


on the remote 

control: ‘1’ is shown in the position. Using the remote control, press 


to 

highlight the chapter position. The message at the bottom of the screen 
changes accordingly, prompting you for the required information. Press 

5

 on the remote handset.

Since we have a number of chapters all from the same title, it would 
be a lot of work to have to enter the title number each time. Press   
on the remote handset. Notice that the player assumes that the title 
number remains the same for this entry as for the previous one. Enter 
the remaining chapter numbers, pressing   after each one. (Note that 
pressing   at the bottom of a column places the cursor at the top of 
the next column.)
Next, we want to specify all of title 2. For this, highlight the title position 
of the next entry (entry 8) and enter the number 

2

, indicating title 2. 

Highlight the chapter position and, without entering any number, press 

. The player fills in the text ‘All’ to indicate that all the chapters in title 

2 will be played.

VCD

The bottom of the screen shows the number of tracks present on the 
disc. Below this is an information line, giving relevant information for the 
cursor position. 
You can enter a sequence of up to 20 tracks for programmed playback. 
If you enter data that is invalid for the current disc, the field is erased 
automatically. 
To program the player, highlight the first entry (using the cursor pad on 
the remote control), then press the number of the track you want to 
play first. To enter a second track, move down, then type the number 
of the second track to play, etc. To enter a track number greater than 
9, press the two digits sequentially (e.g., for track 10, first press 

1

, then 

press 

0

).

To play the programme you have entered, highlight the 

PLAY

 button on 

the screen and press 

OK

. The ‘PROG’ indicator shows on the front panel 

display and the programmed sequence begins. 
If you make a mistake while programming, you can clear a single field by 
highlighting it and pressing 

CLEAR

. To clear all the fields at once, highlight 

the ‘CLEAR ALL’ button on the screen and press 

OK

.

To  stop  the  programmed  sequence  and  return  to  normal  playback, 
select the ‘PLAY’ button in the programme menu with no programme 
specified. This  clears  programme  mode  and  causes  normal  playback 
order to be resumed.
Note that in programmed playback mode, skipping track forward or 
back skips forward or back through the programmed sequence.

GENERAL

To play the programme you have entered, highlight the ‘PLAY’ button 
on the screen and press 

OK

. The ‘PROG’ indicator shows in the display 

and the programmed sequence begins.
If you make a mistake while programming, you can clear a single field by 
highlighting it and pressing 

CLEAR

. To clear all the fields at once, highlight 

the ‘CLEAR ALL’ button on the screen and press 

OK

To  stop  the  programmed  sequence  and  return  to  normal  playback, 
select the 

PLAY

 button in the programme menu with no programme 

specified. This clears the programme mode and cause normal playback 
order to be resumed.
Note that skipping forward or back through tracks while in programmed 
play mode skips through the programmed sequence.

Summary of Contents for DV27

Page 1: ...Progressive scan DVD player DV27 Lecteur de DVD à balayage progressif DV27 DVD Spieler mit progressiver Abtastung DV27 ...

Page 2: ...2 ...

Page 3: ... displayed in the picture In case of 525 progressive scan picture problems it is recommended that the user switch the connection to the Standard Definition output If there are questions regardingTV set compatibility with this model 525p DVD player please contact Arcam Customer Support Department Manufactured under licence from Dolby Laboratories Dolby Pro Logic and the double D symbol are trademar...

Page 4: ...duce heat 6 Climate The appliance has been designed for use in moderate climates 7 Racks and stands Only use a rack or stand that is recommended for use with audio equipment If the equipment is on a portable rack it should be moved with great care to avoid overturning the combination 8 Cleaning Unplug the unit from the mains supply before cleaning The case should normally only require a wipe with ...

Page 5: ...nt RGB sockets and offers picture quality equal to component video Use appropriate cables to connect either the SCART connector or RGB phonos to the TV Note that if you are using RGB output via phono connectors you will also need to use COMPOSITE as a sync signal If you are using a SCART connection to yourTV it is best to mute your TV s speakers because SCART also carries stereo audio signals this...

Page 6: ... are provided Connect one of these to your amplifier s input using a suitable pair of interconnect cables The second set of audio outputs can be used to connect to a second amplifier setup for multi room use or routed to a tape recorder for making recordings REMOTE CONTROL INPUT The REMOTE IN input can be used to pass RC5 code to the DV27 if it is installed in a position or system where infrared c...

Page 7: ...of the screen pressing DOWN takes the bar to the top of the screen OPERATIONAL SETUP Operation 1 4 OSD Language English DVD Menu English Subtitle English Audio English Remote type CR 134 OSD Status On Priority Not applicable OSD LANGUAGE This setting controls the language of the messages displayed on the On Screen Display OSD The default language is English with three other languages supported Not...

Page 8: ...riate for the type of TV used in your country Should you need to change this setting the options are explained below Auto The video output is taken from that recorded on the disc When no disc is playing the logo screen is displayed using the standard of the last disc played NTSC NTSC is always used as the video standard Note that PAL discs are converted to NTSC but this causes some reduction in th...

Page 9: ...ntal level set for specific scenes so a disc will play but skip or substitute certain scenes AUDIO SETUP Audio 3 4 Audio Bitstream 2 Ch Down sample Max 48K Pro Logic Not applicable Audio Delay Normal This section allows you to configure the type of analogue and digital audio outputs In particular the digital output type needs to be set correctly if you are using an external audio decoder receiver ...

Page 10: ...y pressing SETUP on the remote control This saves all the data and closes the setup menu You can press SETUP at any time while in a menu to quit from it To return to the setup menu at any time ensure that there is no disc playing and press the SETUP button ...

Page 11: ...r using the cursor pad then press OK to start playback For discs that do not play automatically including CDs and VCDs press PLAY Note that when playing DVDs the drive mechanism operates at much higher speeds compared with CDs and so may produce more noise when loading and playing initial chapters This is normal FAST PLAY Press or on the front panel or remote control to play fast forward or backwa...

Page 12: ...is lit briefly when DVD mode is selected DISP display Dims or turns the DV27 s display on or off Turning the display off generally gives a slight improvement in sound quality Pressing DISP once turns the display off twice dims the display To restore the display to full brightness press DISP a third time A B This button enables you to repeat a selected section from the disc see page 14 RPT repeat P...

Page 13: ...he screen to disappear although the sides of the image are lost a zoom of x1 25 when a 4 3 image is displayed on a widescreen TV causes the bars at the side of the image to disappear although the top and bottom of the image are lost ANGLE Some DVDs offer the facility to select different camera angles If this feature is available the camera symbol lights in the display Press ANGLE to cycle through ...

Page 14: ...CDs have only one track CLOSINGTHE SEARCH MENU When displayed this menu screen can be closed again by pressing the SRCH button which also has the effect of cancelling the search SPECIAL PLAYBACK MODES Playback modes are available that allow repeat shuffle and programmed playback REPEAT Press the RPT button on the remote control to cycle through the repeat options For DVDs a chapter or title repeat...

Page 15: ...ting title 2 Highlight the chapter position and without entering any number press The player fills in the text All to indicate that all the chapters in title 2 will be played VCD The bottom of the screen shows the number of tracks present on the disc Below this is an information line giving relevant information for the cursor position You can enter a sequence of up to 20 tracks for programmed play...

Page 16: ...is free to navigate around the disc directory structure while playback is stopped Valid files tracks in each directory audio CD tracks or files that can be played are displayed on the screen Pressing PLAY while the cursor is on a valid file track will start playback from that point continuing to the end of the disc Alternatively the PD or PAF buttons can be used to start playback Programme mode Pr...

Page 17: ...ROG is pressed for a second time PROGRAMMED PLAYBACK CD ROM Pressing the PROG button on the remote control stops playback if active and changes the player mode to Programme mode as indicated at point 2 Navigating the directory tree is the same as described earlier for Browse mode Files from any location on the disc may be added to the playlist by moving the cursor to the file then pressing OK on t...

Page 18: ... scan output from the DVD player is being used but the television or another device in the signal path cannot handle progressive scan input Use the interlaced video connections instead of those for progressive scan Black bars are shown at the top and bottom of the screen This can occur when a Wide screen film is viewed on a 4 3 format television Even with a 16 9 format television black bars may st...

Page 19: ...gion that they are sold in for example discs from the USA are Region 1 and discs from Europe are Region 2 Your player is factory configured to play discs from the region it is to be sold in and may not play discs from other regions Disc does not play and Bad Disc is displayed The disc is damaged or dirty or does not contain any files that the DV27 can handle Remove disc from tray and check surface...

Page 20: ... processing by Silicon Image Corporation 3 gold plated phono sockets 525P component video Y 1V pk pk into 75Ω Pb 0 7V pk pk into 75Ω Pr 0 7V pk pk into 75Ω Audio outputs Analogue audio outputs Two pairs of stereo outputs on gold plated phono sockets Output level 2 2V rms at 0dB signal Frequency response 20Hz to 20kHz 0 1db 0 5dB THD N 0 005 for 1kHz 0dB signal measured 22Hz 22kHz unweighted S N 10...

Page 21: ...in the original packing and returned to the dealer from whom it was purchased or failing this directly to the Arcam distributor in the country of residence It should be sent carriage prepaid by a reputable carrier NOT by post No responsibility can be accepted for the unit whilst in transit to the dealer or distributor and customers are therefore advised to insure the unit against loss or damage wh...

Reviews: