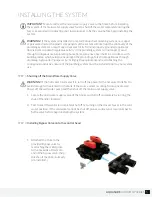
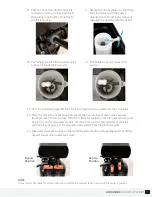
background image

11

AQUASURE 

HARMONY SERIES

4. 

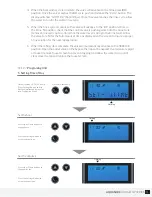
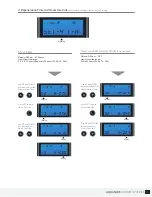
When the backwash cycle is complete, the valve will advance to the brine draw (BD) 
position. Once the valve reaches the BD cycle, push and release the “Cycle” button. The 
display will show “GOTO RR” (Rapid Rinse). Once the valve reaches the rinse cycle, allow 

the water to run for the entire rinse cycle

5. 

When the rinse cycle is complete, the valve will advance to the “BF” position. Once in 
the brine  fill position, check that the control valve is pushing water into the brine tank 
(remove brine well cap to confirm that the water level is rising in the brine tank). Allow 
the valve to refill for the full amount of time as displayed on the screen to insure a proper 

brine solution for the next regeneration.

6. 

When the refill cycle is complete, the valve will automatically advance to the SERVICE 
position. Open the outlet valve on the bypass, then open the nearest treated water spigot 

or faucet (remove faucet screen to prevent clogging) and allow the water to run until 

clear, close the tap and replace the faucet screen.

STEP 7. 

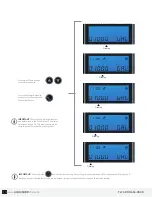
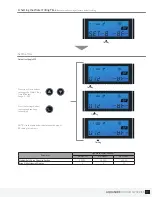
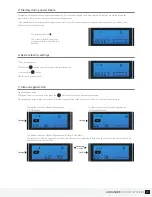
Programing Unit

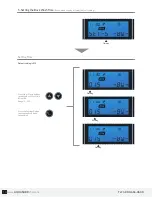
1. Setting Time of Day

Default setting 12:00 (24 hours)
Press Settings Button and Up 
Button simultaneously to enter 
into Programing Mode

Set the hour

Set the minutes

11:30

S E T -   1 T I M E

Flashing

11:30

Flashing

Press Simultaneously

Press the Settings Button to 
accept and continue.

Press Up or Down buttons to  
change hours.

Press the Settings Button to 
accept and continue.

Press Up or Down buttons to  
change minutes.

11:30

Flashing

Summary of Contents for AS-HS32D

Page 1: ...HARMONY SERIES WHOLE HOUSE WATER SOFTENER OWNER S MANUAL FOR MODEL NO AS HS32D AS HS48D AS HS64D AS HS32FM AS HS48FM AS HS64FM HARMONY SERIES WHOLE HOUSE WATER SOFTENER...

Page 2: ......

Page 3: ...y Guide INSTALLING THE SYSTEM STEP 1 Shutting off the main water supply valve STEP 2 Installing Bypass Valve onto the Control Head STEP 3 Brine Tank Preparation STEP 4 Softener Preparation STEP 5 Conn...

Page 4: ...e Before you starting installing your Aquasure Harmony Series Whole House Water Softener Please take a few minute to become familiar with the basics WELCOME Required Tool List for System Installation...

Page 5: ...system Properly ground to conform with all governing code and ordinances Use only lead free solder and flux for all sweat solder connections as required by state and federal codes Place the softener a...

Page 6: ...not use rock block granulated or ice cream making salts They contain contaminants that could cause problems during maintenance Always keep salt lid in place on the softener unless servicing or refill...

Page 7: ...e bridging the equipment and reestablishing the contiguous conductive nature of the plumbing system must be installed prior to your system use INSTALLING THE SYSTEM STEP 1 Shutting off the Main Water...

Page 8: ...Tank Preparation Skip this step if the brine tank comes preassembled 1 Attach the four grid plate stand onto each corner of the grid plate 2 Place the grid plate inside the bottom of brine tank and br...

Page 9: ...to lock it in place 5 Place the upper basket over the distributor tube and push the valve on the tank Thread the valve on the tank by turning it clockwise Be sure not to cross thread the valve on the...

Page 10: ...ve is the outlet 3 Apply the Teflon tape onto the bypass inlet and outlet fittings 4 Connect the inlet and outlet of the softener using appropriate fittings 5 All piping should be secured to prevent s...

Page 11: ...0 lbs of salt and 5 gallons of tap water into the brine tank 13 Place the unit in the bypass position Locate the nearest faucet and remove aerator faucet screen if there are any Turn the cold water po...

Page 12: ...the power cord to the valve 2 When power is supplied to the control the screen will display the time of day gallons remaining and the mode Press and hold the Cycle button The valve will display GOTO...

Page 13: ...splayed on the screen to insure a proper brine solution for the next regeneration 6 When the refill cycle is complete the valve will automatically advance to the SERVICE position Open the outlet valve...

Page 14: ...mode Press the Settings Button to accept and continue Choose Between Time Meter Immediate or Meter Delayed Recommend Setting the system to Meter Delay Timer This mode will not show water capacity opti...

Page 15: ...n to accept and continue Press Up or Down buttons to Change Unit between GAL Gallon L Liter M3 Cubic Meter 3 Setting the Unit Capacity Not shown if Timer Mode was selected in 2nd Step Default setting...

Page 16: ...quires customized settings 11 30 01000 GAL Flashing 11 30 01000 GAL Flashing 11 30 01000 GAL Flashing 11 30 01000 GAL Flashing 01000 GAL Flashing Press the Settings Button to accept cursor moves left...

Page 17: ...st Hours Override Default 2 00 a m 072 hours Hours Override range 3 4 6 8 12 hours then every 24 hours 24 48 76 960 Default 2 00 a m OFF Hours Override range Every 24 hours 24 48 76 960 4 Regeneration...

Page 18: ...Flashing 11 30 015 BW Flashing 11 30 015 BW Press the Settings Button to accept and continue to next digit Press Up or Down buttons to change Back Wash time Minutes Range 0 999 5 Setting the Back Was...

Page 19: ...shing 11 30 060 BD Flashing 11 30 060 BD Press the Settings Button to accept and continue to next digit Press Up or Down buttons to change Brine time Minutes Range 0 999 6 Setting the Brine Time Recom...

Page 20: ...shing 11 30 010 RR Flashing 11 30 010 RR Press the Settings Button to accept and continue to next digit Press Up or Down buttons to change the Rapid Rinse time Minutes Range 0 999 7 Setting the Rapid...

Page 21: ...tons to change the Water Filling Time Minutes Range 0 999 8 Setting the Water Filling Time Recommend keeping at factory default setting Default setting is 012 Set the Time Parameter Aquasure Water Sof...

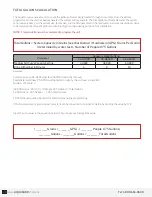
Page 22: ...must be tested on site by the end user or installer Number of People 3 32 000 Grains 25 GPG 3 People X 75 Gallons Total Gallons 1 280 Gallons 225 Gallons 1 055 Total Gallons 1 055 Gallons would be in...

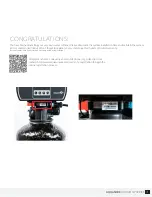
Page 23: ...m at its recommended interval Don t forget to register your system to get full 5 years of limited warranty System comes with 2 year limited warranty without registration Simply scan the QR code using...

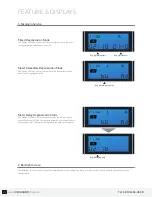
Page 24: ...on and the days override Meter Immediate Regeneration Mode The display will show the current time and the remaining treated water to the next regeneration Meter Delay Regeneration Mode The display wil...

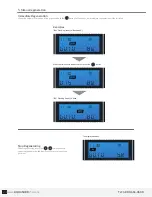
Page 25: ...02 18 11 30 60 M3 5 Manual regeneration 3 Memory during power failure 4 Restore factory settings The display shows the Queued Regeneration in TIMER Mode The display shows the Queued Regeneration in M...

Page 26: ...ition Immediate Regeneration When the valve is in service position press and hold the button for 5 seconds an immediate regeneration will be initiated 5 Manual regeneration 11 30 GOTO SR The display s...

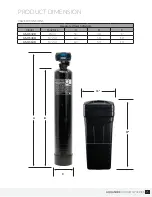
Page 27: ...25 AQUASURE HARMONY SERIES VALVE DIMENSIONS C B A Aquasure Water Softeners Model Tank Size A B C AS HS32D 8 x44 54 46 8 AS HS48D 10 x54 64 56 10 AS HS64D 13 x54 64 54 13 15 37 PRODUCT DIMENSION...

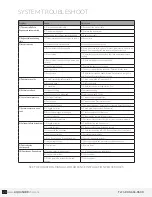
Page 28: ...xcessive salt use A High salt setting A adjust salt setting B Excessive water in brine tank B refer to problem 7 tank 6 Loss of water pressure A Fouling of inlet pipe A Clean or replace the pipeline B...

Page 29: ...27 AQUASURE HARMONY SERIES...

Page 30: ...these guarantees because of circumstances beyond our control Installation workmanship failure is not covered under warranty Damage caused by environmental conditions such as lightening strikes humidi...

Page 31: ...29 AQUASURE HARMONY SERIES...

Page 32: ...www AquasureUSA com 818 N Mountain Ave 203c Upland CA 91786 800 661 0680 sales aquasureusa com...

Reviews: