background image


ENGINE

4 - 21

PEGASO 650 

• 

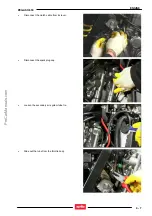
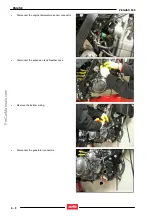
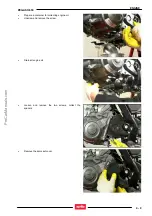
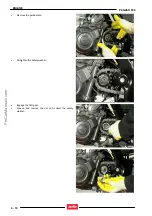
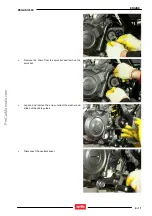
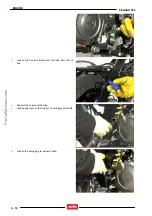
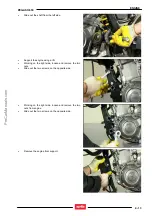
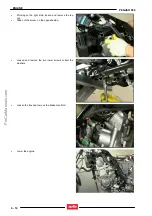
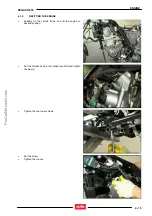
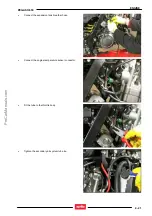
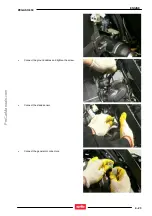
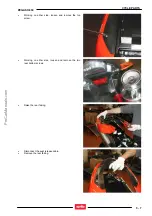
Connect the expansion tank breather hose. 


• 

Connect the engine temperature sensor connector. 


• 

Fit the tube to the throttle body. 


• 

Tighten the secondary air system tube tie. 


ProCarManuals.com

Summary of Contents for Pegaso 650 2005

Page 1: ...INTRODUCTION 0 1 PEGASO 650 INTRODUCTION 0 ProCarManuals com ...

Page 2: ...INTRODUCTION 0 2 PEGASO 650 SUMMARY 0 1 INTRODUCTION 3 0 1 1 FOREWORD 3 0 1 2 REFERENCE MANUALS 4 0 1 3 ABBREVIATIONS SYMBOLS CONVENTIONS 5 ProCarManuals com ...

Page 3: ... in subsequent editions of the manual Should you need assistance or clarifications about the inspection and repair procedures please contact the aprilia SERVICE DEPT they will be glad to give you any information on the matter or supply you with any detail on updates and technical changes applied to the vehicle aprilia s p a reserves the right to make changes to its products at any time barring any...

Page 4: ...04894 CHASSIS WORKSHOP MANUAL aprilia part description 8140874 8140877 8140875 8140876 8140878 ENGINE TECHNICAL MANUAL aprilia part description 8140880 8140883 8140881 8140882 8140884 CD FOR THE NETWORK ENGINE aprilia part description 8CM0086 CD FOR THE NETWORK CHASSIS aprilia part description 8CM0084 ProCarManuals com ...

Page 5: ...ft ECU Electronic Control Unit rpm revolutions per minute HC unburnt hydrocarbons ISC Idle Speed Control ISO International Standardisation Organisation kg kilograms kgm kilograms per metre 1 kgm 10 Nm km kilometres km h kilometres per hour kΩ kilo Ohm kPa kiloPascal 1 kPa 0 01 bar KS clutch side from the German Kupplungsseite kW kilowatt ℓ litres LAP racetrack lap LED Light Emitting Diode LEFT SID...

Page 6: ...SAE Society of Automotive Engineers TEST diagnostic check T B E I crown head Allen screw T C E I cheese head Allen screw T E hexagonal head T P flat head screw TSI Twin Spark Ignition UPSIDE DOWN inverted fork V volt W watt Ø diameter ProCarManuals com ...

Page 7: ...GENERAL INFORMATION 1 1 PEGASO 650 GENERAL INFORMATION 1 ProCarManuals com ...

Page 8: ... 1 1 CONVENTIONS USED IN THE MANUAL 3 1 1 2 SAFETY WARNINGS 4 1 2 GENERAL RULES 5 1 2 1 BASIC SAFETY RULES 5 1 3 DANGEROUS ELEMENTS 8 1 3 1 WARNINGS 8 1 4 RUNNING IN 12 1 4 1 RUNNING IN 12 1 5 VEHICLE IDENTIFICATION 13 1 5 1 POSITION OF THE SERIAL NUMBERS 13 ProCarManuals com ...

Page 9: ... referred to the rider seated on the vehicle in the normal riding position Motorcycle operation and basic maintenance are covered in the OWNER S MANUAL In this manual any variants are identified with these symbols optional catalytic version all versions MP national certification SF European certification EURO 2 limits VERSION Italy Greece Malaysia United Kingdom Holland Chile Austria Switzerland C...

Page 10: ...nal injury hazard Non compliance with the indications given in the messages preceded by this symbol may result in serious risks for your and other people s safety and for the vehicle DANGER Indicates a potential hazard which may result in serious injury or even death WARNING Indicates a potential hazard which may result in minor personal injury or damage to the vehicle NOTE The word NOTE in this m...

Page 11: ...he engine has been stopped Before handling these components wear insulating gloves or wait until the engine and the exhaust system have cooled down USED GEARBOX AND FORK FLUIDS DANGER Wear latex gloves when servicing Gear fluid may cause serious damage to the skin if handled daily and for long periods Wash your hands carefully after handling engine oil Take it to the filling station where you usua...

Page 12: ...able for the type of battery used GENERAL PRECAUTIONS AND INFORMATION Follow these instructions closely when repairing disassembling or reassembling the motorcycle or its components DANGER Using bare flames is strictly forbidden when working on the motorcycle Before servicing or inspecting the motorcycle stop the engine and remove the key from the ignition switch allow for the engine and exhaust s...

Page 13: ...earings abundantly before assembly Make it a rule to check that all components you have fitted are correctly in place After repairing the motorcycle and after each service inspection perform the preliminary checks and then test ride the motorcycle in a private estate area or in a safe area away from traffic Clean all mating surfaces oil seal edges and gaskets before assembly Apply a thin layer of ...

Page 14: ...ead to the engine or gearbox seizure thus causing serious accidents personal injury or even death Gear fluid may cause serious damage to the skin if handled daily and for long periods Wash your hands carefully after use Do not dispose of oil in the environment Take it to the filling station where you usually buy it or to an oil salvage centre WARNING When filling the vehicle with this oil take car...

Page 15: ...vice DO NOT RELEASE BRAKE FLUID INTO THE ENVIRONMENT KEEP AWAY FROM CHILDREN When handling brake fluid take care not to spill it onto plastic or paint finished parts or they will damage DANGER Do not use any brake fluids other than the specified type Never mix different types of fluids to top up level as this will damage the braking system Do not use brake fluid from containers which have been kep...

Page 16: ...o 60 maximum to the solution if needed Use distilled water in the coolant mixture Tap water will damage the engine Refer to the chart given below and add water with the quantity of antifreeze to obtain a solution with the desired freezing point Freezing point C Coolant of volume 20 35 30 45 40 55 NOTE Coolants have different specifications The protection degree is written on the label WARNING Use ...

Page 17: ...substances on tyres In particular avoid contact with fluid fuels leading to a rapid wear In case of contact with oil or fuel do not clean but change the tyres DANGER Some of the factory assembled tyres of this vehicle are provided with wear indicators There are several kinds of wear indicators For more information on how to check the wear contact your Dealer Visually check if the tyres are worn an...

Page 18: ...ng in During the first 500 km 312 mi pull the brakes with caution avoiding sharp and prolonged brakings This ensures a correct bedding in of the pads on the brake discs During the first 500 km 312 mi never exceed 4000 rpm see table From 500 km 312 mi up to 1000 km 625 mi never exceed 5000 rpm DANGER After the first 1000 km 621 mi have the checking operations indicated in the column After running i...

Page 19: ... vehicle registration NOTE Altering the vehicle identification numbers is a legal offence Altering the frame number invalidates the warranty FRAME NUMBER The frame number A is stamped on the right side of the steering column ENGINE NUMBER The engine number B is stamped on the rear right part near the starter motor ProCarManuals com ...

Page 20: ...GENERAL TECHNICAL INFORMATION 2 1 PEGASO 650 GENERAL TECHNICAL INFORMATION 2 ProCarManuals com ...

Page 21: ... TIGHTENING TORQUE SETTINGS 8 2 1 5 SPECIAL TOOLS 11 2 1 6 ARRANGEMENT OF THE ELEMENTS OF THE INSTRUMENT PANEL 12 2 1 7 INSTRUMENT PANEL OPERATION 14 2 2 SCHEDULED MAINTENANCE 38 2 2 1 CHANGING ENGINE OIL AND OIL FILTER 38 2 2 2 CLEANING THE AIR FILTER 40 2 2 3 CHANGING THE COOLANT 41 2 2 4 FRONT BRAKE 43 2 2 5 REAR BRAKE 45 2 2 6 ADJUSTING THE VALVE CLEARANCE 47 ProCarManuals com ...

Page 22: ...eft side of the engine CAPACITY Fuel reserve included 15 0 5 l Fuel reserve 3 l Engine oil oil change 2500 cu cm oil and oil filter change 2700 cu cm Fork oil 105 mm of air per leg measured without spring and compressed rod Coolant 1 2 l 50 water 50 antifreeze with ethylene glycol Seats 2 Vehicle max load 210 kg rider passenger luggage fluids GEAR RATIOS Ratio Primary Secondary Final ratio Total r...

Page 23: ... 150 60 ZR 17 66W 150 60 R 17 66H Inflation pressure solo rider 200 kPa 2 0 bar Inflation pressure rider with passenger 220 kPa 2 2 bar IGNITION Type DENSO inductive ignition system SPARK PLUGS Standard NGK CR7E Spark plug electrode gap 0 7 0 8 mm Resistance 5 KΩ ELECTRIC SYSTEM Battery 12 V 12 Ah Auxiliary fuses 5 A 15 A 20 A Generator with permanent magnet 12 V 290 W BULBS Low beam 12 V 55 W Hig...

Page 24: ...very 10000 km 6250 mi or 12 months Every 20000 km 12500 mi or 24 months Battery Clamp tightening 1 1 Spark plug 1 3 Fork 1 1 Light operation direction 1 Light system Safety switches 1 1 Brake fluid 1 1 Coolant 1 Side panniers coupling pins 1 Tyres every 1000 km 625 mi 1 Tyre pressure every 1000 km 625 mi 4 Engine idling rpm and CO 4 4 Securing locks for the side panniers and the top case 1 Warning...

Page 25: ...ery 1 Carburetion CO adjustment 1 1 Timing chain 1 Transmission cables and controls 1 1 Wheel truing 1 Rear suspension linkage bearings 1 Steering bearings and steering clearance 1 1 Wheel bearings 1 Brake discs 1 1 Fuel pump filter 1 Air filter 1 3 Engine oil filter 3 3 Engine oil filter on oil tank 2 2 General running of the vehicle 1 1 Clutch clearance 4 4 Braking systems 1 1 Cooling system 1 B...

Page 26: ...oints RECOMMENDED AUTOGREASE MP As an alternative to recommended grease use top brand rolling bearing grease that will resist a temperature range of 30 C to 140 C 22 F to 284 F with dripping point 150 C to 230 C 302 F to 446 F high corrosion protection good resistance to water and oxidisation Battery lead protection Use neutral grease or Vaseline Chains RECOMMENDED spray grease CHAIN SPRAY Brake f...

Page 27: ...rear direction indicators 2 M6 3 Voltage regulator 2 M6 12 loctite 243 front direction indicators 2 M6 3 tail light fastener 2 M5 1 Ground fastener onto engine 1 M6 15 Relay cable to starter motor fastener 1 M6 5 cables to relay fastener 2 M6 4 SEAT Hinge to seat fastener 4 NUT M6 7 20 LOCKS rear lock 2 M6 10 FRAME sump guard 3 M6 8 Voltage regulator support 2 M6 12 loctite 243 coils to frame 2 M5...

Page 28: ...pport 4 M6 4 seat support lower cover to frame 2 M6 4 tail guard to seat support lower cover 4 M5 2 tail guard front cover 4 M4 0 5 Manual tail guard to seat support 4 M5 3 tail guard passenger belt 2 M6 12 under seat side body panels 2 M6 7 front fairing lower cover 3 M6 7 windshield to front fairing 6 M4 0 5 Manual instrument panel to arch 3 M6 5 BRAKING SYSTEM Front brake calliper 2 M10X1 25 50...

Page 29: ... rod double connecting rod fastener 1 M10 50 double connecting rod swinging arm fastener 1 M10 50 double connecting rod shock absorber fastener 1 M10 50 SWINGING ARM swinging arm shaft ring nut 1 M17X1 35 swinging arm shaft adj bush 1 M25X1 5 12 swinging arm shaft 1 100 shock absorber guard fastener 2 4 8X13 20 chain tensioner screw and nut 1 1 M8 Man chain slider fastener 1 4 8X13 20 rear stand b...

Page 30: ...of special tools avoids the potential risk of damage as a result of inappropriate tools and or improvised methods The special tools developed specifically for this vehicle are listed below Ask for the general special tools if necessary Pos Description Part number 1 Fork shaft ring nut 8101945 2 Fork tube ring nut 8163500 3 Tool to fit fork oil seal D 63 H 125 8140843 ProCarManuals com ...

Page 31: ...Fuel tank filler cap 5 Fuel tank 6 Battery 7 Electronic control unit 8 Fuse carrier 9 Passenger grab rail 10 Glove compartment 11 Swinging arm 12 Passenger left footrest snapping closed open 13 Side stand 14 Rider left footrest 15 Gear shift lever 16 Seat lock 17 Drive chain 18 Engine oil tank 19 Tool kit 20 Idle speed adjuster 21 Oil drain plugs 22 Underseat compartment ProCarManuals com ...

Page 32: ...shock absorber 7 Engine oil level plug dipstick 8 Front brake fluid tank 9 Right rear view mirror 10 Horn 11 Engine oil filter 12 Rear brake control lever 13 Rider right footrest 14 Rear brake master cylinder 15 Passenger right footrest snapping closed open 16 Coolant expansion tank cap 17 Coolant expansion tank 18 CO sensor plug ProCarManuals com ...

Page 33: ...e initial check up all instruments will briefly show the current values of the corresponding parameters The display shows the following standard settings A coolant temperature B fuel quantity C clock D speedometer E odometer F on board computer and accessories functions MODE selector 2 features three positions a left one to decrease values and scroll the drop down menus a right one to increase val...

Page 34: ...ter the distance covered on fuel reserve KM COVERED W FUEL RESERVE the display shows the MENU page but only if vehicle is not moving MENU If vehicle is stopped it is possible to gain access to the configuration menu from the MENU page by pressing the MODE selector in the centre position while if vehicle is moving go back to the TRIP METER 1 page Configuration menu options are EXIT SETTINGS LAP TIM...

Page 35: ...e the value reaches zero it goes to 59 when the MODE selector is again pressed to the left A Confirmation signal stores the set value and lets you quit clock setting mode GEAR SHIFT THRESHOLD This function allows you to set the value for the Gear shift indicator threshold The main page with GEAR SHIFT THRESHOLD message is displayed Threshold value is increased by 100 RPM every time the MODE select...

Page 36: ...ment panel goes back to diagnosis menu This operation is not allowed in case the user entered with the code Once the operation is over the instrument panel goes back to settings menu This function is used when the old CODE is not available and you want to change it in this case two stored keys should be inserted The first one is already in and you will be prompted to insert the second key insert t...

Page 37: ...ap times Deletion should be confirmed Once the operation is over the display goes back to LAP TIMER menu Operation To use the lap timer set the display to the main page indicating CHRONO Briefly press the MODE selector to the centre position the lap timer starts recording Press again the MODE selector to the centre position before 10 seconds have elapsed from timer start time measurement is cancel...

Page 38: ...UPDATE KEYS KM MILES Once the operation is over the instrument panel goes back to main menu There are two types of ECU diagnosis the passive one and the active one During passive diagnosis the user simply reads data from the ECU such as battery voltage throttle opening angle atmospheric pressure or error reading current or stored During active diagnosis the ECU performs operations such as generate...

Page 39: ...ector 48 AIS solenoid 50 Main relay 51 Fan relay 52 Headlight relay Errors This page shows all present and or stored errors Part number Description 60 EEPROM Error 61 Error FLAG CODE Delete errors this page allows you to delete stored errors Deletion will be effective upon key OFF Part number Description 62 Error FLAG CODE clear ProCarManuals com ...

Page 40: ...u is displayed EXIT COIL INJECTOR AIS SOLENOID INJECTION RELAY FANS LIGHTS Turn the key to stop to quit the following message will be displayed Turn the key to stop to quit Ignition coil The following message is displayed Set the ENGINE ON switch first to RUN and then to STOP The coil will be activated for 5 times Injector The following message is displayed Set the ENGINE ON switch first to RUN an...

Page 41: ...llowing message is displayed Set the ENGINE ON switch first to RUN and then to STOP The injection relay will be activated for 5 times Fans The following message is displayed Set the ENGINE ON switch first to RUN and then to STOP The fan piloting relay will be activated for 5 times Lights The following message is displayed Set the ENGINE ON switch first to RUN and then to STOP The lights relay will...

Page 42: ...y to stop to quit the following message will be displayed Turn the key to stop to quit CO adjustment In this page the instrument panel increases or decreases the CO rate Press the UP or DOWN buttons on the control switch to increase or decrease the value The instrument panel should display the set value the ECU shall store the set value upon key OFF At this stage the rpm are displayed The followin...

Page 43: ...se of fuel sensor failure the relevant icon on the display should be flashing Delete errors Use this option to delete all errors both from the ECU and the instrument panel a confirmation is needed Service reset This function resets the service interval Disconnect On the Pegaso the instrument panel uses diagnostics instruments communication K line for gathering data To avoid any interference use th...

Page 44: ...e up to 4 keys You will be prompted to enter the user code Insert the code If the code is correct the display should show the message Insert the X key Memorised X 1 key At least one key should be stored then the procedure is ended if no further key is inserted within 20 seconds or in case power is missing or after the fourth key All vehicle and instrument panel functions should be enabled even wit...

Page 45: ...rms with same priority level the relevant icons are displayed alternately High priority alarms do not allow you to display low priority ones If the alarm light and the SERVICE icon briefly come on it does not mean that there is a failure FUNCTION FEATURES Speedometer The speed value is shown on the display with nnn format and with indication of unit of measurement km h or MPH Accuracy should be hi...

Page 46: ...light turns on when coolant reaches temperature of 120 Fuel level indicator The instrument panel should interface to a resistive level sensor both of the potentiometric type and the resistive steps type The measurement of values exceeding the sensor limits should be considered as faults and be signalled by the diagnostic Indication is given in the LCD and with relevant reserve light The features a...

Page 47: ...ey on the clock will constantly display 0 00 until a new setting is performed On board Computer In the display bottom are the on board computer indications i e two trip meters with relevant maximum speed and average speed trip time and fuel consumption When resetting one trip meter all connected values are reset Km and miles selection is made via user interface and is connected to the unit set for...

Page 48: ...edes the value and the unit of measurement V follows the value Range 9 0 16 0 V If voltage is lower than 9V or higher than 16V accuracy might exceed required tolerances but should have a constant increasing trend Accuracy 0 2V with respect to voltage at the battery correction factors should then be added as per table varying according to the vehicle the instrument is fitted to Refresh every 10 sec...

Page 49: ... anyway 87 blinks min The instrument panel should be able to directly pilot a lamp load up to 4x21W Consider in any case the chance of piloting even sundry loads such as front lamps and rear LEDs or LEDs only for all 4 outputs It is then necessary to have 4 separate control channels Minimum current per channel will be 1mA Failure signal burnt out or short circuited bulb by doubling the light flash...

Page 50: ... Operation The instrument panel reads key code upon switch on If this code matches one of the memorised codes the instrument panel shall perform the initial check routine and enable engine start The system should be able to store up to four keys If the key code is not acknowledged the instrument panel should inhibit engine starting and the display should show manual override code request In this c...

Page 51: ...s or in case power is missing or after the fourth key All vehicle and instrument panel functions should be enabled even with just one key stored Memorisation of new keys In case one key is lost the customer can disable the lost key or disable and completely change the set of keys by changing the complete ignition switch Diagnosis The instrument panel should indicate the failure of the component co...

Page 52: ...ON INDICATOR CONTROL 13 14 15 16 GENERAL GROUND 17 ABS INPUT 18 SENSORS GROUND 19 MAIN GROUND OPTION 20 MAIN GROUND OPTION The black end pin layout is as follows PIN Service 21 BATTERY 22 FRONT LEFT DIRECTION INDICATOR ACTUATION 23 REAR LEFT DIRECTION INDICATOR ACTUATION 24 ANTENNA 1 25 CONTACT 1 NEUTRAL ECU INPUT 26 27 INDICATORS RESET 28 29 STAND 30 SELECT 2 UP 31 BATTERY 32 FRONT RIGHT DIRECTIO...

Page 53: ...ith devices limiting current in case of failure K line The interface line consists in a line with physical level complying to ISO 9141 to be used for communication with the Denso ECU Speed shall be 15 625 Kbit sec The line shall be fitted with a 1KΩ pull up resistor powered by battery according to key position it should feature a diode connected in series to avoid backflow of power through the sig...

Page 54: ...control Hazard control These are signals indicating the status of direction indicators to the instrument panel they are NO push buttons that give a ground contact when pressed Heated handgrips When handgrip heating is on battery voltage is input to this input Since they are an option item it is necessary to fit a pull down resistor so that light stays off when heated handgrips are not fitted Fuel ...

Page 55: ...not calibrated 20 C 85 C Operating temperature calibrated 18 C 65 C Stocking temperature 30 C 90 C Materials with slow combustion resistant to fire as per UL94 HB V2 standard Vehicle mission profile Forecast life span shall not be shorter than 50000 km or 8 years LCD Specifications The display has a resolution of 128x112 pixel X axis Y axis the visible area is 62x55mm while active area the one act...

Page 56: ... back of every component it shall be indelible and water proof indicating the following details supplier code Aprilia code hardware board version software version production date The Supplier shall add more labels for DOT certification or immobilizer system homologation ProCarManuals com ...

Page 57: ...tem to cool down Stop the engine and let it cool down in order to allow the oil to flow into the crankcase and to cool down NOTE Failure to perform the operations described above may result in the incorrect measurement of the engine oil level Unscrew and extract the plug dipstick Place a container under engine oil drain plug Loosen and remove the oil drain plug and let oil drain off completely WAR...

Page 58: ... Remove the oil filter Install a new oil filter Fit the oil filter cover and tighten the three screws Screw and tighten the oil drain plug Fill up with about 1500 cu cm of engine oil 91 5 cu in Screw and tighten the plug dipstick Start the engine and let it run for a few minutes Stop the engine and let it cool down Check engine oil level ProCarManuals com ...

Page 59: ...2 CLEANING THE AIR FILTER Remove the right side body panel see REMOVING THE REAR FAIRING Loosen and remove the four screws Slide out the filter mount and air filter Remove the air filter from its mount and clean the filtering element ProCarManuals com ...

Page 60: ...ine Coolant is hot and under pressure Release and remove the drain screw collect the copper washer To help coolant draining off completely remove circuit filler plug A on radiator and expansion tank filler plug B on expansion tank Refit the drain screw with a new copper washer Pour fluid into filler until full Repeatedly press with your hand on the unions to allow fluid to fill in all channels NOT...

Page 61: ... tank plug and top up fluid in the expansion tank until level is between MIN and MAX notches Tighten the expansion tank plug B Start the engine and let it idle for a few minutes stop it and let it cool down Check again fluid level in the expansion tank and top up if necessary ProCarManuals com ...

Page 62: ... brake fluid as required Make sure there is always some fluid in the reservoir throughout the process Remove the bleed valve rubber cap Insert one end of a transparent plastic tubing inside the front brake calliper bleed valve and the other end in a container for collection Pull and quickly release the front brake lever a few times then keep it pulled Loosen the bleed valve by 1 4 of a turn so as ...

Page 63: ... are not in place or the calliper pistons might come off their housing thus causing brake fluid leakage Install two new pads fit them so as the holes match those on the calliper WARNING Always change both pads and ensure they are correctly in place inside the calliper Fit the vibration damper Fit both pins Fit both split pins Check brake fluid level ProCarManuals com ...

Page 64: ...here is always some fluid in the reservoir throughout the process Remove the bleed valve rubber cap Insert one end of a transparent plastic tubing inside the rear brake calliper bleed valve and the other end in a container for collection Pull and quickly release the rear brake lever a few times then keep it pulled Loosen the bleed valve by 1 4 of a turn so as the brake fluid flows in the container...

Page 65: ...re not in place or the calliper pistons might come off their housing thus causing brake fluid leakage Install two new pads fit them so as the holes match those on the calliper WARNING Always change both pads and ensure they are correctly in place inside the calliper Insert the pin Fit the split pin Check brake fluid level ProCarManuals com ...

Page 66: ...valves Adjust clearance when the engine is cold at ambient temperature Measure or adjust valve clearance with the piston at top dead centre TDC during the compression stroke Release and remove the four screws Remove the intake tappet cover Loosen and remove the four screws and remove the exhaust tappet cover ProCarManuals com ...

Page 67: ...over 2 Release and remove the spark plug Release and remove the timing reference screw 3 and crankshaft screw 4 Measure the valve clearance as follows 1 Turn the crankshaft counter clockwise 2 With piston at TDC in the compression stroke align reference I a on magnet rotor to the fixed reference b onto magnet cover ProCarManuals com ...

Page 68: ...35 0 0051 in Exhaust valve 0 16 0 20 mm 0 0063 0 0079 in Adjust the valve clearance as follows 1 Loosen the lock nut 5 2 Insert a suitably sized feeler gauge see valve clearance from cold in between the adjuster screw end 6 and the valve tip 3 Turn the adjuster screw in direction d or e until obtaining prescribed clearance using the feeler gauge Direction d Valve clearance increases Direction e Va...

Page 69: ...escribed clearance NOTE Lubricate the valve shims see LUBRICANT TABLE Using the suitable special tool no 8140850 tighten the flywheel cover giving access to the timing reference mark 3 and the flywheel cover giving access to the crankshaft 4 Install camshaft gearwheel cover 2 in its seat and secure it with two washers and tighten the two screws 1 Install the exhaust tappet cover and tighten the fo...

Page 70: ...GENERAL TECHNICAL INFORMATION 2 51 PEGASO 650 Install the intake tappet cover and tighten the four screws ProCarManuals com ...

Page 71: ...FUEL SYSTEM 3 1 PEGASO 650 FUEL SYSTEM 3 ProCarManuals com ...

Page 72: ...FUEL SYSTEM 3 2 PEGASO 650 SUMMARY 3 1 FUEL SYSTEM 3 3 1 1 DIAGRAM 3 3 1 2 REMOVING THE FUEL TANK 4 3 2 INJECTION 7 3 2 1 INJECTION SYSTEM DIAGRAM 7 ProCarManuals com ...

Page 73: ...O 650 3 1 FUEL SYSTEM 3 1 1 DIAGRAM Key 1 Fuel tank 2 Fuel tank plug 3 Rubber block 4 Spacer 5 Flanged screw 6 Fuel level sensor 7 Fuel filter 8 Fuel pump flange seal 9 Flanged screw 10 Fuel delivery hose ProCarManuals com ...

Page 74: ...at Release and remove the two screws remove the right support cover to release the wiring Raise the glove compartment cover using the suitable control Release and remove the five screws Release and remove the two screws on motor for opening the glove compartment raise it and disconnect the connector ProCarManuals com ...

Page 75: ...ug Raise the glove compartment and slide out the fuel breather hose Remove the three fuel breather hose clamps Slide out the fuel breather hose Remove the glove compartment with motor Tighten the fuel tank plug Disconnect the fuel tube ProCarManuals com ...

Page 76: ...FUEL SYSTEM 3 6 PEGASO 650 Release and remove the fuel tank front screw Release and remove the two side screws one on each side Disconnect the fuel pump connector Remove the fuel tank ProCarManuals com ...

Page 77: ...nifold D 46 3 Clamp for manifold D 72 4 Preformed tube D 5 5x11 5 5 Preformed tube D 13x18 6 Pressure sensor tube 7 Throttle body tube 8 Elastic clip D 11 5 9 Elastic clip D 11 5 10 Yellow elastic clip D 8 5 11 Elastic clip D 18 12 Air pressure sensor MAP Sensor 13 Flanged screw ProCarManuals com ...

Page 78: ...ENGINE 4 1 PEGASO 650 ENGINE 4 ProCarManuals com ...

Page 79: ...ENGINE 4 2 PEGASO 650 SUMMARY 4 1 REMOVING AND REFITTING THE ENGINE 3 4 1 1 REMOVING THE ENGINE 3 4 1 2 REFITTING THE ENGINE 15 4 2 SECONDARY AIR SYSTEM 26 4 2 1 SECONDARY AIR 26 ProCarManuals com ...

Page 80: ... 1 REMOVING THE ENGINE To remove the engine first remove the fuel tank the rear fairing panels the sump guard the battery and the exhausts Remove the clamp and slide off the hose Remove the clamp and slide off the hose Remove the air box connector ProCarManuals com ...

Page 81: ...ENGINE 4 4 PEGASO 650 Remove the clamp from fuel vapour recycle hose Remove the tie from wiring Disconnect the speed sensor ProCarManuals com ...

Page 82: ...ENGINE 4 5 PEGASO 650 Disconnect the neutral sensor connector Disconnect the generator connectors Disconnect the stand sensor ProCarManuals com ...

Page 83: ...NGINE 4 6 PEGASO 650 Loosen and remove the screw and disconnect the ground cables Disconnect the starter motor power cable Loosen the nut and slide out the clutch cable from its housing ProCarManuals com ...

Page 84: ...ENGINE 4 7 PEGASO 650 Disconnect the clutch cable from its lever Disconnect the spark plug cap Loosen the secondary air system tube tie Slide out the tube from the throttle body ProCarManuals com ...

Page 85: ...ENGINE 4 8 PEGASO 650 Disconnect the engine temperature sensor connector Disconnect the expansion tank breather hose Remove the tie from wiring Disconnect the generator connectors ProCarManuals com ...

Page 86: ... 4 9 PEGASO 650 Prepare a container for collecting engine oil Unscrew and remove the screw Drain all engine oil Loosen and remove the two screws collect the spacers Remove the sprocket cover ProCarManuals com ...

Page 87: ...ENGINE 4 10 PEGASO 650 Remove the guide plate Straighten the safety washer Engage the first gear Loosen and remove the nut and collect the safety washer ProCarManuals com ...

Page 88: ...INE 4 11 PEGASO 650 Remove the chain from the sprocket and remove the sprocket Loosen and remove the screw collect the washer and slide out the cable guides Disconnect the neutral sensor ProCarManuals com ...

Page 89: ...12 PEGASO 650 Loosen the ties and disconnect the tube from the air box Support the engine with slings Loosen and remove the ring nut on swinging arm shaft Loosen the swinging arm adjuster bush ProCarManuals com ...

Page 90: ... using a lift Working on the right side loosen and remove the two nuts Slide out the two screws on the opposite side Working on the right side loosen and remove the two nuts from engine Slide out the two screws on the opposite side Remove the engine front support ProCarManuals com ...

Page 91: ...g on the right side loosen and remove the top nut Slide out the screw on the opposite side Loosen and remove the two lower screws collect the washers Loosen the ties and remove the intake manifold Lower the engine ProCarManuals com ...

Page 92: ...TTING THE ENGINE Suitably fix the vehicle frame and lift the engine to desired position Set the throttle body in the intake manifold and tighten the clamp Tighten the two lower screws Set the screw Tighten the top nut ProCarManuals com ...

Page 93: ...t the engine front support Fit the two screws Working on the right side tighten the two nuts on engine Fit the two screws Working on the opposite side tighten the two nuts Remove the engine lift Fit the shaft ProCarManuals com ...

Page 94: ...EGASO 650 Fit the bushing and tighten it Tighten the pin Set the ring nut to the centring bush and tighten it Remove the slings Set the air box hose and tighten the clamp Connect the neutral sensor ProCarManuals com ...

Page 95: ...ENGINE 4 18 PEGASO 650 Fit the cable guides and tighten the screw with washer Install the sprocket Engage the first gear Fit the safety washer and tighten the nut ProCarManuals com ...

Page 96: ...ENGINE 4 19 PEGASO 650 Bend the safety washer Refit the guide plate ProCarManuals com ...

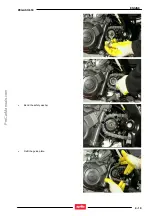
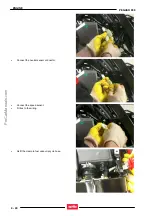
Page 97: ...ENGINE 4 20 PEGASO 650 Refit the sprocket cover Fit and tighten the two screws with spacers Fit and tighten the screw Connect the generator connectors Fit a tie to the wiring ProCarManuals com ...

Page 98: ...GINE 4 21 PEGASO 650 Connect the expansion tank breather hose Connect the engine temperature sensor connector Fit the tube to the throttle body Tighten the secondary air system tube tie ProCarManuals com ...

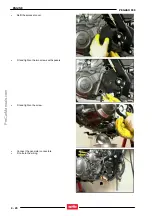
Page 99: ...ENGINE 4 22 PEGASO 650 Connect the spark plug cap Connect the clutch cable to its lever Fit the clutch cable in its housing and tighten the nut Connect the starter motor power cable ProCarManuals com ...

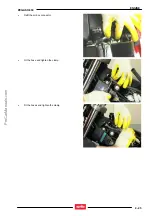
Page 100: ...ENGINE 4 23 PEGASO 650 Connect the ground cables and tighten the screw Connect the stand sensor Connect the generator connectors ProCarManuals com ...

Page 101: ...ENGINE 4 24 PEGASO 650 Connect the neutral sensor connector Connect the speed sensor Fit ties to the wiring Refit the clamp to fuel vapour recycle hose ProCarManuals com ...

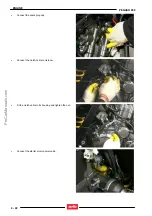
Page 102: ...ENGINE 4 25 PEGASO 650 Refit the air box connector Fit the hose and tighten the clamp Fit the hoses and tighten the clamp ProCarManuals com ...

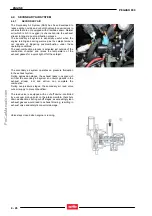
Page 103: ...mbustion chamber and raises the temperature of the exhaust gasses for a quick light off of the catalyst The secondary air system operates on pressure fluctuation in the exhaust system During depression stages the exhaust takes in oxygen rich air from the secondary air system so unburnt gasses in the exhaust stream hot and active can complete the combustion During overpressure stages the secondary ...

Page 104: ...Secondary Air System The vehicle will operate regularly even with system disabled but in this case the harmful emissions will be higher Moreover overheating might derive due to air not circulating thus causing damages to SAS tubes and unions DANGER Stop air from circulating using only suitable equipment using plugs to block off the air box scoop might overheat and damage the secondary air system a...

Page 105: ...CYCLE PARTS 5 1 PEGASO 650 CYCLE PARTS 5 ProCarManuals com ...

Page 106: ... FAIRING 6 5 1 3 REMOVING THE OIL SUMP GUARD 8 5 2 FRONT FORK 9 5 2 1 DIAGRAM 9 5 2 2 REMOVING THE FORK LEGS 10 5 2 3 INSTALLING THE FORK LEGS 13 5 2 4 CHANGING FORK FLUID 16 5 2 5 DISASSEMBLY 18 5 2 6 REASSEMBLY 21 5 2 7 CHECK 24 5 3 STEERING BEARINGS 26 5 3 1 ADJUSTING THE STEERING BEARINGS 26 ProCarManuals com ...

Page 107: ...CYCLE PARTS 5 3 PEGASO 650 5 1 OUTER STRUCTURES 5 1 1 REMOVING THE HEADLIGHT Release and remove the six screws Remove the unit Disconnect the instrument panel connector ProCarManuals com ...

Page 108: ...cket stays on the vehicle because wiring is routed inside it Release and remove the two outer screws The left bracket stays secured to the headlight Release and remove the two inner screws Unscrew and remove the outer screw ProCarManuals com ...

Page 109: ...CYCLE PARTS 5 5 PEGASO 650 Release the headlight wiring connector Remove the headlight together with left mount ProCarManuals com ...

Page 110: ...the seat Working on either side release and remove the two side body panel screws and remove the side body panels Loosen and remove the three passenger grab handle screws Remove the grab handle Working on either side loosen and remove the front screw ProCarManuals com ...

Page 111: ...650 Working on either side loosen and remove the top screw Working on either side loosen and remove the two rear bottom screws Raise the rear fairing Disconnect the seat release cable Remove the rear fairing ProCarManuals com ...

Page 112: ...5 8 PEGASO 650 5 1 3 REMOVING THE OIL SUMP GUARD Release and remove the sump guard front screw Release and remove the sump guard rear screw Remove the sump guard pay attention to the breather hose ProCarManuals com ...

Page 113: ...ng bush 5 Damping rod 6 Damper rod ring 7 Counter spring 8 Buffer 9 Washer 10 Allen cheese headed screw M12x1 25x25 11 Guide bush 12 Ring 13 Oil seal 14 Snap ring 15 Dust seal 16 Spring 17 Spring seat 18 Spacer 19 O ring 20 Plug 21 Protection 22 Allen cheese headed screw M6x20 23 Complete fork leg ProCarManuals com ...

Page 114: ...HE FUEL TANK Support the stand front part using stand OPT Loosen and remove the two mudguard shell screws Working on either side loosen and remove the screw securing the front mudguard shell Loosen and remove the two screws securing the rear mudguard shell Loosen and remove the two screws securing fork plate and remove it ProCarManuals com ...

Page 115: ...ention not to pull the front brake lever to avoid pad jamming Unscrew the wheel shaft nut collect the washer Working on either side partially loosen the wheel shaft pinch bolts and completely loosen the wheel shaft Support the front wheel and manually withdraw the wheel shaft Remove the wheel by withdrawing it from the front ProCarManuals com ...

Page 116: ...12 PEGASO 650 Support the stanchion and loosen the three screws securing stanchions to bottom yoke Loosen the screw securing stanchion to top yoke Slide out the stanchion be careful not to damage it ProCarManuals com ...

Page 117: ...three screws securing stanchion to bottom yoke Smear some grease all along the wheel shaft Position the front wheel between the fork legs on the support Move the wheel until its central hole and the holes on the fork are aligned Set one of the two spacers between wheel hub and fork right leg Position the other spacer between the wheel hub and the fork left leg Push the wheel shaft fully home from ...

Page 118: ...tle the fork legs Tighten the wheel shaft clamp bolts to the right Remove the support that upon disassembly was put under the tyre Fit the brake calliper tighten the screws Remove the front support stand Remove the rear support stand With pulled brake lever press the handlebar repeatedly thrusting the fork downwards In this way the fork legs will settle properly Position the vehicle on the stand T...

Page 119: ... the fork plate and tighten the two screws Fit the rear mudguard shell and tighten the two screws Fit the front mudguard shell and tighten the two screws working on either side Tighten the two mudguard shell screws ProCarManuals com ...

Page 120: ...g and filling fork fluid the stanchion and its parts should be clamped in a vice be careful not to tighten them too much and damage them always use aluminium protections DRAINING Drain oil as follows Remove the fork leg see REMOVING THE FORK LEGS Release and remove the top cap be careful not to damage the surface and the O ring Remove the spring preload spacer Collect the washer ProCarManuals com ...

Page 121: ...help oil drain out completely from the damper rod FILLING UP Tighten the sleeve in a vice in vertical position Pour oil in the tube Pump with the stanchion ensure that oil completely filled the damper rod Install the spring the washer and the spring preload spacer in this order Tighten the top cap ProCarManuals com ...

Page 122: ... bottom screw Clamp the sleeve in a vice in vertical position Remove the dust seal prise with a screwdriver WARNING Be careful not to damage the tube edge and the dust seal Pull up the dust seal to remove it Remove the snap ring from inside the sleeve using a screwdriver WARNING Be careful not to damage the sleeve edge ProCarManuals com ...

Page 123: ...EGASO 650 Unclamp the sleeve from the vice and remove the damper rod with bottom buffer Clamp the sleeve in a vice in vertical position Firmly remove the tube with lower sliding bush Remove the oil seal ProCarManuals com ...

Page 124: ...CYCLE PARTS 5 20 PEGASO 650 Remove the shim Remove the top sliding bush ProCarManuals com ...

Page 125: ...YCLE PARTS 5 21 PEGASO 650 5 2 6 REASSEMBLY Fit the top sliding bush Fit the oil seal to the fork leg Fit the shim to the fork leg Install the damper rod with bottom buffer to the tube ProCarManuals com ...

Page 126: ...and oil seal in the relevant seats in the sleeve WARNING Be careful not to damage the sleeve edge Fit the snap ring from inside the sleeve using a screwdriver Install the dust seal Clamp the sleeve in a vice in horizontal position Tighten the bottom screw ProCarManuals com ...

Page 127: ... fills up all damper rod channels Pump with the stanchion ensure that oil completely filled the damper rod Insert the spring Insert the washer Install the spring preload spacer Start the plug onto stanchion tube be careful not to damage the O ring Tighten the plug to the specified torque ProCarManuals com ...

Page 128: ...kled beyond the service limit Buckling limit 0 2 mm 0 00787 in SLIDER Inspect for damage and or cracking Replace if damaged SPRING Check spring conditions and straightness Ensure that there is no interference between one winding and the other DANGER NEVER attempt to straighten a buckled stanchion as this would weaken the overall structure leading to a dangerous riding condition Check conditions of...

Page 129: ...r rod Change any component which is badly worn or damaged WARNING Remove any residues from the bushes be careful not to scratch the surface Renew the following components on assembly seal dust seal O ring on the plug ProCarManuals com ...

Page 130: ...on either side loosen the screw securing the fork leg to the top yoke Tightening torque 5 kgm 50 Nm Remove the nut from the steering tube Tightening torque 10 kgm 100 Nm Slide out the yoke complete with handlebar from the fork legs Adjust bearing load using the suitable tool no 8163500 Tightening torque 10 kgm 100 Nm ProCarManuals com ...

Page 131: ...WIRING DIAGRAM 6 1 PEGASO 650 WIRING DIAGRAM 6 ProCarManuals com ...

Page 132: ...WIRING DIAGRAM 6 2 PEGASO 650 INDICE 6 1 ELECTRIC SYSTEM 3 6 1 1 CHECKING THE ELECTRICAL COMPONENTS 3 6 1 2 WIRING DIAGRAM 8 ProCarManuals com ...

Page 133: ...WIRING DIAGRAM 6 3 PEGASO 650 6 1 ELECTRIC SYSTEM 6 1 1 CHECKING THE ELECTRICAL COMPONENTS ProCarManuals com ...

Page 134: ... black cable and spark plug cable Spark plug resistance 10 0 kohm at 20 C 68 F 2 FUEL PUMP Fuel pressure 324 kPa 3 24 kg sq cm 46 1 psi 3 BANK ANGLE SENSOR Voltage to be measured across yellow green and black blue cable Less than 65 slant 0 4 1 4 V More than 65 slant 3 7 4 4 V Note the sensor correct operation can also be checked via the instrument panel 4 TAIL LIGHT Led ProCarManuals com ...

Page 135: ...e press asp 22 Segnale vel 9 Segnale TPS 21 Pick up 8 masse contr iniez 20 Massa 7 rel iniezione 19 6 rel ventola 18 sens iniez 5V 5 rel luce 17 aria sec 4 in da rel iniezione 16 Chiave 3 iniettori 15 2 Massa 14 Bobina 1 Pin nr Pin nr Neutral da crusc 26 In pulsante avv 13 Stamp lat da crusc 25 Linea k 12 Segnale Temp Acqua 24 Segnale caduta 11 Segnale Temp Aria 23 10 Segnale press asp 22 Segnale ...

Page 136: ... 9 STARTER MOTOR 12V Power supply Max absorption 0 8 kW 10 PICK UP SENSOR 192 288 ohm at 20 C across blue yellow and green white 11 GENERATOR Max power 290 Watt Recharge voltage 14V 5000 rpm measured at battery terminals Stator coil resistance 0 224 0 336 ohm at 20 C 68 F across white cable and white cable ProCarManuals com ...

Page 137: ...0 0 145 kohm at 110 C 230 F 13 HEADLIGHT Low beam 12 V 55 W in H11 High beam 12 V 55 W in H11 Front parking light 12 V 5 W 14 INTAKE AIR PRESSURE SENSOR Intake air pressure sensor voltage 3 4 to 3 8 V with engine off and key ON 15 SAS VALVE ACTUATOR SAS solenoid valve resistance 18 22 ohm at 20 C 68 F across brown red cable and red white cable ProCarManuals com ...

Page 138: ...WIRING DIAGRAM 6 8 PEGASO 650 6 1 2 WIRING DIAGRAM ProCarManuals com ...

Page 139: ...operated switch 24 Fan 25 Fan relay 26 Injection relay 27 Starter relay 28 Starter motor 29 Fuses 30 Battery 31 Voltage regulator 32 Generator 33 Pick up 34 Fuel pump 35 Fuel level sensor 36 Map sensor 37 Secondary air 38 Injector 39 Throttle Position Sensor TPS 40 Water temperature sensor 41 Air temperature sensor 42 Spark plug 43 Coil 44 ECU 45 Right direction indicator 46 Low beam bulb 47 Parki...

Reviews: