background image


Chassis Installation and Rack Mounting (EVC-3101) 

To install the Ethernet over VDSL2 Converter in a 19-inch Converter Chassis with standard rack, follow 

the instructions described below. 

Step 1: Place your EVC-3101 on a hard-flat surface, with the front panel positioned towards your front 

side. 

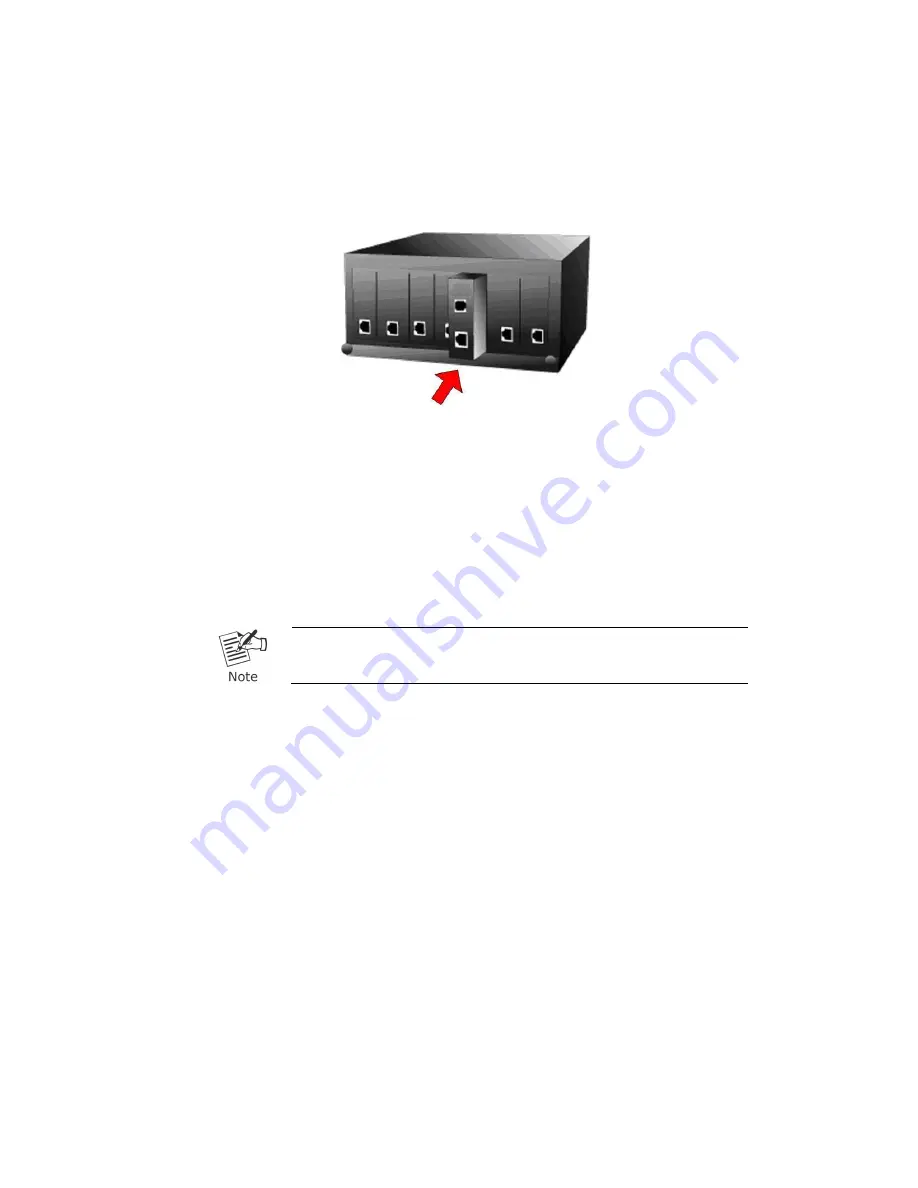
Step 2: Carefully slide in the module until it is fully and firmly fitted into the slot of the converter chassis.   


Figure 4-8-1: Insert a VDSL2 converter into an available slot 


Step 3: Attach a rack-mount bracket to each side of the Converter Chassis with supplied screws attached 

to the package.   

Step 4: After the brackets are attached to the Converter Chassis, use suitable screws to securely attach 

the brackets to the rack. 

Step 5: Connect one end of the power cable to the 19-inch Converter Chassis. 

Step 6: Connect the power plug of the power cable to a standard wall outlet, and then power on the 

19-inch Converter Chassis. The PWR LED should be lit. 


Please refer to your User’s Manual for setting up the device. 


Summary of Contents for EVC-3101

Page 1: ...Gigabit Ethernet over VDSL2 Converter EVC 3101 User s Manual ...

Page 2: ... misleading or incomplete we would appreciate your comments and suggestions FCC Warning This equipment has been tested and found to comply with the limits for a Class A digital device pursuant to Part 15 of the FCC Rules These limits are designed to provide reasonable protection against harmful interference when the equipment is operated in a commercial environment This equipment generates uses an...

Page 3: ...ic equipment end users of electrical and electronic equipment should understand the meaning of the crossed out wheeled bin symbol Do not dispose of WEEE as unsorted municipal waste and have to collect such WEEE separately Revision ANTAIRA Gigabit Ethernet over VDSL2 Converter User s Manual For Models EVC 3101 Revision 1 1 January 2018 Part No 2350 AC0500 001 ...

Page 4: ...l and LED Indicators 7 3 2 Rear Panel and Mode DIP Switch 8 3 3 Power Information 10 4 CONNECTING AND USING THE EVC 3101 11 4 1 Point to Point Application LAN to LAN Connection 12 5 PRODUCT SPECIFICATIONS 13 6 PERFORMANCE TABLE 15 7 Troubleshooting 16 8 FAQs 17 9 CUSTOMER SUPPORT 18 ...

Page 5: ...arefully unpack it The box should contain the following items EVC 3101 5V 2A Power Adapter User Manual If any of these are missing or damaged please contact your dealer immediately if possible retain the carton including the original packing material and use them again to repack the product in case there is a need to return it to us for repair ...

Page 6: ...ric and asymmetric and SNR margin Half duplex back pressure and IEEE 802 3x full duplex pause frame flow control Voice and data communication can be shared simultaneously based on the existing telephone wire with distance up to 1 4km Supports a packet size of up to 9K bytes IEEE 802 1Q VLAN tag transparency VDSL2 stand alone transceiver for simple bridge modem application Advantage of minimum inst...

Page 7: ...nk is at training status about 10 seconds Slow Blink Indicates that the VDSL link is at idle status CO Green Lit Indicates the EVC 3101 is running in CO mode CPE Green Lit Indicates the EVC 3101 is running in CPE mode 10 100 1000BASE T Port LED Color Function 1000 Green Lit Indicates that the port is operating at 1000Mbps Blink Indicates that the EVC 3101 actively sending or receiving data over th...

Page 8: ...hich conforms to the bundled AC adapter Should you have the issue of power connection please contact your local sales representative The device is a power required device meaning it will not work till it is powered If your networks should be active all the time please consider using UPS uninterrupted power supply for your device It will prevent you from network data loss or network downtime ...

Page 9: ...k devices When the EVC 3101 operates in CPE mode DIP switches 2 3 and 4 are without function DIP 2 Transmission G INP and Interleave mode G INP Method of protection against bursts from other devices or lines to impact your xDSL line Interleave Method of error correction used on xDSL line Interleave requires additional latency to improve resilience to burst of error DIP 3 Band Profile Asymmetric Sy...

Page 10: ...C DC adapter and Antaira media chassis Should you have the issue of power connection please contact your local sales representative Please keep the AC DC adapter as a spare part when the EVC 3101 is installed to a media chassis 2 5mm Width of DC Receptacle 2 5mm 5V for each slot DC receptacle is 2 5mm wide that matches the central post measuring 2 5mm wide of the VDSL2 converter s DC jack Do not i...

Page 11: ...key limitation on the VDSL2 Bridge Please check the following items The device can be used for Point to Point one CO device to one CPE device connection The EVC 3101 provides only one RJ11 connector for VDSL2 port to build VDSL2 connection Depending on the quality of telephone line the maximum distance of one VDSL2 segment is 1 4km 4593ft with AWG 24 telephone wires The distance could vary on the ...

Page 12: ...t up the EVC 3101 LAN to LAN connection 1 LAN1 Set the EVC 3101 at LAN 1 to be CO mode from the DIP switch 2 LAN2 Set the EVC 3101 at LAN 2 to be CPE mode from the DIP switch 3 Power on the EVC 3101 CO and CPE at both sides by connecting its power source 4 Power LED will illuminate 5 Connect VDSL line from another VDSL device to RJ11 VDSL port of the EVC 3101 6 VDSL LNK LED will blink to illuminat...

Page 13: ...tionality 4 position DIP switch CO CPE mode select Selectable G INP and interleaved mode Selectable target Band Profile Selectable target SNR mode Switch Specifications Switch Processing Scheme Store and Forward Address Table 2K entries Flow Control Back pressure for half duplex IEEE 802 3x pause frame for full duplex Jumbo Packet Size 9K bytes System Specifications VDSL Compliance VDSL DMT ITU T ...

Page 14: ...w Control IEEE 802 1p Class of Service ITU T G 993 1 VDSL ITU T G 997 1 ITU T G 993 2 VDSL2 Profile 17a 30a Support ITU T G 993 5 G Vectoring G INP ITU T G 998 Note1 When EVC 3101 connects to an ADSL 2 2 device this ADSL2 2 devise has to be CPE device does not support to be CO device ...

Page 15: ... 1000m 47 7 41 5 26 25 23 18 1200m 39 4 33 3 24 13 22 9 1400m 25 4 23 3 20 9 16 7 Distance meter G INP Downstream Upstream Asymmetric Symmetric 8dB 12dB 8dB 12dB 200m 197 101 185 89 150 150 140 140 400m 168 65 148 54 117 117 97 97 600m 109 34 95 32 77 77 60 60 800m 65 20 58 14 43 43 35 35 1000m 53 7 46 6 29 28 26 21 1200m 44 4 37 3 27 15 25 11 1400m 28 4 25 3 22 10 18 8 The actual data rate will v...

Page 16: ...SYMPTOM TP LED does not light after cable is connected to the port CHECKPOINT 1 Verify you are using the Cat 5 or better cable with RJ45 connector to connect to the port 2 If your device like LAN card supports to auto negotiation please try to manually set at a fixed speed of your device to solve this issue 3 The Converter Bridge and the connected device s power are on or not 4 The port s cable is...

Page 17: ...e of frequent errors that require the source transmitting computer or terminal to resend some packets of data SNR measures the quality of a transmission channel over a network channel The greater the ratio the easier it is to identify and subsequently isolate and eliminate the source of noise Generally speaking the higher SNR value gets the better the line quality gets but performance is lower Q3 ...

Page 18: ...ion please contact Antaira support team Antaira support team mail address support antaira com Copyright Antaira Technologies 2018 Contents are subject to revision without prior notice Antaira is a registered trademark of Antaira Technologies All other trademarks belong to their respective owners ...

Page 19: ...rder being presented Wall mount Installation Step 1 Please find the wall that can mount the EVC 3101 Step 2 Screw two screws on the wall Step 3 Hang the EVC 3101 on the screws from the wall Step 4 Refer to chapter 3 3 Power Information for power supply to the EVC 3101 Before mounting the device to the wall please check the location of the electrical outlet and the length of the Ethernet cable ...

Page 20: ...assis Figure 4 8 1 Insert a VDSL2 converter into an available slot Step 3 Attach a rack mount bracket to each side of the Converter Chassis with supplied screws attached to the package Step 4 After the brackets are attached to the Converter Chassis use suitable screws to securely attach the brackets to the rack Step 5 Connect one end of the power cable to the 19 inch Converter Chassis Step 6 Conne...

Reviews: