background image

17

4.6 Input specifications

The 

QuickMatriX

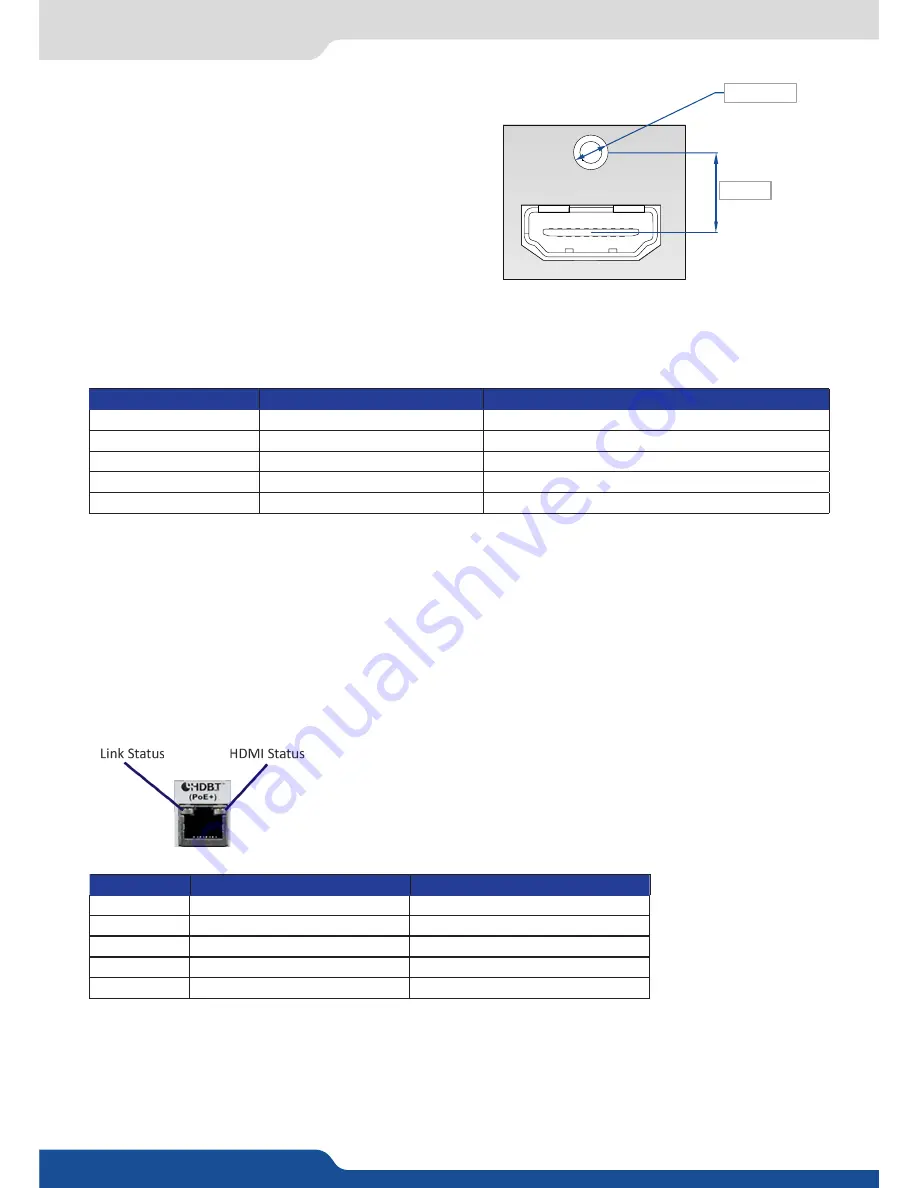
  uses  an  HDMI  plug  with  a  standard 

mounting  screw  above  the  connector.    Please  see  the 

diagram below.

This hole is occupied by a Torx10 screw when you receive 

the  unit.  If  desired,  this  screw  can  be  removed  and 

replaced by a compatible aftermarket HDMI plug locking 

mechanism  to  ensure  a  secure  HDMI  connection.  This 

threaded hole should not be left empty.

This hole is used by a TX10 screw when you receive the unit, if you wish to use an HDMI cable with a security 

fixing screw you can take this screw off and use your own in order to insure good fixing of your HDMI plug.

Please take a look at the accepted formats regarding the input plug type:

WARNING:

 Only the video and audio signal is processed for the HDMI®, and 3G/HD/SD-SDI inputs; other 

embedded auxiliary features are not supported or passed through. The embedded audio is processed. All 

other HDMI® features such as: HDMI Ethernet Channel, Audio Return Channel, 3D, 4K, Content Type, Deep 

Color and x.v.Color are 

NOT

 supported.

Plug Type

Formats

Signals

Universal Analog Input

SDTV - EDTV - HDTV - Computer

Analog SDTV - Analog EDTV - Analog HDTV - Analog Computer

DVI-D Input

SDTV - EDTV - HDTV - Computer

Digital SDTV - Digital EDTV - Digital HDTV - Digital Computer

HDMI Input

SDTV - EDTV - HDTV - Computer

Digital SDTV - Digital EDTV - Digital HDTV - Digital Computer

HDBaseT Input

SDTV - EDTV - HDTV - Computer

Digital SDTV - Digital EDTV - Digital HDTV - Digital Computer

3G/HD/SD-SDI Input

SDTV - HDTV 

Digital SDTV - Digital HDTV

M3x0,5 mm

27 mm

The 

QuickMatriX-H 

(only for Ref. QMX150-H) is equipped with two HDBaseT input connectors. 

In addition of the management of the embedded audio streams, the HDBaseT inputs also support the Ether

-

net pass-through and the Power Over Ethernet (PoE+ with 48V and 30W) functionalities.

The following table indicates the LED status of HDBaseT inputs plugs:

Status

LINK (green color)

HDMI (orange color)

LED off

No Link

No HDMI Video

Low Blink

Ethernet Fallback Mode

Not Applicable

Medium Blink

Low Power Mode without Ethernet

HDMI content without HDCP encryption 

Fast Blink

Low Power Mode with Ethernet

Not Applicable

LED on

HDBaseT Link

HDMI content with HDCP encryption 

Summary of Contents for QuickMatriX QMX150

Page 1: ...QuickMatriX Ref QMX150 QMX150 H USER MANUAL...

Page 2: ...ty rights 2014 Analog Way all rights reserved 11 2017 Consequently any representation and or reproduction in part or in full is prohibited and would be considered a violation of Analog Way s copyright...

Page 3: ...2 French 4 1 3 Italian 4 1 4 German 4 1 5 Spanish 4 5 1 Signal descriptions 4 5 2 Supported video formats 4 5 3 Computer formats 4 5 4 Input Computer formats 4 5 5 Output Computer formats 4 7 1 Standa...

Page 4: ...Setup 7 3 Edit 7 4 Live 6 3 RCS top menu 5 1 1 Rear panel Ref QMX150 5 1 2 Front panel Ref QMX150 5 1 3 Rear panel Ref QMX150 H 5 1 4 Front panel Ref QMX150 H 6 3 1 Setup 6 3 2 Edit 6 3 3 Live 7 2 1 M...

Page 5: ...yers with transitions 8 2 9 Capturing frames 8 2 10 Working with frames 8 2 11 Frame input setup menu 8 2 12 Creating presets 8 2 13 Working with presets 8 2 14 Working with audio 8 2 15 Working with...

Page 6: ...the HDBaseT Alliance logo are trademarks of the HDBaseT Alliance Thank you for choosing the Analog Way QuickMatriX Before you start setting up your QuickMatriX for the first time please read through a...

Page 7: ...ving a portion of the first image For example removing all content of a certain color such as green or blue is called a Chroma Key and removing content based on its brightness or luminance levels is c...

Page 8: ...tely disconnect the equipment from the main power Apply the following guidelines The equipment connected to the network must have a release system easily accessible and located outside the unit Unplug...

Page 9: ...t ce cordon doit tre d branch de la prise murale Appliquer les consignes suivantes Le mat riel reli demeure au r seau doit avoir un dispositif de sectionnement facilement accessible qui doit tre incor...

Page 10: ...entazione Per assicurarsi che totalemente l apparecchio non pi collegato il cavo deve essere disconesso della presa murale Seguire le instruzioni seguenti Il materiale collegato a residenza alla rete...

Page 11: ...orgt wird muss dieses Kabel aus der Netzsteckdose ausgesteckt werden Bitte beachten Sie die folgenden Hinweise Wenn Ger te dauerhaft am Netz bleiben m ssen sie ber eine leicht zug ngliche Trennvorrich...

Page 12: ...alimentado este cable debe de ser desconectado de la toma de corriente Aplicar las siguientes consignas El material conectado a residencia a la red inform tica debe de tener un dispositivo de secciona...

Page 13: ...s not included Rear fixing is also recommended in particular for permanent installations Connect all of the cables of the device and attach them to the rack with the help of tie wraps IMPORTANT The op...

Page 14: ...ad ID management Only A level type DVI RGB ou YUV 8 bits 4 4 4 16 235 TMDS HDMI RGB or YUV 8 bits 4 4 4 or 4 2 2 16 235 TMDS HDBaseT RGB or YUV 8 bits 4 4 4 or 4 2 2 16 235 Type Levels Impedance YUV Y...

Page 15: ...75 H TTL and V TTL Type Characteristics DVI RGB 8 bits 4 4 4 0 255 TMDS HDMI RGB or YUV 8 bits 4 4 4 or 4 2 2 0 255 TMDS HDBaseT RGB or YUV 8 bits 4 4 4 or 4 2 2 16 235 Analog computer Digital compute...

Page 16: ...gle DVI D HDMI compatible 3G HD SD SDI BNC Universal Analog HD 15 4 5 5 Output Computer formats Format Size Aspect ratio Frequency 50 Hz 60 Hz VGA 640x480 4 3 Yes Yes WVGA 848x480 16 9 Yes Yes SVGA 80...

Page 17: ...Deep Color and x v Color are NOT supported Plug Type Formats Signals Universal Analog Input SDTV EDTV HDTV Computer Analog SDTV Analog EDTV Analog HDTV Analog Computer DVI D Input SDTV EDTV HDTV Comp...

Page 18: ...x720 Yes No Yes Yes Yes XGA 1024x768 Yes No Yes Yes Yes WXGA 1280x768 Yes No Yes Yes Yes SWXGA 1360x768 Yes No Yes Yes Yes 1366x768 1366x768 Yes No Yes Yes Yes 800p RGB 1280x800 Yes No Yes Yes Yes SWX...

Page 19: ...Digital Computer The QuickMatriX H QMX150 H has two standard outputs The standard output contains HDMI connector HDBaseT connector The QuickMatriX H QMX150 H has one Video output 3G HD SD SDI BNC Out...

Page 20: ...X H QMX150 H can manage the Ethernet passthrough A specific LAN over HDBaseT connector is available on the QuickMatriX H to be connected to the dedicated network The HDBaseT LAN cannot be used to mana...

Page 21: ...Edition Am 1 2009 EN 60950 1 2006 A1 2010 A11 2009 A12 2011 CSA C22 2 National Differences specified in the CB Test Report UL listed Canada US ELECTROMAGNETIC COMPATIBILITY IEC 61000 3 2 2009 IEC 6100...

Page 22: ...1 2009 A12 2011 CSA C22 2 National Differences specified in the CB Test Report UL listed Canada US ELECTROMAGNETIC COMPATIBILITY IEC 61000 3 2 2009 IEC 61000 3 3 2008 CISPR22 2008 CISPR24 2010 FCC Par...

Page 23: ...enabled or disabled on all HDCP outputs The QuickMatriX can manage HDCP repeaters on its outputs up to 32 display devices can authenticate simultaneously on each output In order to permit quick ident...

Page 24: ...connectors DVI D inputs 1 to 4 Capability to receive digital audio signal from HDMI connector via an adaptor HDMI compatible 9 Ethernet plug 10 HDMI connectors HDMI inputs 3 to 6 Digital audio compli...

Page 25: ...en press TAKE This is a fast routing mode 5 Layer Black clear the layer Freeze freeze unfreeze the input selected in the currently selected layer 6 Quick Frame allows to quickly display a foreground f...

Page 26: ...I connectors DVI D inputs 3 and 4 Capability to receive digital audio signal from HDMI connector via an adaptator HDMI compatible 11 Universal Analog Computer TV HDTV HD15 multi plug inputs 3 and 4 12...

Page 27: ...routing mode 5 Layer Black clear the layer Freeze freeze unfreeze the input selected in the currently selected layer 6 Quick Frame allows to quickly display a foreground frame 7 On Off Stand by hold f...

Page 28: ...If this setup will be part of a larger network with other devices please check with your network administrator before plugging these devices into the network to avoid any IP address conflicts For exa...

Page 29: ...ing off the wifi connection Close the RCS Restart the RCS Once your computer has established connection the RCS control panel will begin to load and will begin to synchronize with the device When the...

Page 30: ...our inputs adjust the layer attributes such as size position effect etc You can save all your screen configurations into presets as well as review and recall them on each individual screen The Live mo...

Page 31: ...ery time you set up your shows or events Go to the setup section to start to set up your unit A Setup assistant is available to help you to correctly adjust all basic setups of your unit 7 2 Setup The...

Page 32: ...utput A change of content into a video layer has no effect on the audio ROUTING MODE in this configuration simply choose an audio input to assign it to the output The audio configuration remains the s...

Page 33: ...the configuration cog icon for that output Once the individual output setup page is opened you have access to MODE choose your rate generation mode internal free running within the unit or Framelock b...

Page 34: ...and a RATE If that information is not available your input has not been properly detected or set up 7 2 6 Input management PATTERN a selection of patterns is available to test your output These patte...

Page 35: ...rding to your source AUDIO MAPPING select the audio input that will be linked with the video input EMBEDDED SIGNAL AUDIO status indicates if an embedded audio signal is detected or not STATUS format a...

Page 36: ...out the blanking and aspect ratio are available there Under the BLANKING ADJUSTMENTS H V POSITION SIZE you can manually adjust the input blanking with the V H size or position Under the ASPECT RATIO s...

Page 37: ...keyed pixels less or more dark This is useful when keying white or light colored text over a bright background How to use the LUMA KEY Select the lumakiller and then adjust manually the luma level Ma...

Page 38: ...7 Frame management How to save a frame Choose first Program or Preview click on FREEZE if you want to freeze your output Then click on EXECUTE to save your frame into the selected slot 7 2 8 Vide out...

Page 39: ...e gamma of your output Then you will be able to configure the Layout LAYOUT configure the layout by selecting either the OUT 1 or the OUT 2 or a mix of OUT 1 and OUT 2 BACKGROUND COLOR select the colo...

Page 40: ...re to check the audio input mapping Each video input has one audio source mapped to it The audio mapping configuration is found under Menu Inputs each input Into the AUDIO SETTINGS To display only the...

Page 41: ...increase the value to modify the sound level Specific feature DIGITAL SOURCE all digital sources will have their sample rate displayed SDI SOURCE on SDI source you can choose 2 channels on one of the...

Page 42: ...The interface loaded into the unit uses the IP configuration Under INTERFACE you can define a new IP address Netmask Port choose the port EDID Under this section you can manage the EDID library and c...

Page 43: ...he chosen screen You can assign or change the inputs directly on Program as well as Preview Erase memories Into this section you can erase individual settings Erase input settings memory all input set...

Page 44: ...E button the Preview screen is transitioned to the Program screen By default PRESET TOGGLE mode is disabled That means after a TAKE the Preview stays as it was before The Program and Preview will have...

Page 45: ...Effects Force transition The Force Transition button disables the cross transition between two sources into the same layers Enabling the Force Transition it forces the layer to go out and then go in...

Page 46: ...select at less 2 layers then you can align them horizontally or vertically use Shift to select 2 layers KEEP ASPECT RATIO BUTTON enabling this feature will keep the layer aspect ratio during resizing...

Page 47: ...ly be available when using the RCS2 software If you want to have more details you can SHIFT CLICK on any preset to bring up a detailed status window In this window you can rename each preset using the...

Page 48: ...ry from the memory of the device or the RCS using the following windows Please click on SAVE MASTER MEMORIES and then choose a number to save the current preset of the unit into a master memory To act...

Page 49: ...e scene To select the memory simply choose it into the list or drag and drop it into the scene box from the memories selection on the right This toolbar acts like a command for your timeline Simply cl...

Page 50: ...settings INPUT select to configure the 10 individual input types and resolutions PRESET select to store and use presets IMAGE2 select to change source image settings of an input KEYING TITLING2 select...

Page 51: ...depending on whether the selected layer is active in respectively the Program or Preview window menu buttons are indicated in green Selecting a button with an available source or function will cause...

Page 52: ...Source Output selection Once your inputs all have been configured the output settings of the QuickMatriX must be set according to the machines plugged on your QuickMatriX Program and Preview outputs v...

Page 53: ...input 1 Press Matrix 2 button Press Output button Press input 3 Press TAKE to view the result on both screens 8 2 6 Working with layers functions Once a source is assigned to a layer you will have acc...

Page 54: ...Cut Fade or Transitions are available in the native Matrix mode You will be able to per form powerful transition effects seamlessly It can depend on your configuration The QuickMatriX has 4 scalers to...

Page 55: ...dissolve fade and a cut effect 8 2 8 Layers with transitions A WIPE DOWN HARD WIPE UP HARD WIPE RIGHT HARD WIPE LEFT HARD WIPE CENTER OUT HARD WIPE CENTER IN HARD WIPE CURTAIN IN HARD WIPE ANGLE TOP...

Page 56: ...ainly used as quick frames in a typical show or event setup and can be recorded from any of the QuickMatriX 8 sources and called back at the press of a single button To use a frame be sure first that...

Page 57: ...audio ROUTING MODE in this configuration simply choose an audio input to assign it to the output The audio configuration remains the same during the show Source settings into this menu you will have a...

Page 58: ...affected to output 2 Layers will have the same position and size OUTPUT 1 OUTPUT 2 OUTPUT 1 OUTPUT 1 OUTPUT 2 OUTPUT 2 3 Copy H pos Flip mode Output 2 will be exactly the same as output 1 except the...

Page 59: ...automatically activates the transparent background Automatic adjustment of the layer Ratio to fit the source image borders during a transition Dynamic Automatic adjustment of the layer to fit the sou...

Page 60: ...selected the QuickMatriX provides you some keying advance setting For Luma Key Luma Keying is used to key from a particular luminous intensity It produces a hard edged key based on intensity which is...

Page 61: ...lerance of 255 will select nearly all hues Black Level this option permits adjustment of the luminance levels of the keyed hue The Black Level is the luminance lower bound Colors in the selected hue r...

Page 62: ...62 8 3 Menu tree 8 3 Menu tree MATRIX MODE OUTPUT 1 OUTPUT 2 FORMAT 1920X1080 RATE 50 00HZ LOCK INTERNAL FORMAT 1920X1080 RATE 50 00HZ LOCK INTERNAL SCR 1 SCR 2 Layer2 Input3 SDI 1 Layer1 Input1 SDI 2...

Page 63: ...iguration of your device MENU MODE OUTPUT VIDEO OUT MIXER SYNC W OUT1 CONFIG MODE CONNECTION OUTPUT STATUS OUTPUT FORMAT OUTPUT RATE BACKGRND COLOR ADJUST GAMMA FLICKER FILTER SHARPNESS UNDER OVERSCAN...

Page 64: ...ANKING ADJUST CROPPING OPTIMIZE UNDER OVER ASPECT IN PREDIFINE CROP ASPECT OUT SHARPNESS COLORIMETRY COMPONENTLEVEL LOW LATENCY 3 2 PULLDOWN 2 2 PULLDOWN RESET SETTINGS PRESET LAYOUTS STEP BACK SAVE P...

Page 65: ...TINGS LAYER TYPE BACKGRND COLOR CHROMA KEY AUTO TAKE PRESET TOOGLE SCREEN LAYER COPY MODE LAYER ADJUST LAYER ZOOM SIZE TEMPLATES TRANSPARENCY BORDER OPENING EFFECT CLOSING EFFECT SMOOTH MOVE STATUS LU...

Page 66: ...SETUP DYNAMIC FIT LCD BRIGHTNESS FREEZE MODE DATE TIME PRESET MODE SOURCE MASTER MUTE STEREO ANALOG LEVEL MASTER VOLUME BALANCE SOURCE DELAY MODE AUDIO DELAY 1KHZ OSC RECORD LOGOS STEREO ANALOG GAIN...

Page 67: ...67 8 3 Menu tree RESET LAYERS ERASE CUST FRMT DEFAUT VALUES ERASE MEMORIES ERASE PRESETS RESET ERASE TECH SUPPORT...

Page 68: ...on the unit Please click on the Dashboard button On this chart you will find under the INFO tab the Device name the Serial number of your product the actual firmware and the software version of the R...

Page 69: ...any other non protected format To help troubleshoot HDCP in your installation each input and output page is equipped with HDCP status information to indicate in realtime when HDCP encryption is being...

Page 70: ...o be around for a long time it should last longer than any other component in the network and choice of cable should take into consideration new applications additional users and potential expansions...

Page 71: ...utely necessary make sure to use less than two per cable run and keep each less than five meters from the end 8 Thou shalt terminate carefully One of the advantages of HDBaseT s using of LAN cables os...

Page 72: ...ng of the returned product and bring the best satisfaction In the unlikely event that a product is required to return for repair please call the regional Maintenance center Customer Service and ask to...

Page 73: ...a analogway com Technical support techsupport analogwayusa com Analog Way Pte Ltd Tel 65 6292 5800 152 Beach Road 15 03 Gateway East SINGAPORE 189721 Sales General information sales analogwayasia com...

Page 74: ...ded are ready to use programs and can be freely adapted or used as a base to build your own real world Midra controller application 13 2 AMX NetLinx Integrated Controllers Midra Driver Using this driv...

Page 75: ...QMX150 QMX150 H 01 NOV 2017 Follow us...

Reviews: