background image

Web Interface Pages

10

NXB-CCG-K NetLinx® Clear Connect™ Gateway

Configure Page

Once logged in, the Web interface defaults to the 

Settings

 tab of the 

Configure

 page. From here, the administrator may 

access other tabs and pages to add or change Web and integration logins and passwords, change network or security 
settings, add devices to a network, or control the programming of buttons on an individual device. 

Settings Tab

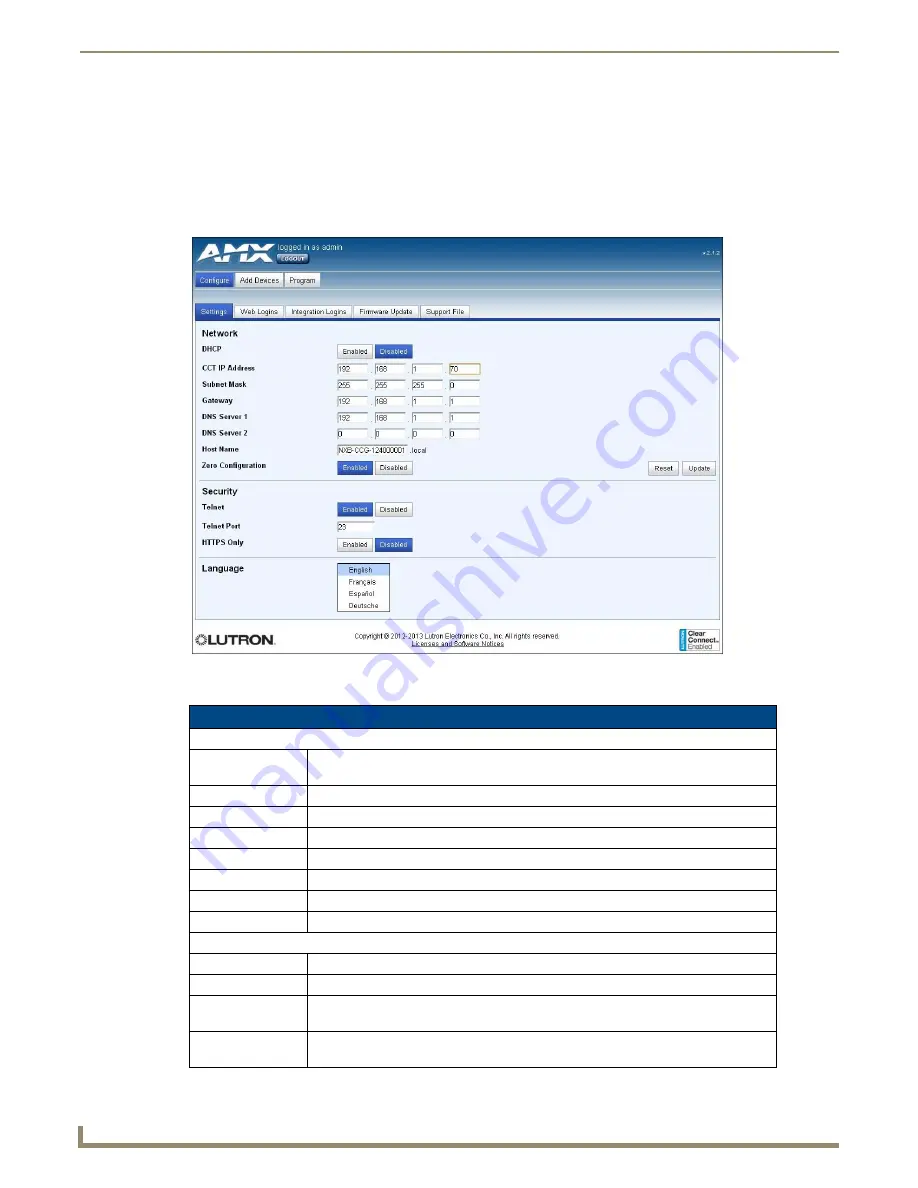
The NXB-CCG-K’s network settings can be modified via the 

Settings

 tab of the 

Configure

 page (FIG. 10). 

FIG. 10  

Configure - Settings tab

Settings Tab

Network Settings:

DHCP:

Allows enabling or disabling of DHCP functionality.When Disabled, the other Network 
Settings entries are editable.

CCT IP Address:

Displays the IP address of the device.

Subnet Mask:

Displays the device’s subnet mask.

Gateway:

Displays the device’s gateway address.

DNS Server 1:

Displays the device’s main DNS server address.

DNS Server 2:

Displays the devices optional secondary DNS server address.

Host Name:

Displays the device’s host name on the network.

Zero Configuration:

Allows enabling or disabling of ZeroConfig functionality.

Security Settings:

Telnet:

Enables or disables Telnet functionality.

Telnet Port:

Displays the device’s Telnet port.

HTTPS Only:

Enables or disables the ability of the device to be accessed solely through a secure 
page.

Language:

Allows the interface to be switched between one of four languages: English, French, 
Spanish, and German.

Summary of Contents for NetLinx NXB-CCG-K

Page 1: ...Operation Reference Guide Lighting Controls NXB CCG K NetLinx Clear Connect Gateway Last Updated 12 3 2013 ...

Page 2: ...rked on the outside of each box The RMA is valid for a 30 day period After the 30 day period the RMA will be cancelled Any shipments received not consistent with the RMA or after the RMA is cancelled will be refused AMX is not responsible for products returned without a valid RMA number AMX is not liable for any damages caused by its products or for the failure of its products to perform This incl...

Page 3: ...ecting To the NXB CCG K 9 Automatic Detection 9 ZeroConfig in Safari 9 ZeroConfig in Other Browsers 9 ZeroConfig in NetLinx Studio 9 Troubleshooting 10 Web Interface Pages 11 Accessing the Web Interface Pages 11 Configure Page 12 Settings Tab 12 Web Logins Tab 13 Adding a Web Login 14 Changing the Password of a Web Login 15 Deleting a Web Login 15 Integration Logins Tab 17 Adding an Integration Lo...

Page 4: ...ement 23 Program Page 24 Buttons 25 Button Details 26 Editing Button Defaults 27 Editing Button Names 27 Adding Virtual Buttons 28 Occupancy Sensors 28 Integration 29 Supported Protocol 30 XML Integration File 30 Administration Page 31 Firmware Update Tab 31 Downloading a Firmware File 31 Logging Tab 33 Extracting a log from the NXB CCG K 33 ...

Page 5: ...The NXB CCG K is designed to interface with Lutron s Clear Connect Occupancy Sensors Features Clear Connect Enabled Lutron s patented RF Technology uses a quiet band that is essentially free of interference ensuring reliable communication between system devices Create Light Control Events with Room Occupancy Use the Clear Connect Wireless Occupancy Sensor with RMS to automatically power up and shu...

Page 6: ...C to 40 C 0 to 90 humidity non condensing Indoor use only ESD Protection ESD protection to withstand electrostatic discharge without damage or memory loss in accordance with IEC 61000 4 2 Communications The NXB CCG K communicates to other Clear Connect devices through RF All devices except wired accessory dimmers switches must be located within 30 feet 9 m of the NXB CCG K Auto Discovery Supports ...

Page 7: ...ations could damage the NXB CCG K and possibly overheat the DC adapter FIG 2 RF Configuration 30 feet 9 m maximum NXB CCG K Power Source Lutron switches dimmers Proper orientation of the antenna helps ensure maximum range and the best performance The NXB CCG K should be positioned centrally to the devices being controlled and as high and clear of obstructions as possible The NXB CCG K utilizes an ...

Page 8: ...ow 7 in 177 8 mm clearance for the antenna and ensure convenient access to the power plug In order to achieve proper RF performance do not mount unit in a metal enclosure 3 Attach the DC adapter cord to the power jack on the NXB CCG K and insert the DC adapter plug into a receptacle FIG 2 FIG 3 NXB CCG K Vertical Installation FIG 4 NXB CCG K Horizontal Installation 1 25 4 mm Wall Level Surface 1 2...

Page 9: ...r which it will start rapidly flashing for approximately 20 seconds and then remain on 3 The device has been returned to its factory default settings FIG 5 Underside of NXB CCG K FIG 6 Ethernet Pin Numbering Ethernet Pin Numbering Ethernet Pin T Ve 1 T Ve 2 R Ve 3 R Ve 6 2 62 67 0 mm Returning an NXB CCG K to factory default settings will erase all programming from it and all system devices and wi...

Page 10: ...list FIG 7 ZeroConfig in Other Browsers Some standalone ZeroConfig browsers exist that vary in their feature set Most of them will allow you to discover the devices on the network and find the IP addresses The NXB CCG K will by default have the host name NXB CCG K followed by the serial number of the device Other browsers have plug ins that can be downloaded and installed for use in autodetecting ...

Page 11: ...n XML file to assist with further integration efforts The file is generated as a text file FIG 8 The Lutron Integration Protocol credentials can also be added to the web address to automate this process example IP address of NXB CCG K xml login username password password FIG 8 XML Integration File example ...

Page 12: ...ure a network connection is made between the NXB CCG K and a router PC Factory default the NXB CCG K Place a router between the NXB CCG K and the controlling PC Refresh the NXB CCG K web page Cycle power to the NXB CCG K Ensure power is connected to all devices being programmed in the system Ensure recommended device spacing with a maximum of 30 feet 9 14 meters between devices and a minimum of 10...

Page 13: ...gh NetLinx Studio to access the Login page FIG 9 To access the Web Interface pages 1 From any computer or Netbook that has access to the LAN on which the NXB CCG K resides open a web browser and type the IP address of the target NXB CCG K unit in the Address Bar 2 In the Login page enter your username and password For reference the top right corner of the screen displays the version of the softwar...

Page 14: ... DHCP functionality When Disabled the other Network Settings entries are editable CCT IP Address Displays the IP address of the device Subnet Mask Displays the device s subnet mask Gateway Displays the device s gateway address DNS Server 1 Displays the device s main DNS server address DNS Server 2 Displays the devices optional secondary DNS server address Host Name Displays the device s host name ...

Page 15: ...Language section of the Settings tab the Web Interface pages language may be changed to one of four options English is the default interface language but the Web Interface pages may be changed to French Spanish or German To change the Web Interface pages to a new language 1 From the Language section click on the language you wish to use This enables the Change Language button FIG 11 2 Click on the...

Page 16: ... FIG 14 Configure Web Logins tab Web Logins Tab Username Displays the usernames for each of the current web logins Change Password Click this link to change the password for the web login Delete User Click this link to delete the user This feature is disabled if only one user is listed Add Web Login Click this button to add a new web login to the current list The Web Logins tab will allow up to fi...

Page 17: ...G 17 2 Confirm that you wish to delete that web login by clicking Yes 3 If only one web login is visible in the Web Logins tab this login may not be deleted and the Delete User link is disabled Integration Logins Tab The Integration Logins tab on the Configure page allows management of integration logins FIG 18 FIG 16 Change Password window FIG 17 Delete User prompt FIG 18 Configure Integration Lo...

Page 18: ...ration Login To change a user s password 1 From the Configure page select the Integration Logins tab 2 In the appropriate user entry select Change Password to open the Change Integration Password window FIG 20 3 Enter and confirm the new password and click Change 4 The new password is now enabled Deleting an Integration Login To remove a login 1 From the Configure page select the Integration Login...

Page 19: ...sen to upload the Update Firmware button is now enabled Clicking on this button will start the Update Firmware process FIG 23 4 Upon completion of the firmware update process a pop up dialog will be displayed with the status of the update FIG 24 Upon success you may have to refresh and or login to the web page again FIG 22 Firmware Update tab Firmware Update Tab Firmware Path Enter the path to whe...

Page 20: ...roubleshooting purposes These may be extracted through the Support File tab FIG 25 Extracting a log from the NXB CCG K To extract a log from the NXB CCG K 1 From the Support File tab click the Extract Logs button 2 If you do not wish to extract device logs click the Create Support File button 3 A Lutron log file will be downloaded into the default Downloads directory of the browser This file can t...

Page 21: ...ices Page Add Remove Devices Click this button to add new devices to the NXB CCG K network Name Displays the name of the device in the network Type Displays the type of device in the network ID Displays the device ID number 1 10 in the network Action This link allows removal of the device from the network Show Occupancy Groups Click this box to show all occupancy groups within the devices in the n...

Page 22: ... Button and Wiggle Shades To enter a device to your system via Press Button FIG 29 1 Press and hold the device to be added to the system that is exhibiting the LED feedback on the appropriate button Dimmers and switches can be added by pressing and holding the main paddle plug in switches can be added by pressing the light toggle button on the device and sensors can be added by pressing and holdin...

Page 23: ...ice to your system via Wiggle Shades 1 Click the Wiggle Shades button The NXB CCG K will attempt to find available shades within its signal range FIG 31 2 If the NXB CCG K does not find available devices within its signal range the Wiggle Shades function will state so FIG 32 You may try again by clicking the refresh link FIG 30 Wiggle Shades function For more information on Lutron shades please co...

Page 24: ...m by clicking Add or pressing Enter on your keyboard Removing Devices To remove a device 1 In the Add Devices page click the Remove link in the Action column while the device is in Activation Mode 2 When prompted click Yes Exiting Activation Mode To exit Activation Mode 1 With the Add Devices page in Activation Mode click the Done button The NXB CCG K will start exiting all devices from activation...

Page 25: ...ncy sensor to see the entire room you can add multiple sensors to the system and assign them all to the same group Once in a group the unoccupied state will not be triggered until all of the sensors have reported this state This will prevent the lights shutting off while people are still in the room but out of view of the sensor or integration reporting this condition for the same situation When O...

Page 26: ...always send the programmed devices to their programmed level regardless of the state of the devices The LEDs on buttons are scene logic meaning that they are lit when all devices programmed to the associated button are on at the exact levels that are programmed The Program page allows you to program devices to buttons Clicking a button in the Devices tab of the Program page view will show a window...

Page 27: ...FIG 43 When a button already contains programming this programming is displayed in the button details window Clicking the Test Programming button will test the current programming by sending the devices to those levels Devices can be removed from the button by clicking the Remove link on the row corresponding to the device to be removed Adding Virtual Buttons The NXB CCG K has 100 virtual buttons ...

Page 28: ...sors can be programmed in groups where occupancy is determined by the state of all sensors in the group or individually FIG 44 Clicking on the Occupied Action or Unoccupied Action links for each device displays the Switch Programming pane FIG 45 and FIG 46 FIG 44 Program Occupancy Tab FIG 45 Occupied Action Details tab FIG 46 Unoccupied Action Details tab Switch Programming Device Name Displays th...

Page 29: ...de time goto level with fade 3 OUTPUT integration ID 2 raise 4 OUTPUT integration ID 3 lower 5 OUTPUT integration ID 4 stop 6 OUTPUT integration ID 1 query level 7 DEVICE integration ID component number 3 button press 8 DEVICE integration ID component number 4 button release 9 DEVICE integration ID component number 9 1 set led on NOTE you cannot set the state of programmed keypad LEDs 10 DEVICE in...

Page 30: ...Web Interface Pages 26 NXB CCG K NetLinx Clear Connect Gateway ...

Page 31: ...Web Interface Pages 27 NXB CCG NetLinx Clear Connect Gateway ...

Page 32: ...cation knowledge In the ever changing AV industry continual education is key to success AMX University is dedicated to ensuring that you have the opportunity to gather the information and experience you need to deliver strong AMX solutions Plus AMX courses also help you earn CEDIA NSCA InfoComm and AMX continuing education units CEUs Visit AMX University online for 24 7 365 access to Schedules and...

Reviews: